Whew! I don't think I really expected that to succeed, and now I've got a whole second half of the game to handle. Well, I triumphantly flew around in the Airship for about five minutes while planning out my next moves.
Before Castle Ordeal, I'd raid the Waterfall, a very small and unthreatening dungeon. This would get me a Ribbon for fire resistance in Castle Ordeal, of course. Ordeal has the SORCERORs, which you still can't really do anything about other than Evade. But the rest of the threat comes from FIR2 monsters (MANCAT and R.GOYLE), and the Ribbon drastically boosts my chances of surviving that. Waterfall also yielded the Defense, but it can't be used by anybody until class change.
Should I go right for Ordeal now, or for the Sea Shrine upper wing first? Well, there's no equipment there that'll make any difference in Ordeal. Unfortunately, the second Ribbon is in Sea Shrine Lower, about four floors in, too far to comfortably extract without LIFE and EXIT. And having bypassed the Flame Sword, I'm actually lagging quite a bit in weapon capability. Still using three Silver Swords, and Ordeal will get me both the second Ice Sword and access to Defense.
Finally, who ever wants to traverse the Sea Shrine without the protection of Zeus? And a Gold Bracelet for good measure, so Ordeal it is. Let's get this over with.
Before that, though, I flew to Gaia and bought a CatClaw, after misreading a FAQ and thinking a fighter could use it before class change. Oops.
Before entering Castle Ordeal, I once again pulled the trick of running an extra encounter outside, to reset the step clock. The first fight in Castle Ordeal was 3 R.GOYLEs, which might be dangerous to the unRibboned Red Mage if they cast all three FIR2s, but they only got off one before my brawlers killed them. The second fight was MUMMYs, cake, and I was already upstairs.
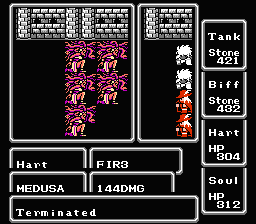
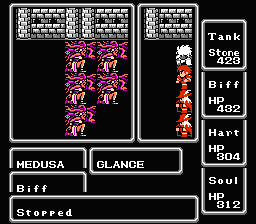
Fight three opened in serious danger mode: five MEDUSAs got a surprise round and stoned two warriors! Well, Hart has the Ribbon so he should be immune (I think?) Anyway, he did launch the FIR3 for the win, and broke out the SOFT potions. (Why in the world can't you use SOFT potions during battle? The SOFT spell doesn't work either.)
Fight four was unthreatening NITEMAREs.
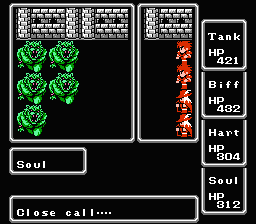 Fight five was five MANCATs. My party RAN like hell, and Soul acted first and got out!
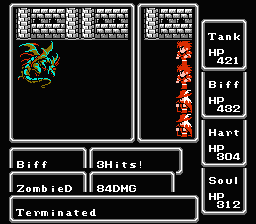
ZombieDs are no problem for a fully armored party, and there we go! I triumphantly flew to Bahamut and presented the TAIL for the reward.
After Ordeal, my weapon collection comprised two Ice Swords (29/25), Defense (30/35), and the CatClaw (22/35). The latter two weapons went to the fighters, at least getting some use out of that 65000 gold spent. I now had exactly perfect usage of converting Hit% into hit chances. The two level-18 fighters wielding 35 Hit% weapons had exactly 96 Hit%, good for four hits. The two level-17 red mages wielding 25 Hit% Ice Swords had exactly 64 Hit%, good for three hits. :)
Class change opened up the Red Wizards' spell options. At fifth rank, both mages had FIR3 and now got LIFE of course. The third spell took a bit of thinking, and I decided to split it with WARP on one wizard and CUR3 on the other. CUR3 would be my only access to sizable in-battle healing, but WARP is very useful too, especially now while they don't yet have slvl-6 spell charges for EXIT.
I also flew around picking up White spells for the Knights, and ICE3 and EXIT and LIT3 for the Reds.
The Sea Shrine was extremely uneventful. I cleared the top part, EXITed (that's actually negative stealth leveling, as compared to walking back out), fetched my way to the CHIME, and cleared the treasures up to level two of Mirage Tower. If the armorless Berserkers could manage all that without a party wipe, so could this fully-powered party, and they did so.
The twin thunders of Zeus and Thor blasted through the rest of Sea Shrine, and here we go at KRAKEN.
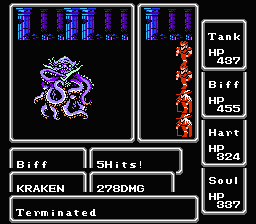
He died on round two, after the mages both FASTed on turn one and LIT3ed on turn two. Actually, this party packs even more offense than the Berserkers, with double black magic firepower, and mature Fighters rather than not-quite-diesel-yet Black Belts.
Now I took some time to plan out my precise allocation of armor. This party is very cramped on armor slots, and I'll need to maximize the benefit from every slot in order to clear the Temple of Fiends.
| Armor | Helm | Hand | Shield/Misc | |
| Tank | Ribbon | |||
| Biff | Heal H | |||
| Hart | Ribbon | |||
| Soul | Ribbon |
The first two Ribbons definitely go to the two red mages, since they have fewer HP and need to survive to cast LIFE and EXIT, and the third Ribbon goes to the lead fighter. Since Fighter #2 is the only one without a Ribbon occupying his helm slot, he definitely gets a Heal Helmet.
| Armor | Helm | Hand | Shield/Misc | |
| Tank | Opal A | Ribbon | Aegis S | |
| Biff | Ice A | Heal H | Flame S | |
| Hart | Ribbon | |||
| Soul | Ribbon |
The Ribbonless fighter can still get all four elemental resistances (ice/fire/lightning/poison), but only two at a time, since only the armor and shield slots can confer resistance. Well, the way to manage this is to keep all four resistances available between the two fighters' armor and shield slots. I'll keep the Ice Armor* (Fire), Flame Shield (Ice), Opal Armor (Lit), and Aegis Shield (Poison) on the two fighters, and swap to Biff whichever two resistances he needs at any time. Most of the time this will be ice and fire. He only needs lightning against Fiends and poison against Gas Ds. Coincidentally, this leaves the stronger Absorb items on the lead fighter most of the time.
| Armor | Helm | Hand | Shield/Misc | |
| Tank | Opal A | Ribbon | ProRing | Aegis S |
| Biff | Ice A | Heal H | Zeus G | Flame S |
| Hart | Ribbon | ProRing | ||
| Soul | Ribbon | ProRing |
For everybody's hand slots, I'm going to mimic that setup. I'd like four ProRings, but the Zeus G has to go somewhere, so it's three ProRings for the elven lords the same three Ribbon characters for the same reasons, and the Zeus G for Biff.
| Armor | Helm | Hand | Shield/Misc | |
| Tank | Opal A | Ribbon | ProRing | Aegis S |
| Biff | Ice A | Heal H | Zeus G | Flame S |
| Hart | Opal B | Ribbon | ProRing | Black St |
| Soul | Gold B | Ribbon | ProRing | Heal H |
The two Red Mages need the best absorb they can get: Opal and Gold bracelets.
And the only remaining armor slots are the Red Mages' shield slots, which will hold the last two utility armor items: the Black Shirt and second Heal Helmet.
This means ditching the following armor items: Dragon Armor (no resist), Opal G (ProRing supersedes), Opal Shield (because rL can be found on a stronger item, Opal A), Opal Helmet (loses out to Ribbons and Heal H), White Shirt (actual casting of INV2 will have to do if I decide I need it), ProCape (ProRing is better), Power G (it's broken anyway.)

Weapon allocation follows from the armor allocation. Warriors #2 and #3 have damage spellcaster armor items (Zeus and Black Shirt), so warriors #1 and #4 get the Mage Staff and Thor Hammer.
Because undead monsters resist ice, one Light Axe should complement the Black Shirt on character #3. The other Light Axe should not pair up with the Mage Staff (it'd be redundant since undead are weak to fire), leaving fighter #2 and RM #4. It goes to fighter #2, since RM #4 can cast fire himself if needed against undead.
The Wizard Staff goes to #1 as something to do against fire-resistant monsters instead of the Mage Staff. And the Heal Staff goes to #3, since #2 and #4 have Helmets and #1 has the Wizard Staff. (If you're in a healing situation, using the three HEAL items, using the Wizard Staff is a great way to keep the fourth character busy and perhaps prevent some enemy attacks.)
*Wait, he said Ice Armor? Didn't I skip that? And can't I get the same effect from the pair of Flame Armor/Ice Shield as Ice Armor/Flame Shield? Well, yes, but I screwed up: I already sold the Flame Armor before I worked out all this armoring. :)
Well, I had to go get it. In Ice Cave, as long as either red mage survived a battle, LIFE would restore everyone. And the trip would be short, just right up to the armor, then EXIT. And MAGEs were no longer a threat with ProRings on the reddies. I ran into SORCERERs only once, a two-pack, and ran before they got a turn.
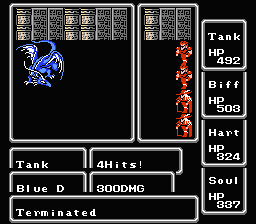
Anyway, to Mirage Castle and the Floating Tower. Blue D died without a turn. I looted all the treasures up to floor 3, and still had 79 heal potions left, so just went straight for the top rather than EXITing for Xcalber.
WarMECH knew what was good for him and stayed far away. But this battle showed up on floor five, which might be scarier.

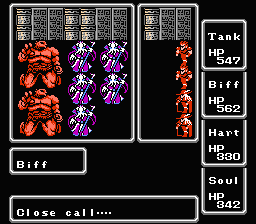 But the Gods of Running were with me again (actually the Gods of Action Order, since Biff's run was guaranteed as long as Soul stayed healthy), and I got away.
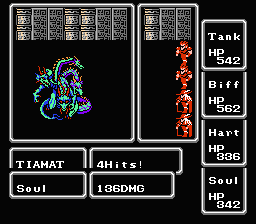
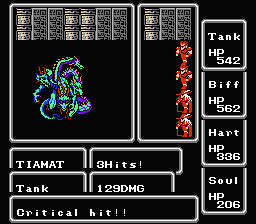
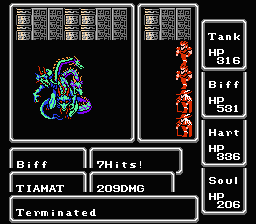
So I arrived at TIAMAT, and swapped lightning and poison resistance to Biff. Fight Fight Fast Fast, then the mages Fasted themselves as well. TIAMAT died on round four, after never casting a spell and only physically attacking the Light Warriors.