This is my writeup of playing through the old Magic the Gathering game by Microprose, the Shandalar adventure environment.
My goal here was a sizable challenge: Beat the game to 100% with a perfect record. That means never losing a duel, and with 100% defined as collecting all dungeon treasures and all world magic spells. On the top difficulty level of course. This is both a general strategy guide for that and a writeup of my particular playthrough.
For everyone asking "where do I get this": I played this on a version of the game called "Shandalar 2010 .iso". I downloaded this years ago and don't have a source for it now, but searching might turn it up. This version is a fan update and repackaging with compatibility fixes to work on newer Windows computers. It also has additional cards for the standalone duel mode, but the Shandalar adventure mode is unchanged with only the original cards (some with alternate art.) I'll assume this is legitimate as far as effectively unmodified original gameplay.
Startup
First you must pick a starting color. This doesn't really matter - the idea of not losing a single duel is to completely avoid any fighting until you've upgraded the deck a lot. I most prefer to start as a White mage. Not for the deck contents - the white deck is likely the worst of the starting options, the black and red decks are better with better mana and more attacking creatures. But starting as White gives you the Sword of Resistance world spell, to teleport to a city being attacked, which is more important and useful than any of the other options.
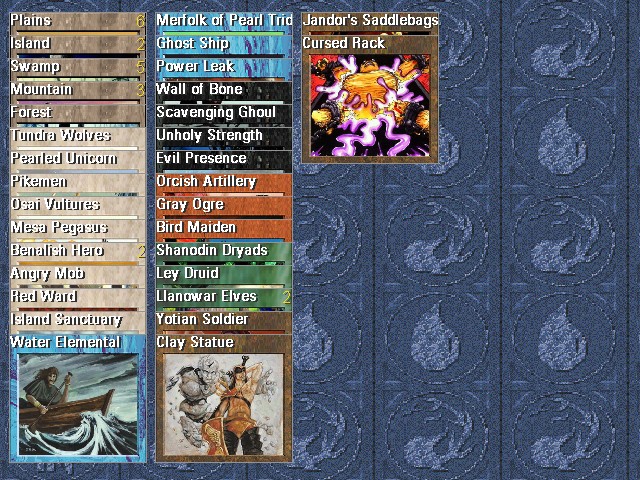
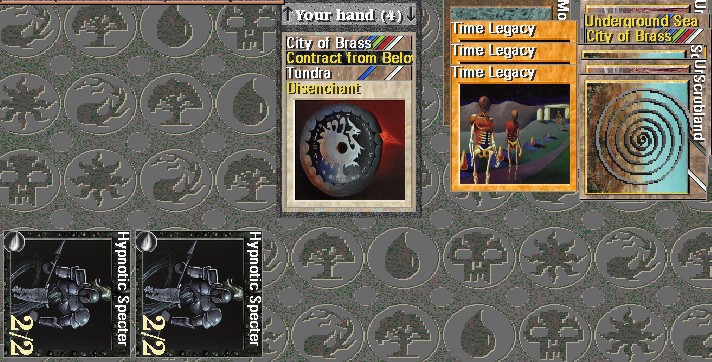
Being a White mage starts you with this mess. I immediately stripped out all but the black and white cards and artifact creatures, and also the on-color useless dreck in Red Ward, Island Sanctuary, Evil Presence. This leaves a deck of about 25 cards. You can actually still play that; any shortage below 40 gets filled in with random basic lands at the start of a game, but I had no intention to.
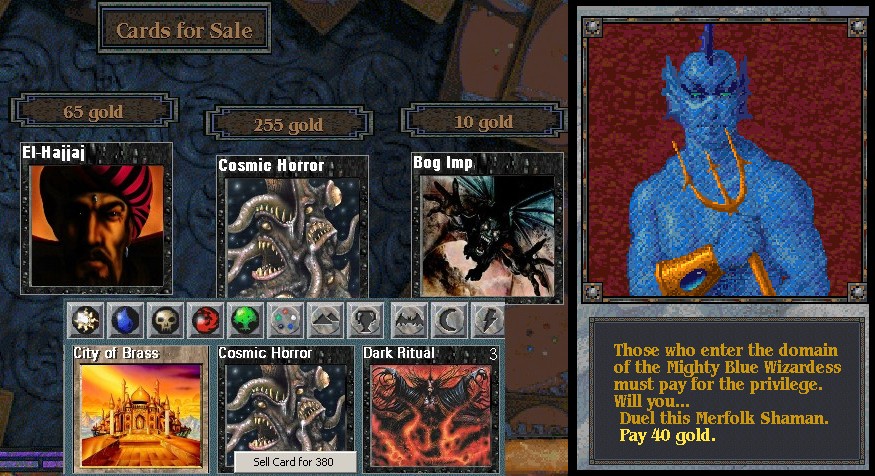
This is how to navigate the entire first half of the game. Go to the small villages, which always have the cheapest prices for cards, and buy every card on sale there. Sell them at the bigger cities for more than you paid; that's a profit of 125 from this example Cosmic Horror here. Use this profit to pay off every opponent you encounter instead of fighting them.
To find the best selling prices, look for cities where food costs 25. Those are your premium markets and where you should sell out everything. Check the details by looking at the sell price for each basic land in that city, which indicates the price for cards of that color here. 30 for the basic land is highest, 25 is good, 20 is mediocre and you should look for a better deal elsewhere for selling that color.
You can keep doing this for a very long time. Go to dozens of villages - it's not too much to cover half the map or more before you fight anything at all - and keep buying everything in sight. When you find one of the high-priced markets, sell out everything you've accumulated, and return there frequently from the nearby villages to sell again.
Adventuring
Along the way as you buy and sell cards, you'll take care of a number of other things as well. Obviously, when you find good playable cards in the villages, keep them for your deck rather than selling them. You might also get a few amulets, to trade for playable cards at the cities that supply them.
You'll also accumulate a number of the world-magic spells; important ones include Haggler's Coin (more cards on sale), Dwarven Pick and Amulet of Swampwalk (speed up movement), Staff of Thunder (spend a red amulet to destroy the nearest monster), and of course Tome of Enlightenment (lifts the restriction on duplicate card copies in your deck.) Other world spells besides those aren't important, and can wait if you don't have an ample supply of spare gold (2000+) at that moment.
There are also the random map lairs and events that pop up. Go to all of those; there's no negative risk. You'll most often accumulate extra cards to sell. Of course you also want to find a Nomad's Bazaar event that lets you buy any regular card for gold. Other helpful events include a Gemcutter's Guild (buy amulets) and Diamond Mine (trade amulets for any regular card.)
The random map events can also offer a chance to duel an enemy for a set of cards, which can even include extra copies of restricted cards. This is an interesting question. There is no risk to these fights - you don't ante anything, and if you lose, the game stats don't count it against your won/lost record! It's up to you how to handle this, whether you're aiming for an undefeated finish according to the game's stats, or truly undefeated by not losing any of these bonus duels either. In this run, I fought only one such duel, and won it.
Quests
Of course you'll be offered lots of quests as well. And of course the most important quests are for mana links, which raise your starting life total in every duel. That starts at 10, which is perilously low, and is the major reason to avoid fights as long as possible until you build up your life total along with your deck. Take almost every mana link quest (they never involve fighting, just delivering to a target city) -- but do be careful of ones that require bringing a spell of a certain type somewhere, that you might not have on hand or be able to easily acquire. If the quest says to deliver a red enchantment spell or whatever, check the map for cities offering red cards or enchantment cards, but there may not be any nearby, or you might not have the right color amulets to buy it. Also be careful of conditions that match a restricted card - delivering a blue sorcery spell could take your Time Walk!
Besides mana links, you can also take delivery quests for an amulet, for a reward with no risk. The other category of quests is to defeat a certain enemy. Eventually you want to take advantage of these when you feel strong enough, as we'll discuss shortly.
What stops you from just selling and bribing forever are two things: enemies attacking cities (too many cities overtaken and you lose), and the biggest types of enemies that must be fought and can't be bribed. So we do have to build a deck to deal with those, so let's look at how to do that.
Deckbuilding
This is approximately the deck I aim for before starting serious fighting.
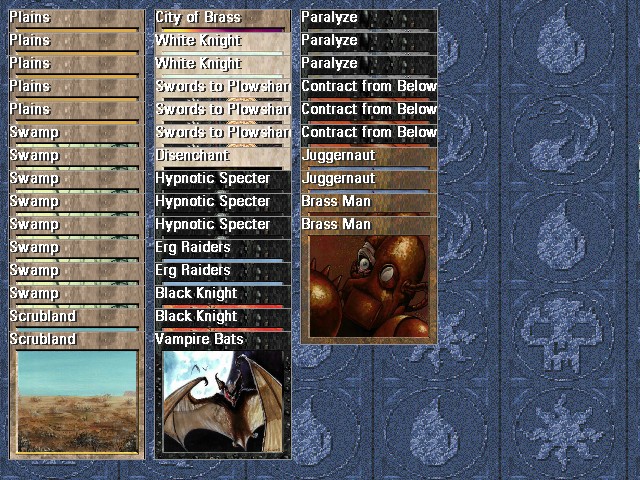
I believe the strongest deck you can put together at this stage is black-white, a blend of aggro and midrange and removal. These two colors have the best aggressive creatures in this format: Hypnotic Specter, Erg Raiders, White/Black Knight, and some others like Savannah Lions or Vampire Bats or Thunder Spirit are also reasonable to run. Juggernaut tops the curve, particularly since the computer plays against it very badly; it thinks that Juggernaut can only attack and ignores it as a potential blocker, and so the AI will very often attack with a small creature and suicide it into your blocking Juggs. I found that heavier creatures like Serra Angel or Sengir Vampire aren't necessary; Juggernaut is higher power at lower cost, and ramping up just to that is enough to win.
Black and white also have the best removal. Creature kill is king in this format. The computer decks have a lot of creature buffs and enchantments, and you can very easily get two-for-one card exchanges by using removal in response. The computer will also double-block to trade creatures in combat whenever possible, and you can also get a two-for-one by removing one of those blockers so your attacker kills the other while surviving. Obviously Swords to Plowshares is the king of removal, and you can also add in Terrors each time you're going to fight a non-black deck next.
But besides those, there's also another key removal spell here: Paralyze! This is very surprisingly effective in Shandalar. The computer AI also handles this card very badly. It will pay the four mana to untap the creature every single time, but then it doesn't really know that the creature is still paralyzed. It will happily keep attacking with a paralyzed 1/1 and waste four mana every turn, or even waste the four mana on untapping a mana elf or bird just to re-tap it for one mana. And it will happily keep casting creature enchantments on the paralyzed creature. Paralyze can virtually shut down an AI deck until it draws into several more lands, by which time you should easily win with your better creatures. Paralyze almost invariably buys you plenty of time to draw into any other answers or offense you need.
And there's one other key card this deck is built around, the card famously known as the strongest in all of Magic's history but unplayable in any other format, but it works bigtime here. Say it with me: Contract From Below. One mana to draw seven cards, and of course we don't care about an extra ante card if our goal is to win every game anyway! Contract is how this deck will win every war of attrition. You can afford to trade one-for-one all day with creature combat and removal spells, and when you run out of bullets, sign your Contract to load up seven more.
I'll also mention Brass Man from that list, since that looks unusual, it's not an aggro creature at all. But I had very good results with it. A 1/3 blocker for one mana can hold off quite a lot of aggressive weenies, all sorts of bears or knights or goblins or elves or merfolk among the various AI decks. You can omit Brass Man once you rack up enough mana links (22+) to consistently survive early aggro, but I liked it a lot for smaller amounts of dueling before that.
Living On One Mana
There is one common thread through many of those cards. Swords, Paralyze, Contract, and Brass Man as a blocker share one very important property: they are all cast for one single mana. This is critical. If you're trying to win 100% of your games, you must be able to deal with mana-screw situations. Shandalar uses old rules for mulliganing, where the only hands allowed to mulligan are those that consist of zero or seven land. You cannot mulligan out of a one-land situation. Your only option is to push through it, to have enough bullets castable on one land to be able to buy time to draw into more.
Living on low mana is also why Erg Raiders are here, as the biggest body available for two mana. I found myself liking these quite a bit more than Black Knight; the 2/3 body holds off quite a few more possible attackers and can muscle past quite a few more blockers (there are a lot of 2/2s in the computer decks) or attract a double-block, and the casting cost of 1B instead of BB is significantly easier.
What's not here
Dealing with mana screw is why two particular cards aren't in this deck: Mishra's Factory and Dark Ritual. I tried them in some runs that eventually failed with a loss, and I found too many situations where I was stuck with a Factory as my only land and couldn't cast anything to buy more time. And Dark Ritual is not a solution to mana screw; it can't be cast with a single Plains or off-color Mox, casting a single Hyppie with it is not enough to win a game, and it's a dead card when you do have enough land.
What else isn't here: Red. I tried running red in this deck, mostly for Lightning Bolt, and also an Earthquake and Fireball or two can help with removal. I found these weren't necessary, and the three-color mana base created more risk of color screw than the benefit the red cards would give me. There are no red creatures worth running. And as good as Lightning Bolt is, it's not necessary here. Swords, Paralyze, and sometimes Terror are enough removal. Bolt itself often isn't good enough removal; the computer decks often have enchantments and buffs to push a threat to four or more toughness. And the direct damage of Bolt rarely matters to win a game; you're almost never in a rush to win a damage race, you can pretty much always wait to draw into more creatures.
I do add blue once I have at least two of the blue power nine spells (Ancestral Recall, Time Walk, Timetwister.) All three are worth running, and it's worth acquiring the blue-black and white-blue dual lands to support them. That's another reason not to add red; a three-color mana base can be mostly reliable, but four colors is really pushing it. As for green, I don't see any reason to ever add that at all; you don't really need to do a Timetwister-Regrowth loop.
With blue in the deck, there is one more creature I would like to add: Serendib Efreet. This is a very efficient beater, particularly by being castable off Sol Ring. However, this card is tough to acquire; it's not available from the standard list of cards in cities or a Nomad's Bazaar. The only way to get it is to be lucky from a random event on the map. Great if you can get it, but don't sweat it if you can't.
Deck size
Deck size is another topic. I think it's best to stay at the minimum of 40 cards for the best consistency. With the Tome of Enlightenment world spell, I think 4 copies in 40 cards is a better idea in general than unlimited copies in 60 cards. The problem with 60 cards is when all those extra duplicates bunch up at once; you're more likely to get a hand clogged with something like four or five Contracts or unplayable fatties all at once.
There is a danger to the 40-card deck: running out of win conditions. With only 10-12 creatures in the deck, it's actually quite possible for an opposing deck to have enough removal to wipe every one of them, until you run out of win conditions and cards. This vulnerability particularly comes up when you had to cast a Contract to get out of mana screw and had to discard several of your beaters. This is a constant danger to be mindful of; sometimes you have to stop trading creatures in combat and wait to draw more removal. The danger of running out of cards can be mitigated with Timetwister once you get that; it's still possible (particularly if a Contract happened to ante your Timetwister!), but it's less likely and the lesser evil compared to a 60-card deck. Of course, this opinion isn't necessarily authoritative; you may well also do fine with a 60-card deck and something like 6 or 7 Contracts.
Shandalar does not favor aggro
There's one major principle about the Shandalar environment: you must build decks to win the long game. You can't play just aggro; you can't expect to win the beatdown damage race in 100% of situations. The larger enemies have too much life, 22 or 24 or up to 27 for the highest category of enemies in each color, plus even 45 for the castle bosses. Additional concerns include the frequency of times that the computer starts with some extra creature in play for whatever reason, plus life-gain in many of the decks, and also the life you're feeding your foes with Swords to Plowshares. It's almost like your standard deck is trying to fight decks playing by Commander rules.
You typically have to deal 30 or even more damage to win these bigger fights, and that's just out of reach for an aggro deck to consistently do. You do not seek to win the beatdown race; you seek inevitability. And you get that inevitability with removal, card advantage in Contract, and creatures that will grind out a win given enough time and hits.
That's why Erg Raiders and Hypnotic Specter are in this deck. These are the creatures that serve double duty in their slots: cheap enough to hold off some early aggro (the computer won't attack if any blocker could kill its attacker, even if a trade would be great strategically, like a Savannah Lion vs a Hyppie), but strong enough to eventually go all the way to clock off all the damage needed to win. Hyppie isn't primarily here for its discard ability; it's nice, but usually isn't what swings a game; what's left in the computer's hand to get discarded is usually unplayable junk anyway. Hyppie is here mostly just because a 2/2 flyer is enough to close out games while you keep hitting everything else with removal. Erg Raiders are also surprisingly good as a long-game attacker, usually able to keep pushing past whatever weenies remain after you take care of any bigger threats or blockers.
And even though this is a board-controllish deck, I don't like the big board wipes, Wrath of God or Nevinyrral's Disk or Earthquake. These take too much mana - by the time you can get up to 4 mana to cast those, you can stabilize with point removal and cheap creatures instead. These board wipes are win-more and not necessary, compared to just doing one-for-one trades and winning the attrition war with Contracts.
I also don't like blue counterspells for control. Most of the danger comes from the computer putting out quick aggressive threats before you've got counterspells online. There are very few significant threats across the computer decks that can't be handled by creature removal. So I focus on that and leave out any counterspells.
Enemies
Shandalar's enemies come in a certain tier arrangement. It goes like this:
| Role | Life | Bribe | White | Blue | Black | Red | Green |
|---|---|---|---|---|---|---|---|
| Weak | 10 | 40 | Cleric | Seer | Witch | Sorceress | Druid |
| Aggro | 12 | 40 | Priestess | Merfolk Shaman | Undead Knight | Sorceror | Elvish Magi |
| Typical | 14 | 60 | Crusader | Conjurer | Warlock | Troll Shaman | Enchantress |
| Two-color lesser | 16 | 70 | Tusk Guardian (white/green) |
Mind Stealer (blue/black) |
Sedge Beast (black/red) |
Elementalist (red/blue) |
Fungus Master (green/blue) |
| Intermediate | 18 | 80 | Paladin | Sea Dragon | Vampire Lord | Goblin Lord | Forest Dragon |
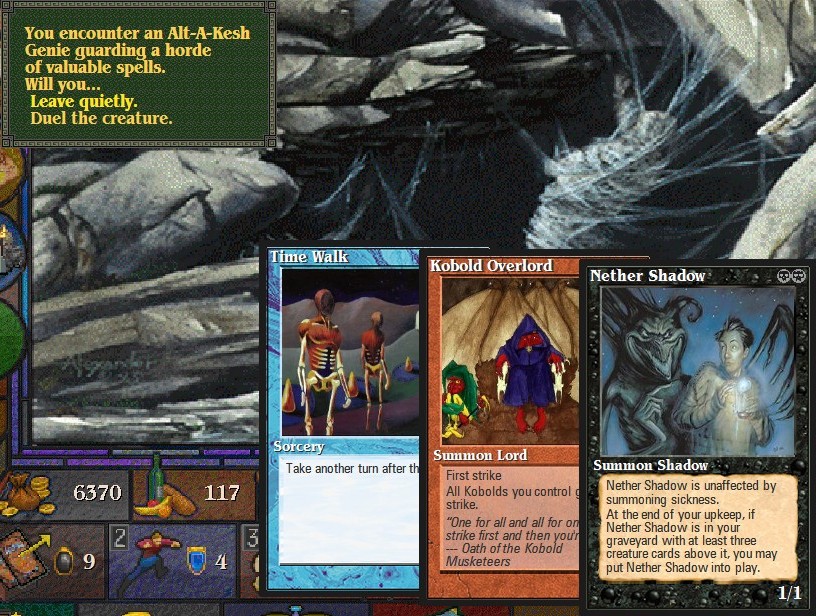
| Tri-color wedge (genie) |
19 | 80 | -- | Saltrem Tor | Aga Galneer | Queltosh | Alt-a-Kesh |
| Two-color greater | 20 | 100 | Lord of Fate (white/black) |
Winged Stallion (blue/white) |
Centaur Shaman (black/green) |
Centaur Warchief (red/white) |
Ape Lord (green/red) |
| Strong | 22 | 100 | Archangel | Shapeshifter | Nether Fiend | Hydra | Beastmaster |
| Tri-color arc (dragon) |
24 | 110 | Kiska-Ra | Whim | Mandurang | Dracur | Prismat |
| Top henchman | Up to 27 | -- | High Priest | Thought Invoker | Necromancer | War Mage | Summoner |
| Castle boss | 35 to 45 | -- | Sainted One | Astral Visionary | Greater Lich | Dragon Lord | Great Druid |
I'll talk about the tiers in broad strokes.
The Weak category is the first one you should start fighting. These are (deliberately) really bad decks, with weak creatures and lots of useless artifacts like the life-gain lucky charms. They're not quite automatic wins for you - they can put out a medium sized creature and attack enough times if you don't do anything about it - but in general these foes are really easy. You can handle these once you've got 16 or so mana links, a workable mana base and a couple Contracts, and a decent but not necessarily optimized list of removal and creatures. Doing quests to defeat these creatures for a card reward (any black card, any sorcery, etc) is a good way to fill out the remaining rare slots in your deck like more Contracts and the dual lands. The exception in this category is Witch, who can be tricky to defeat, with Nevinyrral's Disk to wipe the board, and regenerating creatures to survive that and block yours.
Avoid the Aggro category early on. They pack the best aggro creatures and spells in each color, and can surprisingly quickly rip through a life total of 16 to 18 or so. Enough life will reliably let you hold out against that assault, but I like to get up to 22 or so mana links before I risk much fighting against these. Priestess is a weird aggro deck here, relying on Animate Wall for offense, but she can have enough defense to make her a tough out.
The next few categories up to 18 life are the meat and potatoes of this game; average decks with average threats. Many are trying to pull off Johnny shenanigans, like Prodigal Sorceror to grow a Fungusaur, or Tawnos's Wand for an unblockable Hypnotic Specter. These tricks are silly and overcosted and easily disrupted with removal. That said, there are caveats in these categories. Avoid Mind Stealer since he can play with a copy of your own deck (although it's fun to have him cast Contract and then win his anted copy of your own card!) Paladin is also touchy, with Karma and Northern Paladin to work against your black deck even before he starts with his Magical Hack and Sleight shenanigans. Enchantress can summon a Summoner in her place (although Summoner isn't very hard either.) And avoid Conjurer, because he can force you to fight with a random other deck from Shandalar's roster instead of your own. Most others of these tiers are fairly easy.
I mostly try to avoid the higher categories until I've got a fully developed deck as shown above, and ideally a few dungeons worth of power cards as well. The genie and dragon decks are unpredictable and can whip out or voltron up big creatures to attack with. Two other notable threats are Hydra and War Mage, which pack Mana Flares and big red X damage spells, which our deck full of creature removal doesn't handle well. Archangel is also an oddball threat - she has Wraths and life gain, which pose a serious risk of running you out of cards and win conditions to eventually deck you. All the others can generally be handled by the standard game plan of removal and Contracts to reload.
Unfortunately, you're going to have to fight the top henchman decks; they can't be bribed with gold. One thing you can do is use the Staff of Thunder spell on the world map to get rid of them (risk one red amulet to destroy the nearest monster.) Do this whenever you can react fast enough and have red amulets to spare.
So keep this roster of enemies in mind when you're deciding what to fight. This particularly comes up with enemies attacking cities. When it's a weak enemy, use Sword of Resistance to pop there and defend Shandalar. Stronger enemies it's often wise to just let go; you don't need any particular city on the map and it's no problem if a few get taken over. I don't advise ever trying to liberate a city once it's been conquered; the computer gets a number of extra advantages and you really don't get anything for it to be worth the risk.
There are two enemies with a particularly notable reward: Sorcerer and Elementalist. These have a chance to reward you with any duplicate card of your choice - including restricted cards! Once you have something worth duplicating (like most of the power nine), seek out these to intentionally fight. This reward can also be given by Conjurer and Mind Stealer, but those enemies have risk factors in swapping out or copying your entire deck, so I avoid them. That said, I didn't get such a duplicate-card reward at all this run.
Dungeons
The dungeons of course include the most famous aspect of Shandalar's gameplay: your life total carries over between duels. This sounds perilous, but this actually makes the dungeons pretty easy when you approach this correctly.
There is one single card that does basically all the work here: Spirit Link. Put at least three of these in your deck, maybe a fourth. Your job in the first fight or two is to get in some hits with a Juggernaut enchanted by Spirit Link. You need just a few hits to get your life total up over 40, and once you've got that, you've got as much time as you need in any following duel to do it again. I routinely get my life total to 60 after a couple fights and well over 100 by the end of a dungeon. And of course, Spirit Link can also function as soft removal, by casting it on an opponent's creature, so any damage it deals when attacking will net out to zero against the life gain.
Thanks to that, it really doesn't take much of an optimized deck to start clearing dungeons. You can go as soon as you have the Contracts and Juggernauts and Spirit Links, and a decent but not necessarily optimized pile of removal and small creatures besides that. Explore each dungeon as much as you can before starting any fights; look for the dice rolls to get a bit more life, and a starting advantage (ideally Juggernaut) for your first duel. And once you're in a duel, stretch it out to gain more life whenever possible; hold off attacking with other creatures so the Spirit Linked one can get more attacks for more life. Also cast extra Contracts to dig for more Spirit Links right before you finish the fight, and even keep an eye out to Plowshare your own creature just before winning too.
Besides that, pay attention to the dungeon clues and environments to tune your deck for it. Don't enter a dungeon without all of its clues; you can get a really nasty surprise if it prohibits a category of cards from your deck! The particular environments to watch for are Crusade or Bad Moon in effect - you can take massive advantage of those by loading up your deck with weenies of that color. Some minor effects like Marsh Viper or Smoke can be pretty much ignored.
Of course the most infamously bothersome hindrance is Power Struggle, an enchantment that randomly swaps cards around. But note that this can be removed - it's simply an enchantment card that can be interacted with, destroyable by Disenchant. It's also a reasonable plan to include red in the deck for Red Elemental Blast, or a Boomerang in blue can also do the trick.
But in my run here, I had this to contend with:
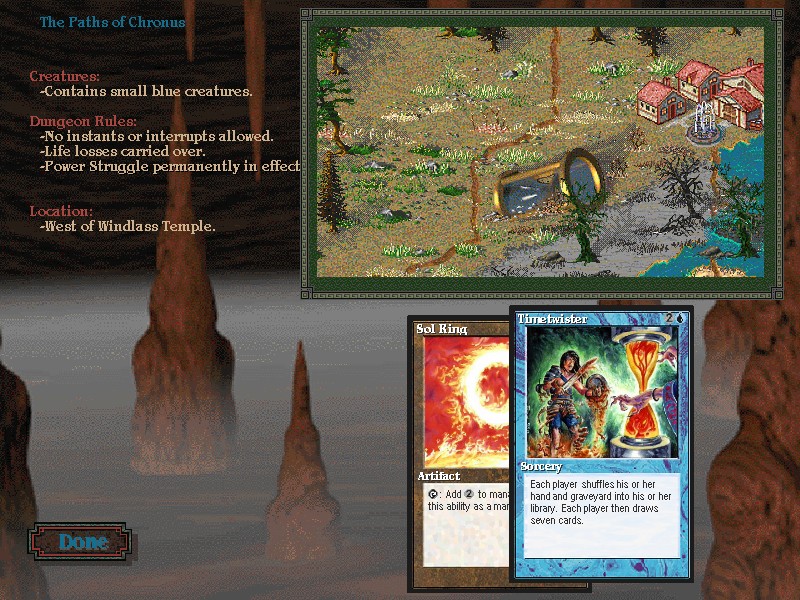
Dear goodness: Power Struggle and no instants or interrupts allowed! All the good answers to Power Struggle are that: Disenchant, REB, Boomerang. There is Tranquility (sorcery), but that costs three mana and involves cramming in green somehow. I decided I just had to brute-force my way through this: just include a lot of creatures (but not Hypnotics that could wreck me), let them get swapped around, trade in combat whenever possible, and expect to win the attrition war through Contracts as always. Don't include the soft removal of Paralyze, it doesn't do any good to have a paralyzed creature swapped to your side! But Spirit Links are great, the life gain works no matter which side the creature is on. And since Swords and Terror are also banned as instants, I picked up some Oubliettes for creature removal. This all worked well enough to get in a few Spirit Linked Juggernaut hits in the first duel, to go up above 40 life as usual and then I had plenty of time to recover from any other weirdness from there.
Anyway, I got through all the dungeons with no problems or close calls. I was able to get Spirit Linked Juggernauts hitting often enough in my first couple fights to raise my life total well out of any danger, all the way across all ten dungeons. The only other notable restriction I had to deal with was one dungeon that allowed no artifacts, so for that I loaded up on Knights instead of Juggernauts, and more removal to buy time to play lands instead of Moxes. I think one dungeon said no green cards allowed, but I wasn't using any anyway.
Powered Up
So I upgraded my deck with the dungeon treasures: on-color Moxes, the blue spells, and Black Lotus which actually didn't come until the last dungeon. There was also this:
I found (and won) a lair bonus fight for an extra copy of Time Walk! With that, this became the final form of my deck here:

The power nine spells here really did power up this deck. Particularly the two copies of Time Walk. It felt like almost every time I cast a Contract, it would draw into a Time Walk and a Mox to cast it immediately. You don't need me to tell you how good Time Walk is, but I experienced it bigtime firsthand. In particular it's killer with Hypnotic Specter, particularly in multiples; an extra hit from two Hyppies will rip out any remaining threats or answers the opponent might have. Time Walk also lets a newly cast Juggernaut attack right away ahead of any blocker or other response, and I closed out many games that way.
Ancestral Recall also smoothed out the deck significantly, plus Demonic Tutor to fetch any missing piece (often Ancestral itself, or Time Walk when that would close the deal to win a game), and also Timetwister to recycle my attackers if a lot got killed or discarded to Contracts. With all those pieces, I cut the removal slots down to three Swords and two Paralyze, still enough to buy enough time when I did stumble with a slow draw. Plus one Boomerang, as a catch-all emergency answer to anything, or it can also function as another virtual Time Walk by bouncing an opponent's first or second land.
Ha, it's fun as hell to stack up extra Time Walks, here three in a row, by casting one and then Timetwistering into drawing both again (the mana came from Black Lotus.)
I didn't try to chase more extra copies of the restricted cards, by fighting Sorceror or Elementalist enemies. I would have if I'd run across them, but just never did at this stage of the game. You can make truly degenerate decks by doing this, things like the legendary 20 Lotus / 20 Ancestral / 20 Bolt deal, but I really didn't want to put in that effort.
Notable restricted cards that aren't here include Library of Alexandria, Balance, Mishra's Workshop, and off-color (red and green) Moxes. Library might be worthwhile as a backup plan when you're stuck without a Contract, but it's dead and unnecessary often enough that I chose to skip it. Balance is too often dead, particularly after drawing cards into a big hand with Ancestral or Contract. And Workshop and off-color Moxes aren't necessary; they only speed up casting Juggernaut but it doesn't matter how soon you do that, it will still win whenever you do.
Castles
So the final chapter is the evil wizards' castles. These look like the dungeons, but don't share the rule about life total carrying over, and don't have any deck construction constraints. They also mostly have harmless effects in play: Greed in the black castle and Sylvan Library in the green (the computer spends all its life and mana drawing too many cards), Leviathan in blue (the computer will laughably strangle itself sacking its islands to that), Elder Land Wurm in white (trades with Juggernaut, fly over it with Hyppie, or just Paralyze it.) The scary one is Mana Flare in the red castle, which plays a little too well with the red decks powering up X damage spells. For that I added two Blue Elemental Blasts to deal with either the damage spells or Mana Flare itself, which worked, though I was a little worried in a few fights.
I decided that 100% completion would also include the treasure chests in the castles (gold and jewels), so went for those too. This took a lot of extra fighting, eight or so extra duels per castle, but I handled all of it. (I was definitely not trying to 100% the game by collecting every single card. Arguably, 100% completion might have included getting mana links with every city on the map, but I didn't bother here.)
In the black castle was where I had my really close calls, two of them. One was when I was mana flooded all to hell, getting beat down; I had two creatures but the computer wiped them with Ashes to Ashes! Then I miraculously drew a Contract on the last possible turn to draw into removal, and won from there. (Swords or a blocker were other outs at that moment.) The second close call was when my starting hand had only Black Lotus as a mana source, with which I cast Ancestral Recall... only to draw THREE HYPNOTIC SPECTERS and still no land! Fortunately the computer had a slow draw too (a Vampire Lord deck which is pretty bad, with Sorceress Queens and Carrion Ants), and threatened me slowly enough that I got the six turns I needed to draw into a black source, to cast Contract and then Timetwister to recycle my Hyppies.
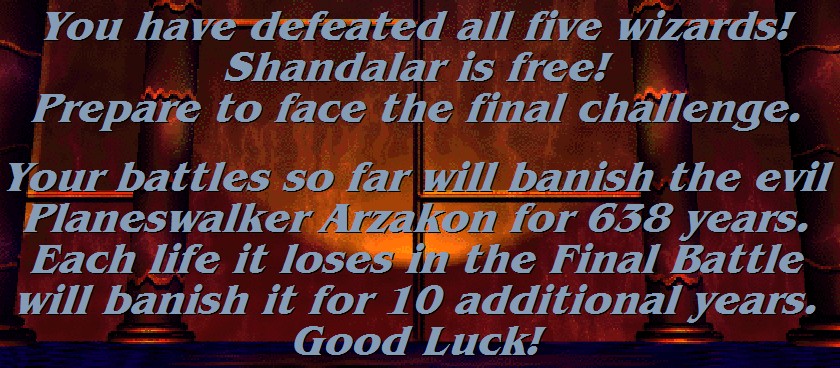
And here we go with the final boss battle. He starts with 400 life, an incredible total. You're not really supposed to defeat him, the game ends whatever you do here, you're just supposed to deal as much damage as you can manage. But of course, I'm going to win this too.

I assembled a new deck for this. Now I went up to 60 cards, and included every big creature I picked up along the way. This also involved expanding the mana base to all five colors, to put in Shivan Dragons in red and Regrowth in green. That last is important to execute the Timetwister-Regrowth loop, to go as long as you need without ever running out of cards. I switched the removal to more Paralyzes instead of Swords, because the Paralyzes stay in play once cast, rather than occupying deck and hand slots once I start the Timetwister loop, so the Timetwister can reliably draw back into Regrowth and Time Walk and if necessary Demonic Tutor. Arzakon's deck is terrible, with hardly anything worth attacking with, so you get plenty of time to set up whatever overkill you want...
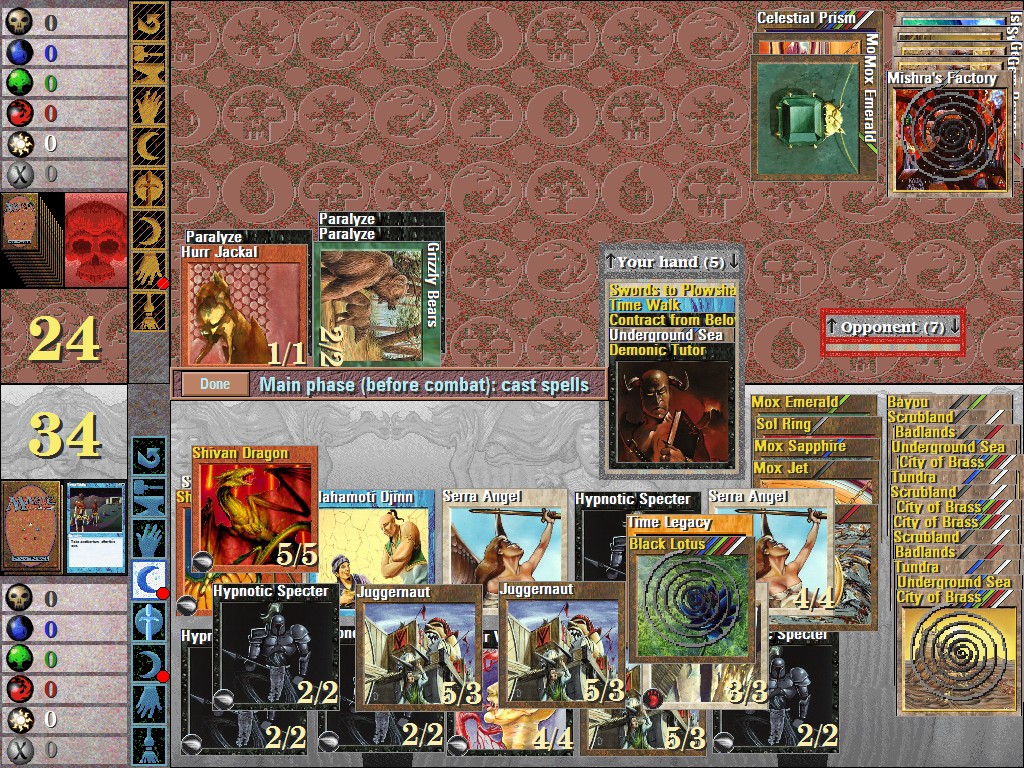
And that's what it looks like on reaching my desired game state. I pared down the deck enough that every turn I could cast Timetwister and it would draw back into Regrowth and Time Walk, creating a loop of infinite turns. To get here, I had cast Contract twice, and had to hope that it didn't ante either Timetwister or Regrowth, but it didn't. I took about six consecutive turns this way before this screenshot, with about 40 power worth of creatures attacking each turn. Then for the finish I also sank my red mana into that Shivan, and threw on a Berserk just for even more overkill:
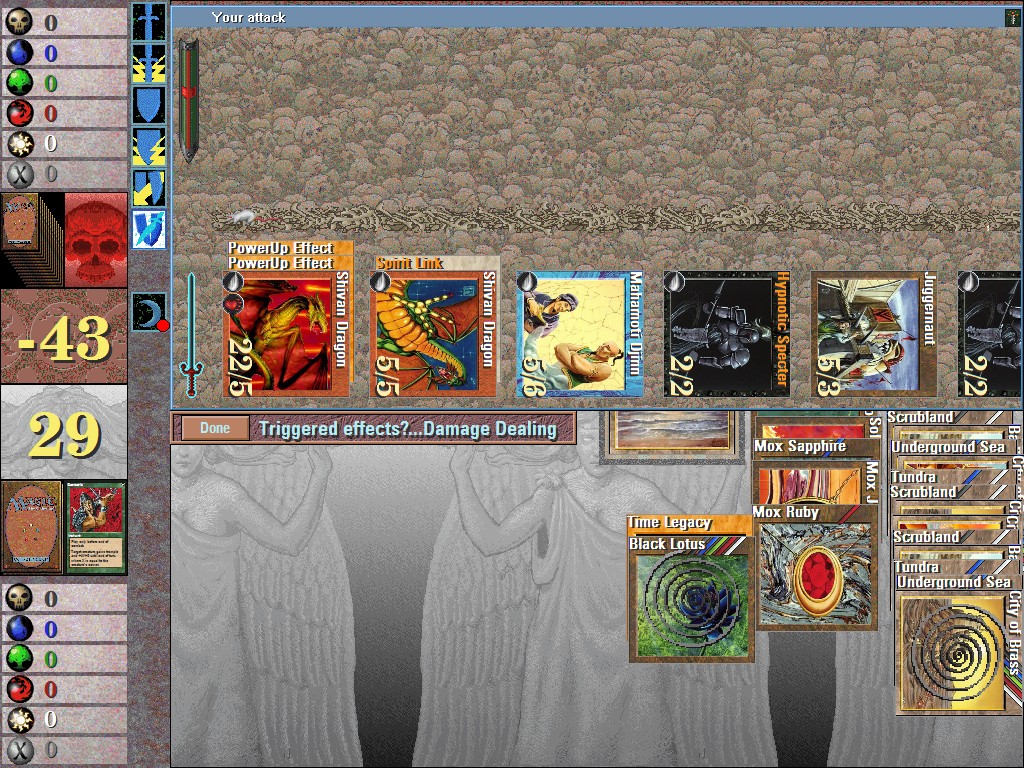
And finished off Arzakon's 400 life total there. Although I could have done 4000 or 4 billion if necessary, with infinite turns. (And although I didn't do it here, it's possible to deal exponentially infinite damage in a single turn: include Wild Growths and a Twiddle so that each iteration of the Timetwister-Regrowth loop nets positive mana, and include Berserk in the loop to exponentially double a creature's power each time. The Shandalar program tends to crash after looping that a bunch of times, though.)
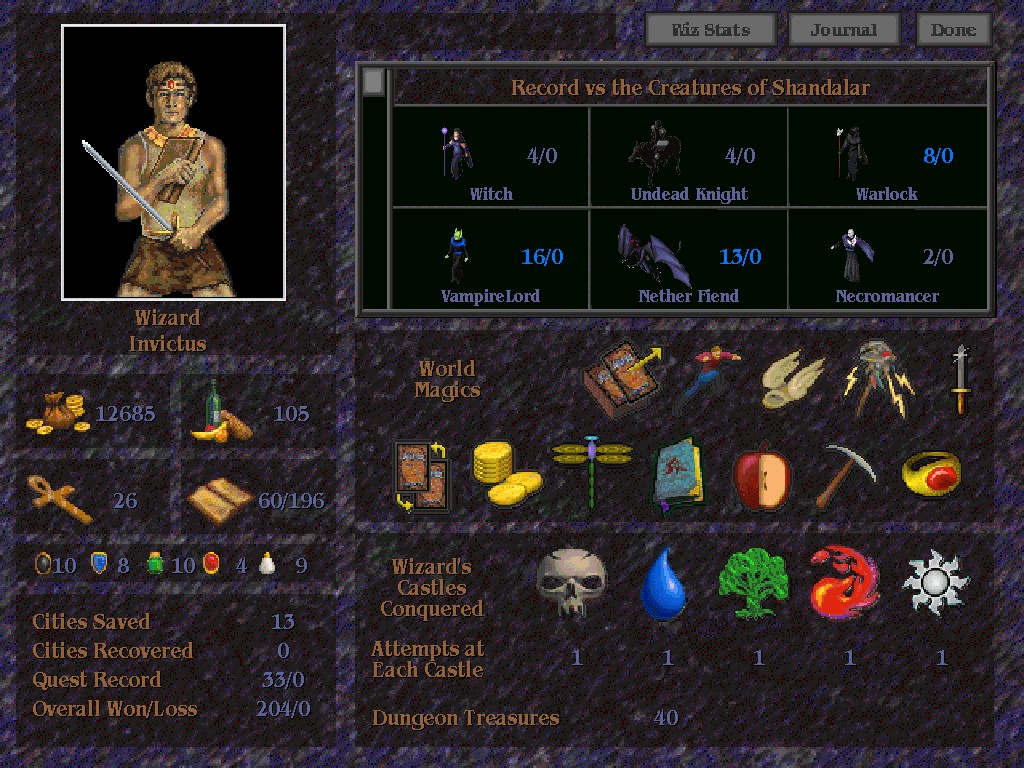
And here are the final statistics. There's my goal, a perfect record, 204-0 against the creatures of Shandalar. Roughly half of that was in the dungeons with a grossly inflated life total, but the other half were standard games against Shandalar's various enemies. (This can't prove that I didn't reload after a loss, but I didn't.) It also shows the 40 dungeon treasures, which is the total from 10 dungeons with 3 each plus 5 castles with 2 each. (This also doesn't prove it; you can exit a dungeon and go back and collect a treasure again, but again I didn't.) And finally all the world-magic spells are here, completing what I considered to be 100%.
That's all here, and thanks for reading!