Sid Meier's Alpha Centauri - University of Planet
This time, I didn't target or pause at any particular base count before the Planetary Transit System. I just intuitively built formers first at each base, then either more colony pods at bases with good food production or supply crawlers at bases with only a forest to work. This came to a good number of bases anyway, 13 total, one past the second bureaucracy limit, which didn't result in a second b-drone at any base.
To build the PTS, I didn't yet have access to expensive enough components to make it worthwhile to upgrade crawlers, so I did it by building enough regular crawlers to all cash in together to insta-build the project. I built a total of 9 crawlers at 27 minerals each with Wealth's industry discount, then I fake-swapped out of Wealth to cash in all 9 for 30 minerals each, then completed the project for 270 minerals with the industry discount back on. As always, I also rushed any colony pod I could at size 2 just before completing the PTS, since the project would instantly bounce all the populations back up to size 3.
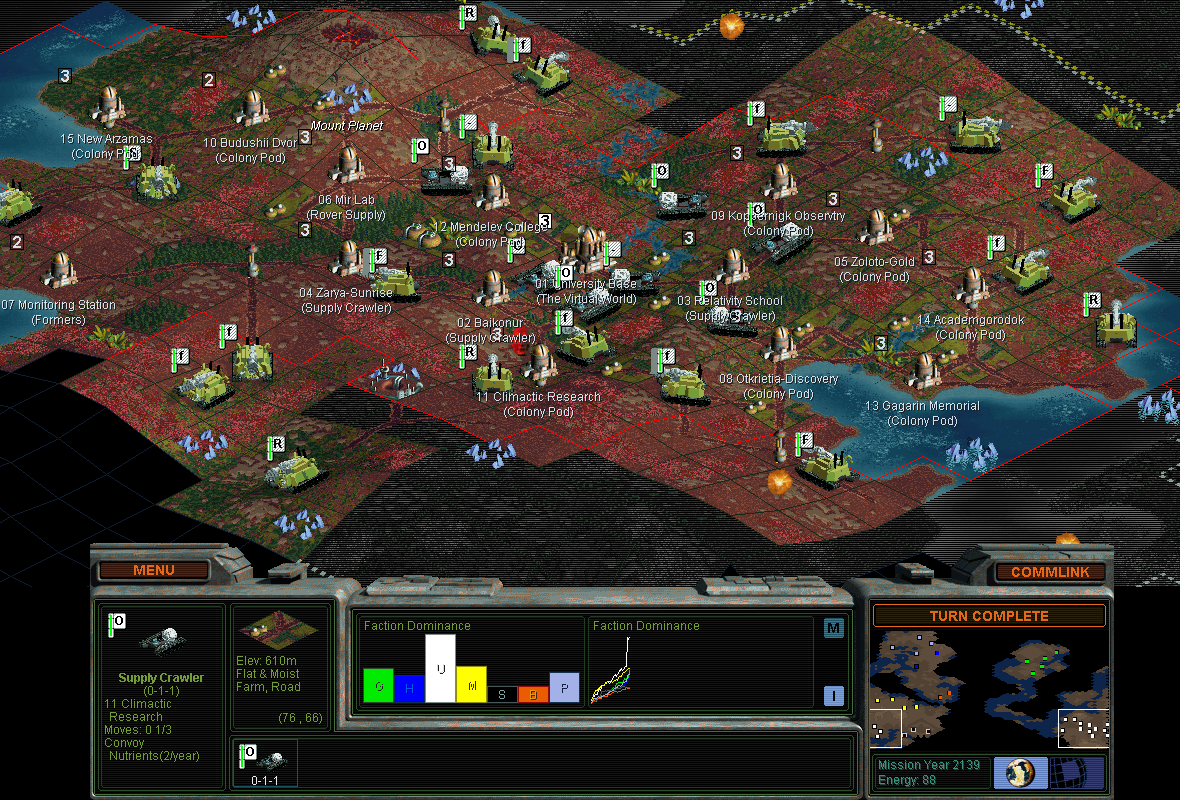
The picture shows how I line up the timing (for the Virtual World which is to come next, in the same way as the PTS.) Two turns ahead of time, I rushed all the crawlers in every base that is two turns of travel time away from the HQ. One turn before completing the project, as you see here, I put those crawlers in position to reach the HQ next turn, and each is sitting on a useful tile to crawl for that one turn in the meantime. And this turn I rushed the remaining crawlers, in the bases close enough to reach the HQ in one turn. Then next turn is the critical one, with all 9 crawlers in range to be cashed in to insta-complete the project.
The one downside to the PTS is that all that free population doesn't really run at full steam without a good means to control the drones. I had to run 60% psych slider, choking my energy and tech economy. My Morgan game had to do the same, losing a ton of the Free Market energy to the psych slider the same way, and then flipped to Green for police units instead; Gaia and Sparta also didn't run Free Market and had to build police units; the Believers did it with recreation commons but that was also costly enough to be a significant slowdown.
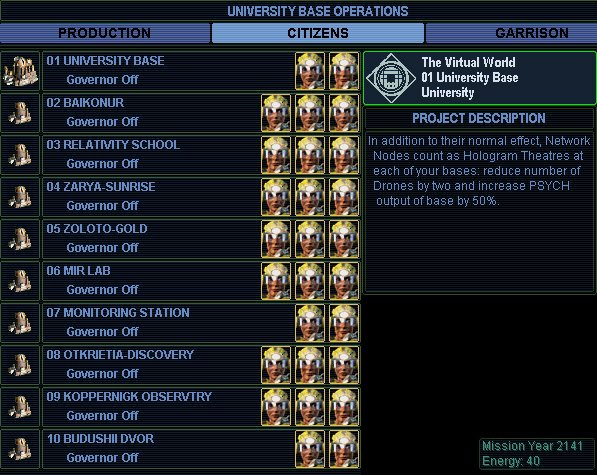
But the University has a perfect solution to the drones right here. Everyone knows this combo: the Virtual World secret project makes the free network nodes also count as hologram theaters to squelch two drones each. That plus the PTS's own drone effect makes for perfect ironclad drone control for every base at size 3. This is why I wanted to play this game. Now I'm finally running the Planetary Transit System at maximum peak efficiency, every size-3 base producing all of its Free Market energy with nothing spent on the psych slider or police or rec commons.
How can I grow beyond size 3? My answer is going to be simply, don't try! A size-3 base working farms and forests is quite nicely productive. Pop-booming any higher than that requires a lot of components: the growth modifiers, food, drone control, and useful jobs for the added population. I have none of those, so the answer is don't do it! I can just continue expanding horizontally at size 3 for a very long time.
In fact, size 2 is very often even more convenient than size 3, because of food supply. A size-2 base can work two forests or moist tiles, but that third marginal tile has to yield 2 food to not starve, which were in short supply and the ones I did have wanted to be used by new bases on their first turn at size 3. So almost every base began new colony pods immediately after the Virtual World completed, and if they would stay at size 2 afterwards, so be it.
And I rushed those colony pods more efficiently and effectively than in any other game here. Morgan went too fast and overpaid for each pod: had to instantly rush a pod at every new base to get it down to size 2 or else starve or riot. Gaia mostly waited until bases were ready to regrow to size 3, and the Believers kept building recreation commons before pods. This time, I mostly waited one or two turns at each new base to rush a new pod, which was the perfect sweet spot of efficiency. That time allowed formers to move outwards with roads and a farm for the next base, and the minerals produced in the meantime would blunt each colony pod's cost (a quadratic function of minerals remaining) down from 48 to roughly 30 energy. Finally, then I often rushed each colony pod fully rather than partial-just-enough-to-complete, since then the overflow minerals would come up to 10 sooner to rush a former next.
I was pretty confident I was playing this very close to optimally. The perfect balance is to rush colony pods with all available energy at a rate that exactly matches formers making new base sites viable. I felt I was almost exactly achieving that, where I spent almost all my money every turn but seldom had more eligible build orders (over 10 minerals in the box) that would wish for more. (The money was around 100/turn and came from Free Market + Wealth + 50% economy slider; any deviation from that would drop a ton to the unbalancing penalty.)
One refinement I thought of, but really need to stop myself from playing a whole additional game to try out: I could have built some rover-chassis formers in order to build roads out to the new base sites faster. There's a speed-of-light limitation, that a chain of rushed colony pods marching outwards can't go any faster than one square per turn. Regular formers can't advance roads any faster than that either, but rover formers can, able to access a new square and build a road on it in the same turn. Although the cost would be considerable; rover formers are expensive (50 minerals) and I'm not quite sure where I could have fit in building them either before or after the PTS. Rover-former road crews might have saved about five turns on founding the outermost bases and maybe a turn or two on the win date, but that's not a drastic enough swing that I have to play a new game to do it.
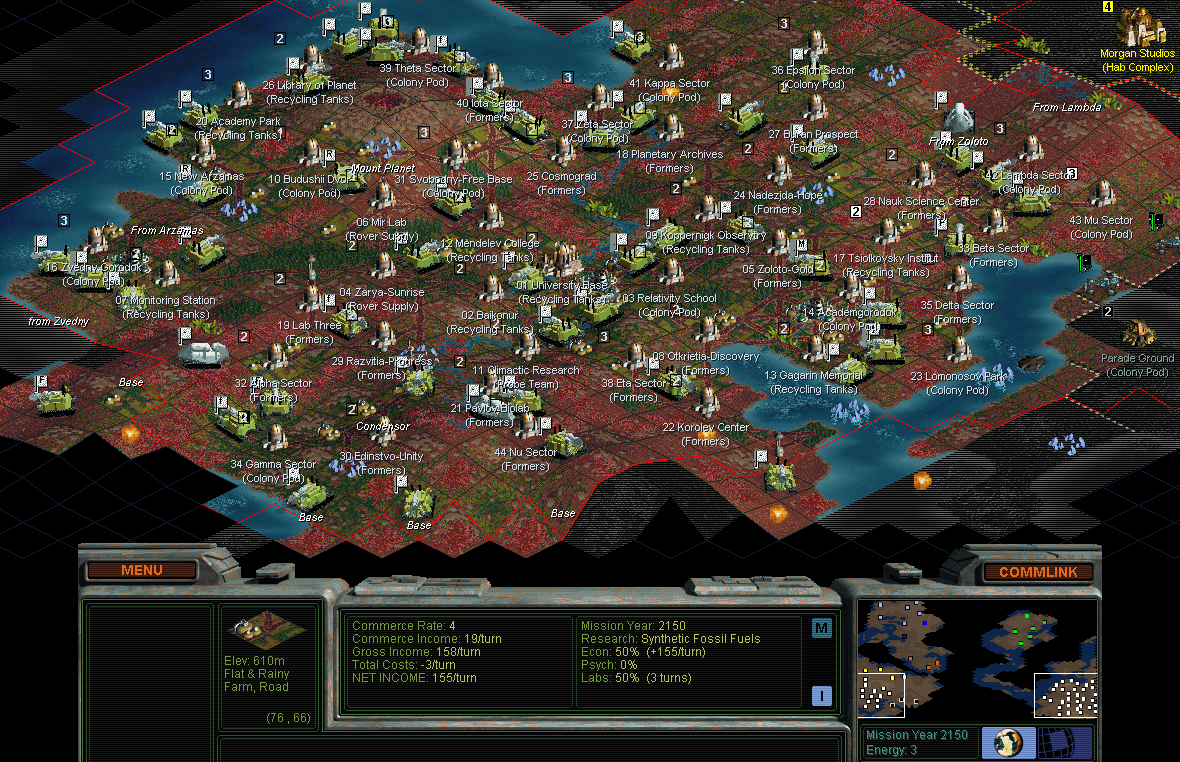
There's the overview after another ten turns, to compare with the Morgan game at the same date. 44 bases here, up from 36! And economy production of 150 and labs of 325 are each also about 25% ahead.
Each base built a colony pod (sometimes more), two formers up to the support limit, then recycling tanks. As always I'm not quite sure if the tanks are better than more formers, particularly here with a tech plan that could soon reach clean formers at Bio-Engineering. But I perceived that the value of formers was going down, not only by their quadratic-decline nature, but also because former-turns become less valuable as all the easy tiles get completed to leave only harsh fungus and rocks. Recycling tanks are always a decent-enough build, and do exhibit maximum value when the food immediately enables booming an additional size, which I anticipated would be happening just about as most of the tanks completed. As for terraforming, I now stopped planting more forests, and started to farm every tile in preparation for the upcoming population boom.
My research had stayed strong through all this expansion as well, unlike Morgan's use of the psych slider. Free Market + Wealth + planetary governorship means every base center square produces at least 5 energy, which accounted for almost all my productivity; every new base automatically meant more research. After the PTS and Virtual World, I was researching at about three turns per tech and rapidly improving. Presently my next target was High Energy Chemistry, mostly for the 3-value armor to serve as a sufficiently expensive crawler component to make it worth upgrading one for the Weather Paradigm rather than building six more regular crawlers. I reminded myself not to sell that tech to Morgan, because he was researching Ecological Engineering himself, so my tech could serve as trade bait for his.
Eco Eng was significantly helpful, letting me do boreholes and mines on rocky squares in areas where the formers had improved everything else. Yes, mines, I actually did what you're supposed to do with rocky tiles, for any that wasn't eligible for a borehole. This seemed the most efficient use of rocky tiles in terms of former-turns; more on this topic later.
My longer term beeline was the Cloning Vats at Biomachinery. Although the University can boom just fine through SE methods, I would ignore that and go straight for the Vats instead, same as in the Morgan game. The big principle for this game is that, as much as I push and talk about population-booming, it does have significant tradeoffs. All three components for the growth modifiers represent a substantial cost. Planned economics takes you out of Free Market; Democratic politics inflicts the support penalty that is a killer against the free minerals for new bases; and each children's creche is 50 minerals that didn't go into more colony pods and formers.
In fact, PTS colony pods are actually even a better deal for adding population than a creche for booming! A PTS pod costs 20 minerals net (after the new base's free 10) to add 3 worked tiles (net out the population cost against the new base's center square.) The creche costs 50 to boom 4 sizes, from 3 to the habitation cap at 7. The PTS pod is better. And a new base comes with two support slots for more formers. And to say it more directly, what's more efficient, 4000 minerals spent on eighty children's creches or 500 on the Vats.
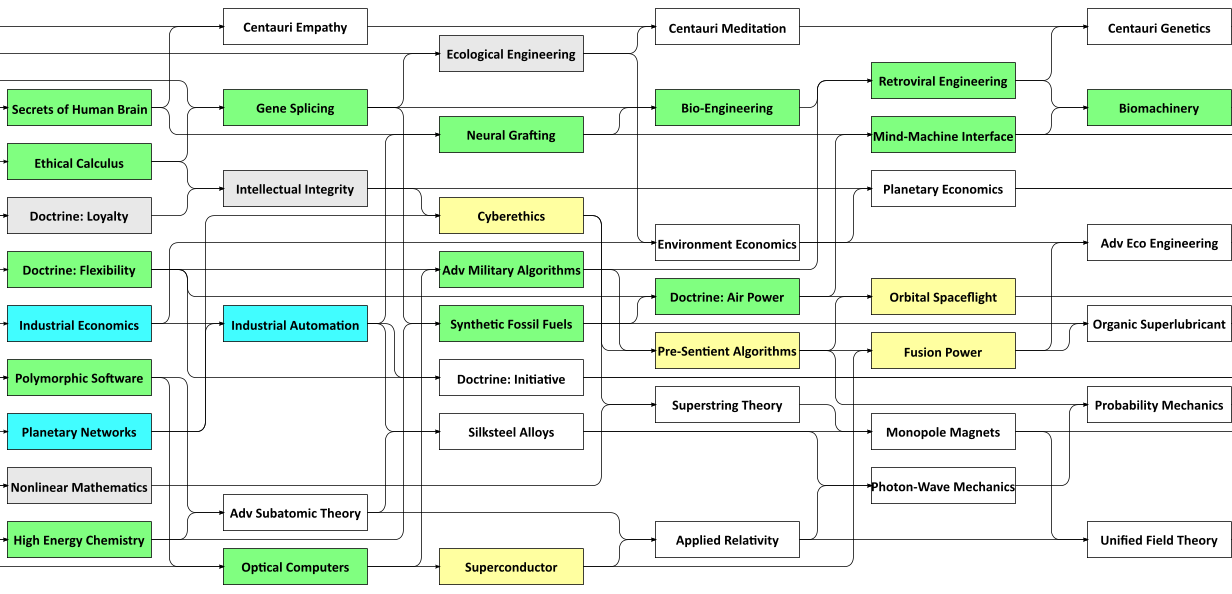
As I like to show, here's a visual illustration of the tech path. Green shows the beeline up to the Cloning Vats. Gray boxes are techs off the beeline that came by trade or steal. Yellow shows the next goals after, up to orbital food and fusion engineers. I stayed in the SE configuration of Frontier + Free Market + Wealth this entire time, with the sliders at 50/50 economy/labs, since the unbalancing penalty would eat any attempted gains in either direction.
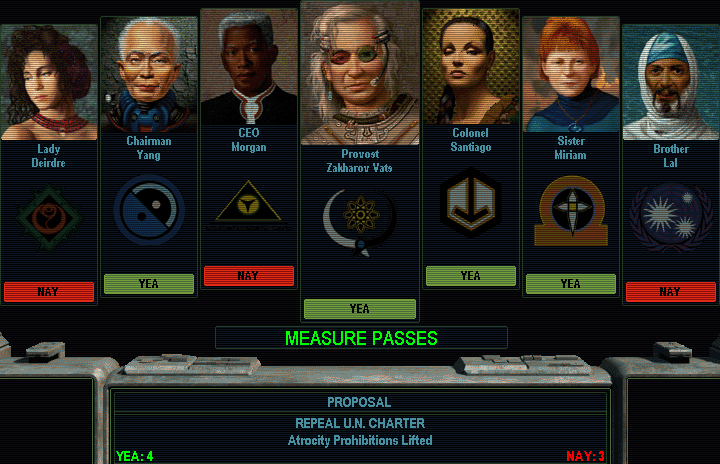
The charter repeal to enable nerve stapling passed, by a precariously thin margin. I found myself unable to buy any votes at all; every single leader either wouldn't talk or wanted a prohibitively high price of thousands of credits. Fortunately, just enough leaders voted on my side anyway. I'm really not sure what I would have done if this hadn't worked; I probably would have had to restart a whole new game to try again. Nothing besides nerve stapling can handle a vast amount of population-boomed drones while running Free Market. With Planned or Green, police units and Longevity Vaccine can work adequately, but no such configuration can keep up with the economic yield of Free Market for any faction that can run it.
While I was beelining to the Cloning Vats, Morgan got Doctrine Loyalty which he traded me, but then Intellectual Integrity which he wouldn't, because of its secret project. I had to grab the latter with a probe steal, since I needed that for my next beeline after. He declared vendetta in response of course. I had reached Synthetic Fossil Fuels, so I built one missile rover to capture one base from him, which is usually enough to make an AI talk peace and he did.

Later, Sparta also researched Nonlinear Mathematics, but refused to talk for the longest time. I prepared a probe to steal it and a few missile rovers to deal with the vendetta -- but then suddenly out of nowhere she did open communications to trade it and I happily accepted. Later still, Gaia researched both Centauri Empathy and Centauri Meditation and also surprisingly (each has a secret project) traded both to me. Finally, Lal got Doctrine Initiative which I did have to steal with a probe. Besides those, I researched every remaining tech myself.
I never went to conquer any neighbor in this game; could have done Sparta with the missile rovers I'd already built, but didn't seem like conquering three junk bases would achieve much of anything.
We'll go onto a new page to cover the population boom through the finale.