One more challenge.
I'm retiring now from my fastest science victory attempts. My previous game turned out to be the high bar. I actually played several more attempts partway through, trying with the Shoshone into Patronage or tweaking Poland into full Tradition. Nothing could match that magical run so I'm resting on that one.
But there's still one more thing to mess around with. I actually had an idea rolling around in mind ever since my try with Greece. That's the one game in my whole oeuvre that surprised me the most on finish date. I'd thought Greece to be an unexceptional civ and Patronage to be a merely decent plan, but all the city-states powered it up to be nearly competitive with the best civs. Ever since that game, I progressively came to focus more and more on city-states, with the games involving Patronage coming out best of all.
A huge map has 24 city-states. But what if I wanted even more? CFC's Hall of Fame eligibility rules stipulate the default number of civs and city-states for a given map size... but I had to take a spin at disregarding that and going crazy. The game allows up to 41 (the highest the setup screen will go, even though 54 exist in the data.) Let's see what happens if we go renegade and ignore the CFC rules.
And if I'm going to use a nonstandard count of city-states, may as well do that with major civs as well. I can play against just one AI opponent, so I can collect the entire map's worth of ancient ruins for myself. And there will be little competition for wonders. It's true that I'll get minimal chances to sell resources and buy luxuries, but that will be tolerable. That one AI will be the Dutch, so I can take advantage of buying their only copy of any luxuries they do have.
What civ? It's going to be Poland again. Of course the Shoshone are super tempting, with the most to gain from more ruins, and the best UU to clear camps for all the city-states. But I've been finding (in some more partial attempts after my best game) that the Shoshone's frontloading ultimately isn't enough to outweigh Poland's later advantages. The Shoshone always get perfect results with ruins and camps, but any other civ can reroll and retry until it gets something like 80% of perfect, which is good enough and then that civ has its own ability too. The fatal flaw for Shoshone or anyone else is being unable to reach Mercantilism to afford the schools and labs and spaceship parts, or else reaching Mercantilism means sacrificing a critical chunk of Liberty or Patronage.
Only Poland can cover all of Liberty, Consulates, and Mercantilism, and they even add extra dips into Aristocracy and Scholasticism. Yes, the social policy plan for this game is the same as in my previous. Why mess with perfection?
And Poland can also leverage one more major reason for playing outside CFC HOF rules. Enable Policy Saving. The one hitch I wasn't quite happy with in that best game was having to take the Commerce opener and Landsknechts dozens of turns before they actually did anything. (They're blank until unlocking Big Ben and Mercantilism, but had to be taken in the medieval era because all the renaissance policies go into Rationalism.) With Policy Saving, Poland can instead save the would-be Commerce policies and crash-dump them into Rationalism! The total policy count adds up perfectly. Reaching the Renaissance comes near the 9th regular policy, plus Poland's classical+medieval+renaissance freebies and the Oracle makes 13, which allocates perfectly as Liberty 5, Patronage 2, Tradition 2, and Rationalism's 4 important policies up to Secularism and Free Thought. Poland's key later-game advantage is accelerating through Rationalism faster than anyone else, and this plan can take that to the max too.
Finally, while we're operating outside HOF rules, I can also pick Abundant Resources for the map, why wouldn't you. I could also turn off barbarians, but no, the camps and captured workers are necessary to get city-state influence.
As before, I rigged the list of city-states in my favor by restarting from the game-setup screen. I eventually got and went with 12 maritimes and 11 mercantiles. The chance of these numbers: 14% for at least 12 maritimes out of 14 possible in 41 picks, then 19% for at least 11 mercantiles out of 14 possible in 29 remaining picks. That multiplies to this being a top 2.6% percentile arrangement, and the other relevant categories of 9 cultured and 5 religious were also slightly above expected values.
My other regular settings: Prince difficulty, Inland Sea map, huge size, hot climate, young world age for hills.
I had to move two turns to get here, and it's short on food with the only 3-yield tile out in second ring. But it's great with hills for settlers and Petra, four in first ring and three luxury hills to come. Including three distinct Mining luxuries, one of them being gems under the city for an extra +3 gold. This is the sort of promising-but-flawed start that I'll often click through a few turns to see what happens, and consider it disposable if things don't go well.
That very first ruin visible in that picture gave population, so there we go. With no food bonuses, from there I would always just work breakeven food and grow entirely from ruins.
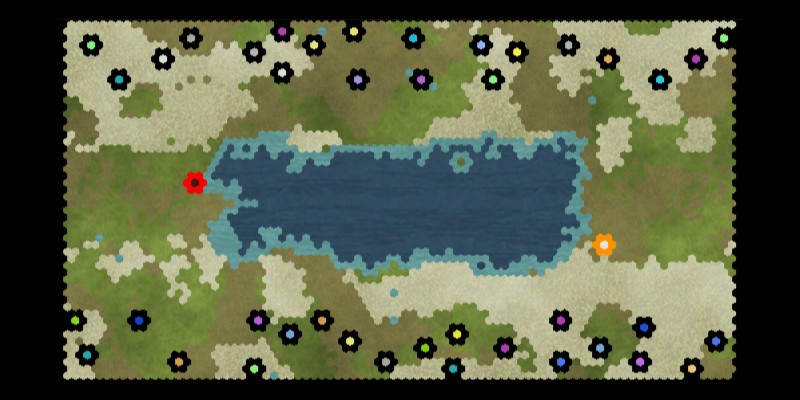
To illustrate what would happen here, I need to show this example map. Check out this weirdness. Somehow, this map setup causes all the city-states to cluster at the north and south edges. I noticed this in my first partially-played start, and confirmed it by rerolling a few more maps. (To see this view, choose the Retire option in-game and click on the Replay tab and the Map dropdown.) This was consistent on every map roll... and you better believe it's highly exploitable in my favor.
The significant downside was that I got a lot fewer desert starts to pick from. Because of the city-states occupying the north and south edges, almost every start had my civ on the east or west sides of the inland sea. There is no desert in those middle latitudes, only forest and jungle. This happened consistently. I had to reroll a lot more than usual to find some good desert -- typically it's one out of every 10 or so map rerolls, but this took around 40 shots to find a workable amount of desert. Hence I had to be less picky about what the desert contained, and why I went ahead with this particular start that was barely adequate on food.
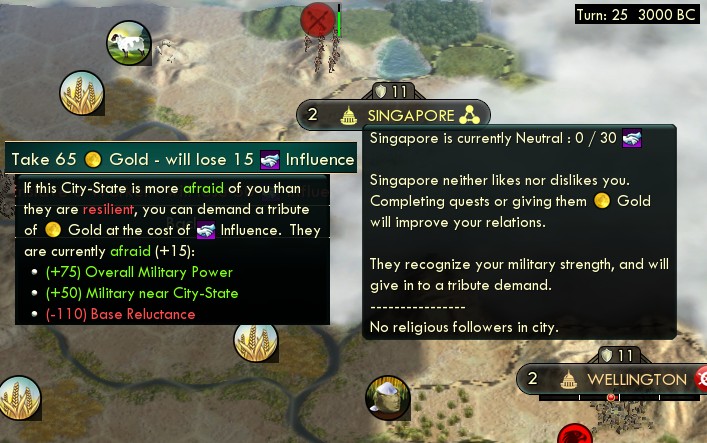
But the overall layout I can massively take advantage of. Knowing where the city-states will be, I can steer the first few scouts away from them into open land to find ruins the fastest. Also, if the starting warrior gets upgraded to a spearman from a ruin, that 11 strength is enough to singlehandedly seize tribute from many city-states. (This is also why not Shoshone for this game idea, they can't pull this trick, the starting pathfinder upgrades to a composite bow instead of a spearman.)
")
Like this. There is enough room on a huge Inland Sea to warrant sending three units in each direction to cover all the space. On normal maps I do two each way, but since I know here that all the land will be vacant and lucrative with ruins, I really wanted the extra scouts to fully cover and scour everything. I sent my starting warrior (yellow line) towards the corner, hoping he'd find an upgrade from a ruin and then tour the city-states for tribute. That didn't happen, but what he did find was two religious city-states right away, enough faith for the pantheon super early on turn 13.
The first few ruins gave population to size 2, Pottery, culture which was perfect, another population to size 3 also perfect, Calendar, and a second culture ruin also nicely early to get Republic on turn 13.
Then this happened.
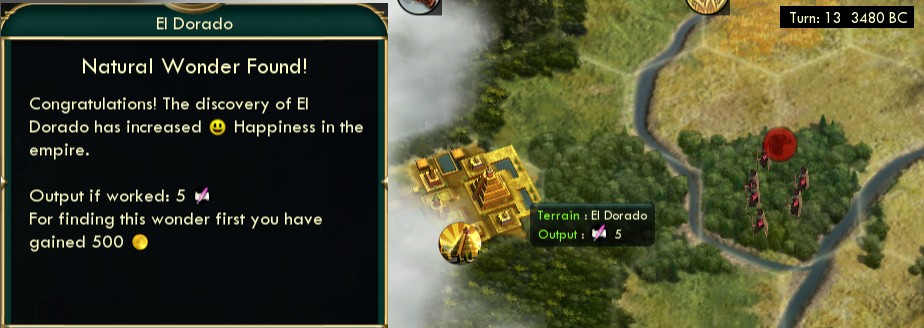
EL DORADO. El Frickin Dorado chooses this moment to show up. Never did when I was seriously into optimization in the various science runs, and now we got it in my one everything-goes renegade game.
The one thing I need most is population, but not even El Dorado can buy that. But I knew what to buy almost instantly. Those two extra scouts, and then get started with a worker. Nothing else came close to any of those options. More scouts beyond those wouldn't have any more new land to explore. A granary is useless while building settlers on the starvation plan, a monument is a terrible gold/hammer ratio (280/40), a shrine is useless with the pantheon already in hand, and settlers are also bad buys compared to the massive hammer leverage on building them by exploiting starvation and Collective Rule. Two scouts and a worker would spend down all the treasury and ramp up the fastest. Not even El Dorado can buy population, but the indirect way is the scouts to go find survivors ruins.

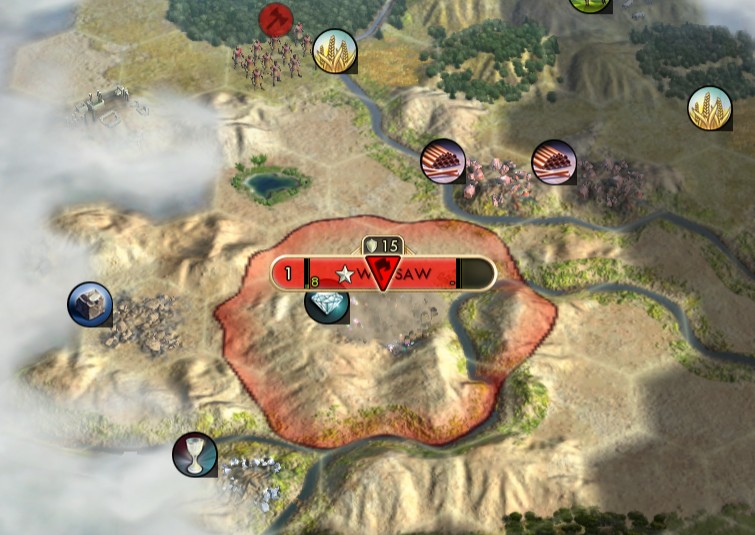
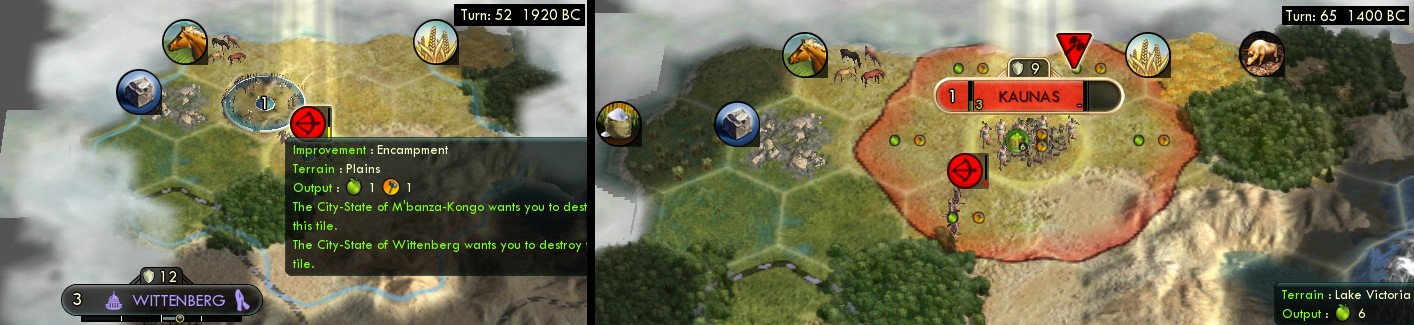
And so this is what the exploring looked like. Three units side-by-side covering the entire width of the land between the edge and the inland sea. They found a continuous stream of ruins, of course, each scout getting a new one every two or three turns. Picking up the list to this point: map, archer upgrade, turn 18 third culture, t19 55 gold, t21 big faith towards the prophet, barbs, map, Writing, and the northern ruin in this picture finally gave that warrior his spearman upgrade.
That spearman immediately got tribute from both M'banza-Kongo and Genoa here. (Not Hong Kong, note its higher strength value from being on a hill.) That plus the first-contact gold from all these city-states came to enough to buy the second worker now on turn 22.
And two more tributes just a few turns later. This would continue on for several more shots, then eventually peter out around turn 40 as the strength values of the city-states started to increase past the 11 of the lone spearman.
The south front looked the same, with three scouts sweeping up all the ruins across the land together. One of those gave population bringing the capital to size 7, and another gave a big 90 faith towards the second prophet. Actually, those three "scouts" have all now been ruins-upgraded to archers and would start to divert their attention to camps, more in a bit.
I don't have time or space to continue illustrating every single ruin that happened. Here's the full list condensed for brevity. Turn 23 finally came more survivors to size 4 after a gap of about ten ruins, t24 second big faith, map, t26 fourth culture, t26 85 gold, archer upgrade, map, t28 fifth culture, t28 pop to 5, t30 50g, barbs, map, t32 half of Animal Husbandry after half-researching it, t33 third big faith which was pretty much wasted because already over 200, t34 95g, t34 pop to 6, t36 The Wheel with one turn left on normal research, t36 85g, archer upgrade, t40 pop to 7, t40 big 90 faith, map, Trapping, barbs, archer upgrade, t56 pop to 8 nice, t56 70g, another culture (sped Consulates by a turn), t57 population again to size NINE!, barbs, t59 70g, t59 population again but now it didn't go to the capital, barbs, map, t61 culture, t61 another upgrade, barbs, map, t64 80g, t64 Sailing, t65 another culture, map, t70 pop also not in the capital, t72 90 gold, t76 culture, barbs, t83 yet another population, t83 95g, t86 culture, barbs, t103 80 gold, t107 culture, t109 map, barbs, t110 culture, t110 75g, map, t115 culture, barbs, t125 map, t126 culture (this is crazy, six culture ruins past turn 75, which all added up to less than one turn worth now).

Back home, Collective Rule came fast on turn 26 after a total of four culture ruins. Population ruins had taken Warsaw to size 5. So here it is building settlers with that starvation loophole, -8 food per turn vanishing into unaccountability. And I carefully managed the overflow from those settlers onto escort archers while spending minimal turns actually building them. The partial progress into this archer had come before Collective Rule itself, set up so that I'd then be able to complete it in a single turn with the overflow from the first settler.
So the starting build order was three scouts - monument - archer - settler - archer, and then mostly alternated between settlers and archers built with the overflow. The research order was Mining - Archery - Masonry - Animal Husbandry, with ruins filling in Pottery, Calendar, and Writing. Then up to Mathematics - Currency and to Civil Service.
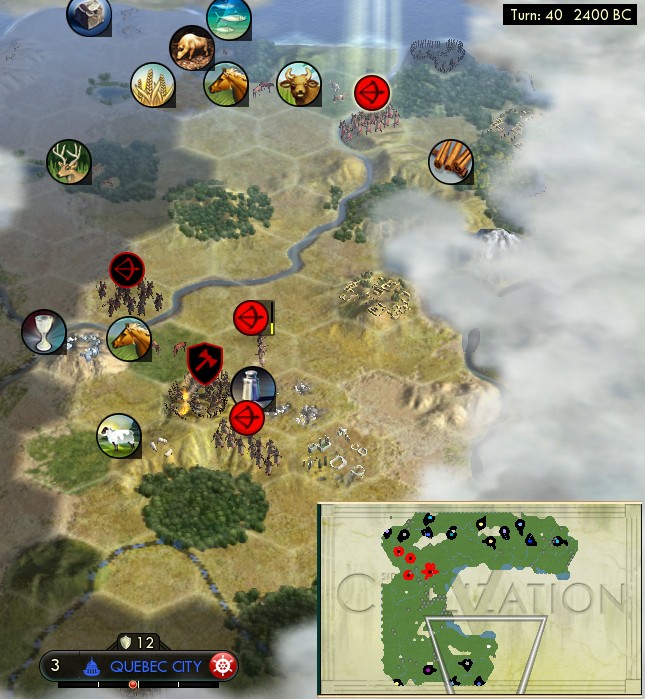
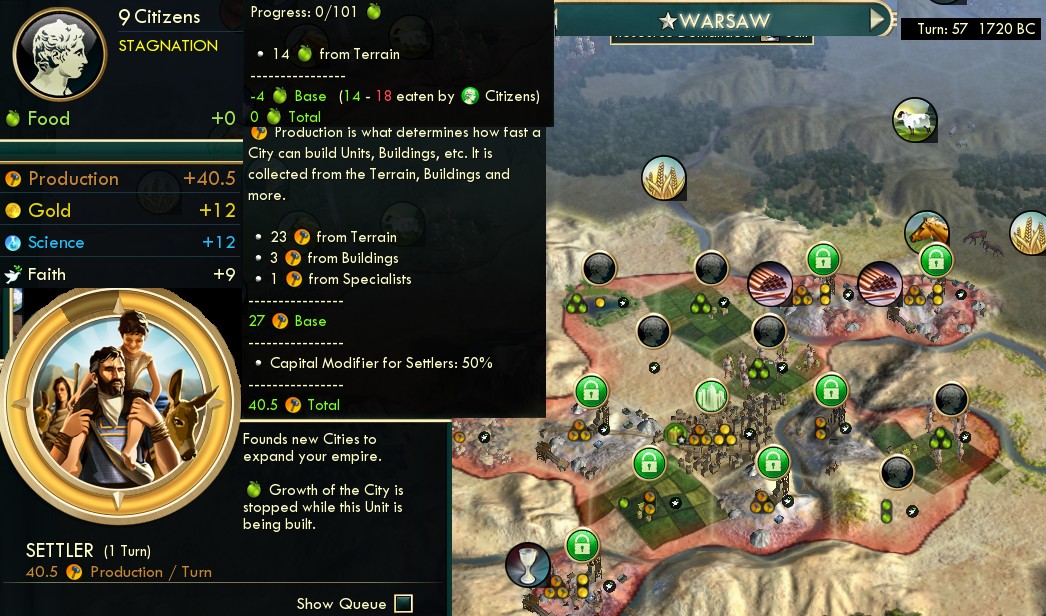
Here I am out to four cities in 38 turns. Can you spot the important aspect of this city layout? It's that all the newer cities are built towards the corner, behind Warsaw, farther away from the rest of the map -- to make sure that all the survivors ruins keep going to the capital! Warsaw is at size 6 here, and would eventually get all the way up to 9 entirely from ruins.
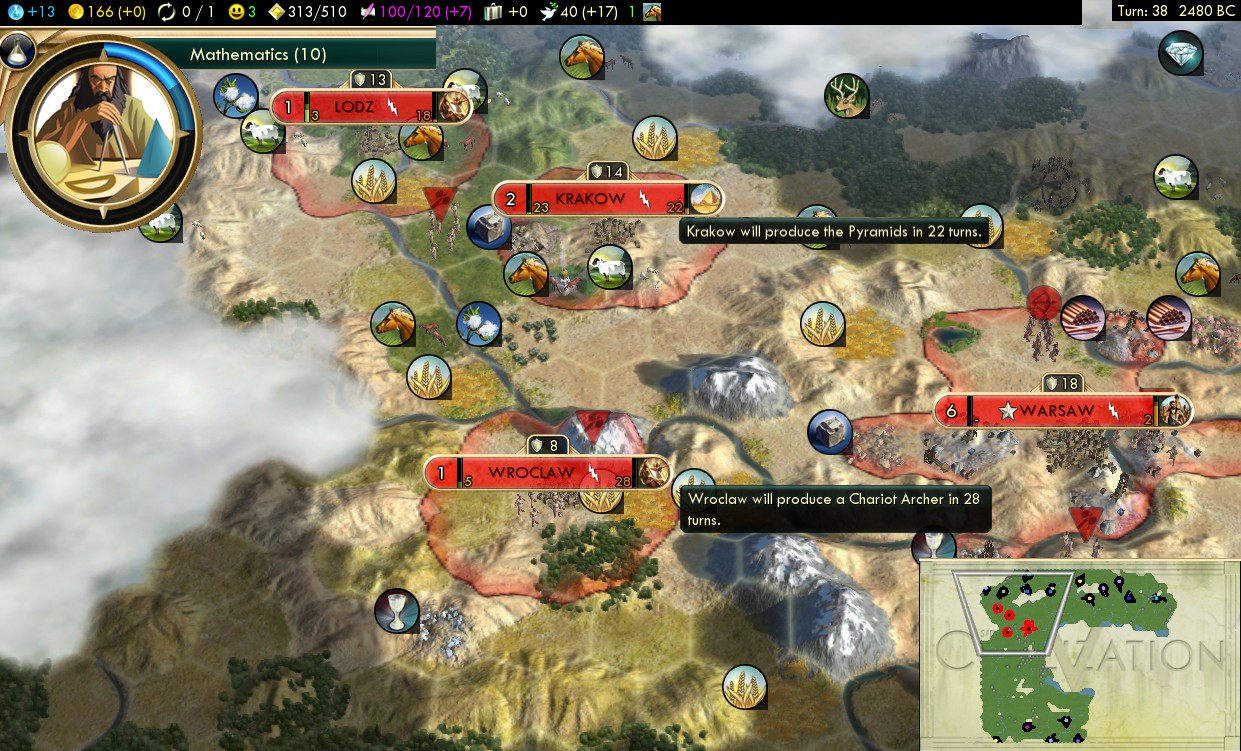
Krakow is doing the Pyramids as is usual for my second city. I liked this location even though it was off the rivers, positioned for stone and sheep and horses all for hammers to build the wonder quickly. Thanks to the super early pantheon and several faith ruins, I got my first prophet early on turn 35. He settled to improve the horses right away, with which Lodz and Wroclaw are each building a chariot archer to get out and start clearing camps for the city-states.
I had some satisfying tile juggling between Krakow and Lodz. Both of them can reach both the wheat and stone tiles. Krakow first used that wheat to grow to size 3, then focused on max hammers for the Pyramids. Then Lodz grew on the wheat, then took the stone for max hammers on the Great Library once Krakow finished the Pyramids. This was possible thanks to lots of worker labor from lots of city-state money: purchased on turns 13 (with El Dorado), 22 (with tributes), 30 at Krakow upon its founding, and 38 at Wroclaw upon its founding.
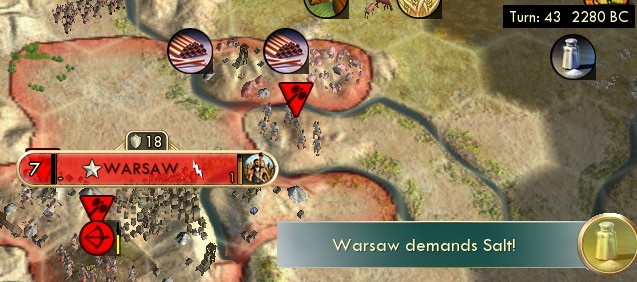
Nice stroke of luck: Warsaw demanded Salt, which would be coming timed just right to connect it for King Day as the city would complete Petra and start growing for real.

And a classic worker steal up near home. As always, a religious city-state isn't important to befriend compared to Desert Folklore. And I discovered (can't believe I never noticed this before) that the game will leak the presence of a worker with that "N turns to construct an improvement" text in the mouseover, even if you can't see the tile! As usual, I kept this war active until stealing a second worker about thirty turns later.
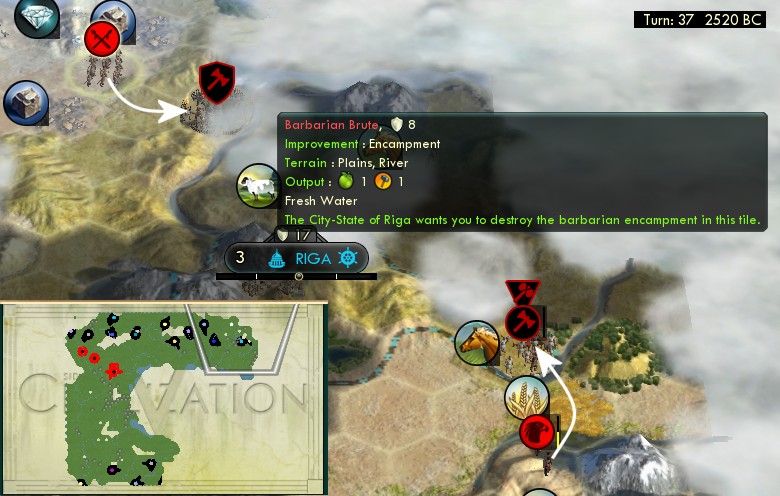
And here's a great episode. All at once, my exploring units happened to come by maritime Riga just as it both issued a camp quest and got a worker captured by a redlined unit that my scout could kill and return. So I got my first maritime ally on turn 40, faster than ever before by a good margin. And the ally also means that the scout and spearman can both use the friendly territory to heal quickly.
Let's gauge the impact mathematically. According to the demographics, my entire civ was producing 26 food and 27 hammers total before the alliance, minus 22 food consumed, equals +31 net hard production. The maritime ally added 6 food - or nearly 20% of my civ's entire net productivity.
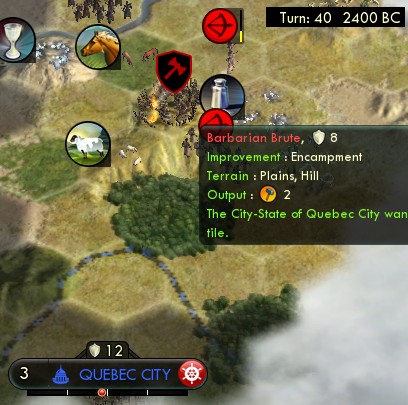
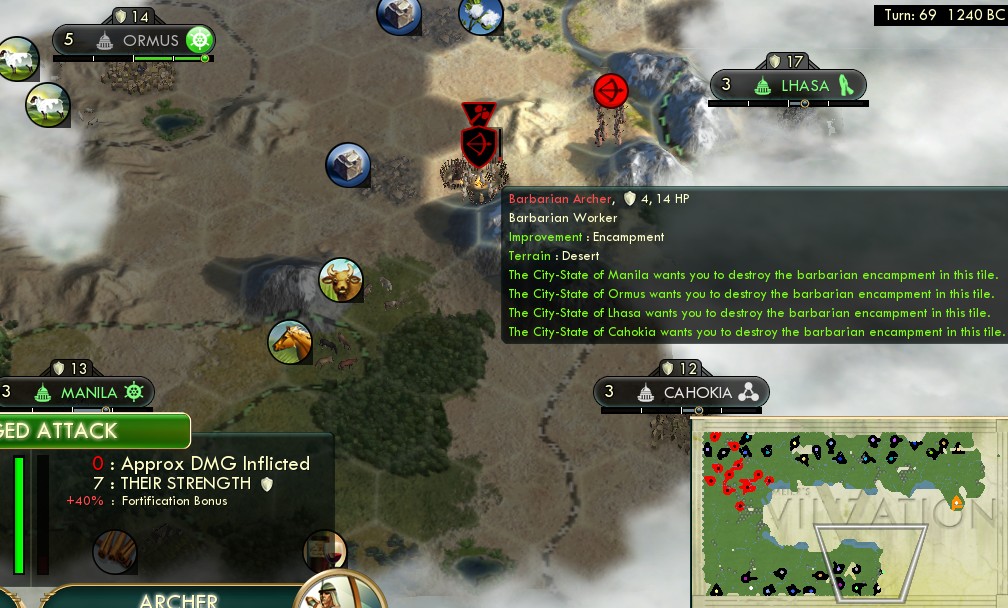
I followed that up on the south front, where one of the three archers peeled back from the front line to take out this camp for Quebec City. I didn't get a worker recapture, but decided it was worth the 250 gold to top up the friendship into alliance.

More camps on the south side. Vilnius and Prague weren't maritime, but still welcome. I had already returned a worker to Byblos, so the camp made for my third maritime ally. Notice how I made sure to walk that archer over to contact Manila before clearing that camp. Manila didn't have a quest for that camp, but did own that worker, and contacting is required to be able to return it. (It was a hostile personality though, so not good value to buy into alliance.)
")
Here's a look at 50 turns and six cities. What's going particularly great here is the luxuries. Warsaw has three, plus cotton at Krakow, spices at Gdansk, and Poznan is founded on top of gold luckily placed at just the right spot to fit at a legal distance from Ife and Hong Kong. This was something I hadn't realized about Abundant Resources. It's known that this option creates more copies of the same resources, but doesn't add new types of luxuries. But across several maps I found that there really were consistently more luxuries available. The extra copies get spread out geographically, and so Abundant Resources does end up placing more luxuries within reachable distance.
In this picture, I also got the second prophet and founded the religion. That's my usual plan: settle the first prophet as a holy site, in order to delay the religion, so that cities founded after that still get the Desert Folklore pantheon automatically.
And here's Warsaw at the peak of its starvation-settler powers. Actually it isn't even starving all that much now, with maritimes propping it up. But that's still 40 hammers/turn into a settler where it would be getting only 23 into anything else (the base of 27, minus the 4 units of food that we'd have to work instead of hammers.) This settler really only cost about 60 hammers of opportunity compared to any other item, not the face value of 106.
Policies: Collective Rule on turn 26, Citizenship on t41, Patronage on t47 by Poland's classical era freebie, Consulates on t57, Meritocracy on t68 perfectly timed to rescue me just as I was most crunched on happiness upon founding my last city but before the last few luxuries got improved.

Sadly, this is the one and only thing that went wrong in this game. I lost the Great Library. Even with only one AI civ in the game, they went for and built that as fast as any AI on Prince difficulty ever can. I couldn't have done anything about it, though. Building it in my second city wouldn't have completed fast enough. Building it in the capital would delay the stream of settlers and the entire game by more than the GL would gain. You guys have no idea how many games I quit for missing the GL or Pyramids when I was counting on them (this usually happens one or two times for every published report.) But here, I had to figure that El Dorado had gained more than the missed Great Library would lose, and had to press on.
Shortly after that I finally did contact my Dutch opponent. They had 2 gpt available so I sold one horse for that, and we swapped embassies. Later on the Dutch would also build Stonehenge and Parthenon (all AIs love that one). I would have considered both of them eventually mostly for city-state quests, so no real consequence to missing those.
I got the happiness Golden Age very early, on just turn 61. That's thanks to settling the capital on top of a luxury. That makes a big difference here, that extra +4 happy from turn ten (when you research Mining) adds up to a hundred points on the Golden Age happy counter and tens of turns saved. Turn 61 might actually be a bit too early and suboptimal for the golden age, but probably can't actually be bad.
Tech also went quickly thanks to popping so many (four) from ruins, even without the Great Library. I got Currency on turn 59, started Petra on t61 and finished it on t68, both records. Then straight up to Civil Service.
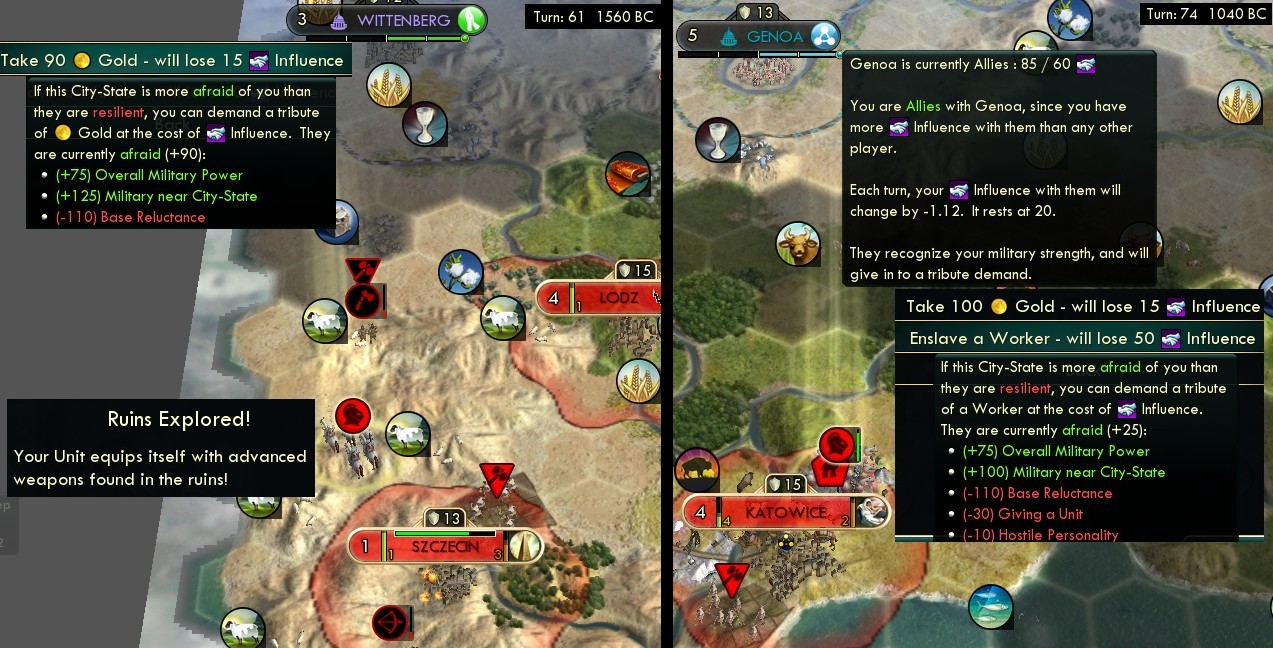
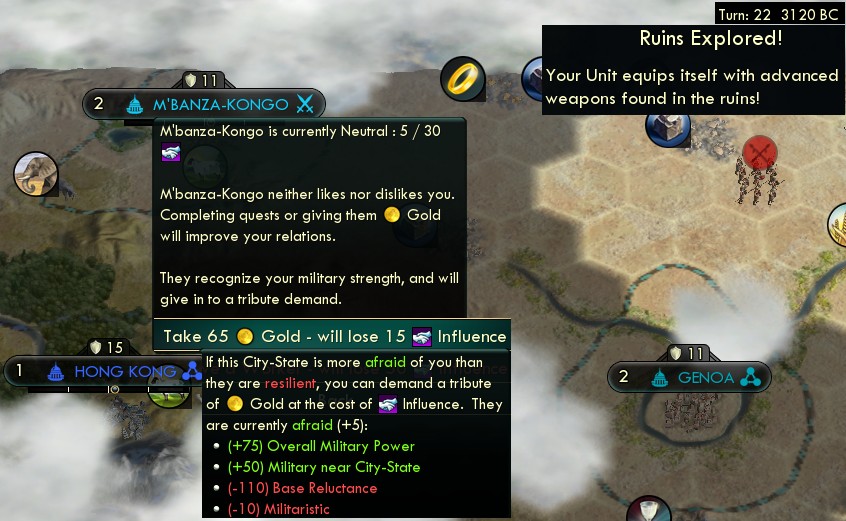
I said I wouldn't chronicle every ruin, but here's a particularly interesting one. I built a chariot archer in Lodz to go fight barb camps for city-states, but first needed it to come over here and fight off some of my own barbarians. It also happened to discover an ancient ruin that I'd missed on the edge over there by Szczecin... and pulled an upgrade to a KNIGHT! That was enough to immediately tribute Wittenberg again. (I also kept that worker that the barbs had also stolen from Wittenberg.)
And a little later that knight finally got going on his mission... and found himself able to tribute Genoa here not just for money, but for a worker! That's a prize big enough that I was willing to sacrifice the mercantile alliance. I didn't need its luxuries (had other copies elsewhere), and figured that any one more quest later on would refresh its friendship.
Like the ruins, I also can't chronicle every camp clear, but here are some of the more interesting incidents. This camp itself wasn't remarkable (but M'banza was my first militaristic friend and that first free unit does matter), but the important part was that it lured me all the way into the corner of the map where I never would have bothered to explore. My archer up there found two new unique luxuries in sugar and truffles, worth settling a city for, plus that's also a lucrative natural wonder over there.
And here in the south I got a four-for-one camp clear (five including the worker), don't think that's ever happened before. The worker belonged to Ormus, and that and Manila became my fifth and sixth maritime allies, although Manila would wear off soon and wasn't worth rebuying as a hostile personality.
I will leave off showing the rest of all the cleared camps, so here's a list of most of them to summarize.
- Turn 59 I cleared another camp for a maritime and bought it into alliance
- t77 camp & worker for Wellington for 6th maritime ally
- t79 camp for Cape Town for 7th maritime, then paid to refresh it
- t87 camp & worker for Vancouver for 8th maritime
- t87 camp for Ragusa for 8th maritime (after Manila wore off)
- t91 wine quest refreshed Manila into 9th maritime ally
- t96 camp & worker for Monaco, 6th cultured ally
- t98 camp & worker for Bratislava, 7th cultured, same camp for Melbourne, 9th mercantile friend
- t101 camp for Jerusalem (2nd religious ally) and Belgrade (3rd militaristic)
- t106 camp for Ur (10th maritime ally) and camp and worker for Milan (8th cultured), later got an Ur worker to refresh it
- t107 camp & worker for Budapest, 4th miltaristic
- t125 camp & worker for Prague, 9th cultured
I didn't keep track of other quests, but got quite a few natural-wonder rewards, and a normal amount of resource hookups and wonders.
")
Here we are at the date of 1000 BC that I always use as a major checkpoint. I just got Civil Service, two turns ahead of my rule-compliant record game even without the Great Library this time.
SIXTY population at this date! Two-thirds more than the 37 in my record game! This stretch of the timeline is all about racking up those maritime allies. And my beaker production of 84 is similarly ahead of the 48 in the other game, thanks to having most of the libraries done already. Of course this isn't a fair comparison between the games, this one rigged so heavily for ruins and city-states (not to mention El Dorado), but I was having fun with it anyway. I saved this game setup for last, because I knew I'd never want to go back under the CFC HOF rules after breaking out of them.
I also arranged good use of caravan trade routes. The three newest and weakest cities (Szczecin, Kaunas, and Katowice) each got a food trade route, so they could skip their granary and go library first.
And I've got plenty of happy headroom to keep going. This is actually what I was most worried about on this map setup, without other AIs to buy luxuries from. I usually buy three or four luxuries by around this time, a happiness margin that would be hard to cover from other sources. I covered that gap here with some of everything: mercantile city-states (seven friends for 3 happy each), many native luxuries of my own (seven now and two more coming), plus Meritocracy operating quickly with road connections thanks to all those early purchased workers.
I also had quite a few cultured city-states on my side, 64 culture/turn is a lot here. That currently pending policy on turn 75 is the Tradition opener, and the next regular policy on t79 would be Aristocracy, timed just right to speed the National College as we researched Philosophy next and completed that last library in Krakow. After this, all of the next few policies would be saved to dump into Rationalism immediately.
 Heh, this is what happens when you take the Tradition opener at a moment when there's already a lot of culture sitting in a city's storage.
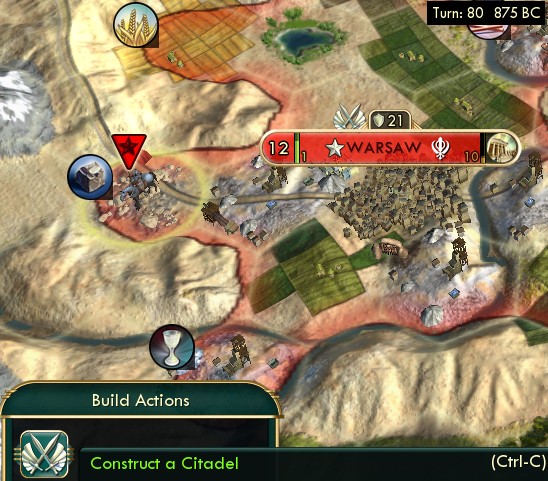 I got a Great General quite early from all the barbarian combat (barbs give GG points from ranged combat but not melee), and made my typical use of grabbing a bunch of desert hills for the Petra city.
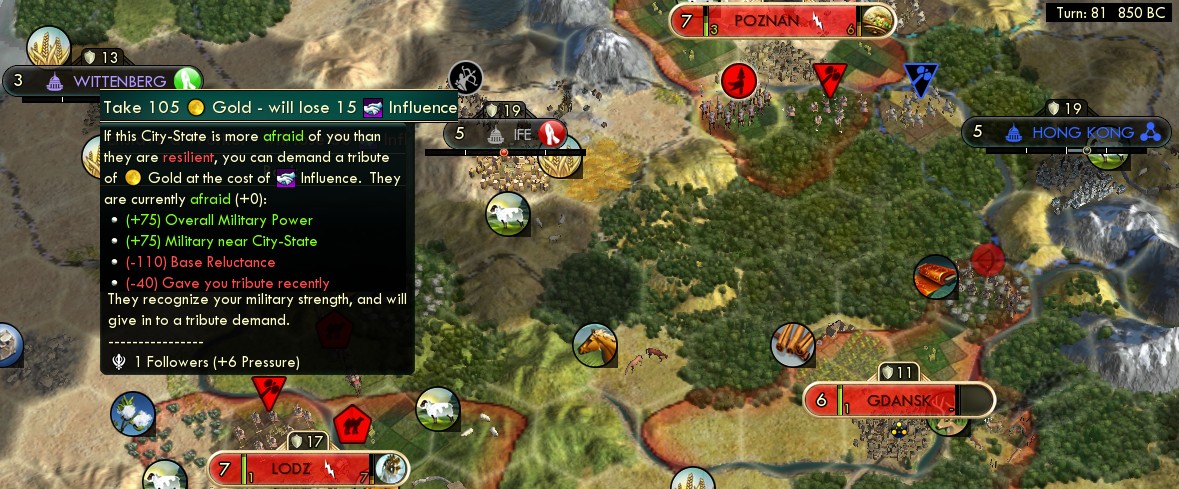
One consequence of getting to Civil Service early: I got a pikeman from a militaristic city-state. He was placed perfectly and strong enough to hit up all of Wittenberg, Ife, and Hong Kong for tribute right here, another 300 gold worth. Also the knight mentioned earlier kept collecting a few more tributes of his own. I spent this money on refreshing maritime alliances. Then I realized it was already time to stop spending on that -- and already start saving to buy schools!
It's hard to convey just how much fun I was having with this game. It was a blast. I had loads of money from all those tributes, enough to easily buy tiles when needed (mostly luxuries), something that's often a problem. I had more than enough happy thanks to the luxuries and mercantile city-states. I kept finding more and more ruins and more camps to clear, lasting well past turn 100, quite a bit longer than I might have expected. This game felt like it was going as perfectly as it could, aside from the single smudge of the lost Great Library.
My cities progressed smoothly up their build queues, which is a big part of how satisfying I find any particular game. They went granary - library - monument - circuses where possible - watermill - university - aqueduct. I enhanced the religion right at the time for Religious Community to help build universities. The capital fit in the National College just before its university, another important point; sometimes the NC gets delayed a long time behind other wonders, but here it fit because Chichen Itza waited until much later since the happy Golden Age had passed early. The capital also added the Hanging Gardens, although late enough (turn 95) that it didn't make a whole lot of difference.
In this game with Policy Saving turned on, I judged that the most important concern was to reach the Renaissance as fast as possible to get all those policies into Rationalism. So after Civil Service, I went directly to Education and then Acoustics. No time to spend going up to Engineering or a better Renaissance entry point; the lost turn-value of the Rationalism policies would not be recouped by anything from those techs. I always want to build the aqueducts before universities, but this game would have to do those in the other order. And if there's any method to withstand the aqueducts coming that much later, it's gotta be possessing nine maritime allies.
I reached Education at the fantastically early date of turn 88, twelve turns faster than the legitimate record game, although this one didn't go to Engineering yet. And turn 95 reached Acoustics and the Renaissance.
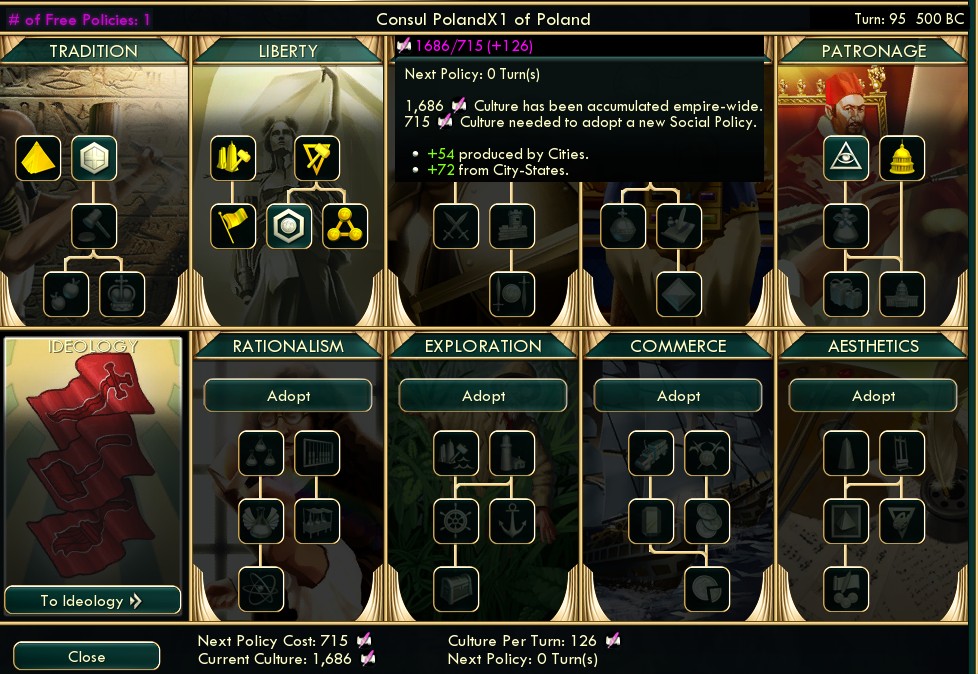
Here we are with two regular policies and Poland's freebie all going into Rationalism immediately, and the Oracle would follow one turn later. I was saying "all those policies", but it was really just one saved policy (the 8th normal one.) Poland usually gets three into Rationalism right away (9th normal, Ren freebie, and Oracle) and so Policy Saving only actually put one extra into Rationalism. But that one was Free Thought accelerated by 10 turns, which does account for about two turns worth of research in that time.
The one thing that went slightly wrong here was the timing of the religious sequence, which lagged behind some of my other benchmarks. I didn't have a ton of desert, only about half my worked tiles. The cities grew too fast and didn't convert at small sizes, so I needed two additional missionaries beyond the usual first one. And the Renaissance came so quickly that I only got half the pagodas before that. I ended up paying the inflated 300 price for the other half of the pagodas, and even 400 for the last one in the industrial age. Still, I would have enough faith to reach 5000 for three scientists by endgame, and that's the only thing that matters for faith after the pagodas.
After Acoustics, I backfilled to Engineering, and then on up to Printing Press, reaching that on turn 108, still ahead of the record pace by about 12 turns. In the policy department, the next (10th normal) came on turn 107, and I had enough culture for that to fit into Sovereignty now and still get to Mercantilism before schools. As always, Poland doesn't merely gain more policies, they also get a lot of flexibility on timing them.
")
An overview at 1 AD. 145 population, 10% ahead of the previous record game. That's good, but not by as much as I might have expected. It's not all that much greater to have 11 maritime allies instead of 9. The aqueducts came later, delaying some growth. And I started to miss out on some growth potential in the form of missing We Love The King Day. I hardly got any of that through the second half of this game, since any luxury demands that I hadn't acquired by now (marble, citrus, pearls) would never come available from anywhere, unless I started extra settlers chasing halfway across the world.
On the verge of Industrialization here, as I've come to optimize for these science games. When you don't have Jesuit Education to buy the schools, it's worth delaying Sci Theory by one tech for a wide array of concerns that dovetail together perfectly by doing Industrialization first. This allows all of the following (I like lists):
- start Big Ben in the capital and finish it just as we reach Sci Theory to use the discount to buy schools
- an extra few turns of culture to reach Mercantilism for the other stackable discount
- an extra few turns of cash income to buy the schools
- enable the industrial-age increased values for city-state culture and faith sooner
- build three factories (in three other cities, parallel with Big Ben) to get the ideology.
And so I got to Sci Theory on turn 124 (11 turns ahead of the previous game) and immediately bought eight schools (three more than previously.)
From here on, this game went pretty much like a standard setup would. I was ahead in turn count, but now not accelerating any more per turn, there wouldn't be anything new from here onwards to go any faster. I'll summarize on a few of the differences.
One difference was that I never built either Notre Dame or the Forbidden Palace. The extra mercantile city-states had supported me on happy throughout the entire renaissance. And the faster tech pace meant that something had to get squeezed out of the capital's build order. By the time the capital's queue cleared up from more important items (National College, university, aqueduct, Hanging Gardens, Leaning Tower, Big Ben) and I could think about the happy wonders, I had reached the Freedom ideology and Universal Suffrage which ends happy trouble for good.
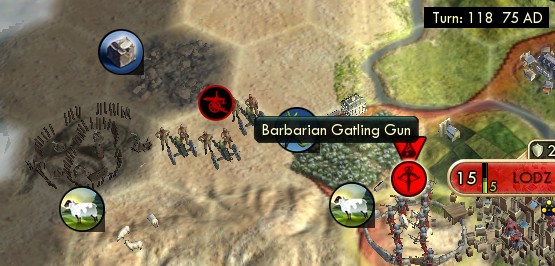
And this was a minor headache. Barbarian Gatling Guns? It appears that barbarians can get a type of unit once half the civs in the world have the tech. With only two civs on the map, now of course half of them (me) have Industrialization. That doesn't happen in games with a full roster of AIs. I would now see gatling guns at most barbarian camps, which really stalled out my leftover archers trying to clear them. This was kind of funny, an arms race with the barbarians I could never win, since they'd get advanced units exactly as I would! They also got Infantry a little while later, and it was pretty funny to watch a barbarian infantry stomp all over a city-state that had far inferior units. That even worked to my advantage, since barbs killing city-state units would reduce their tribute resistance.

I did have noticeably more culture than a regular game, well over 300/turn, thanks to nearly twice as many cultured city-states on the map. Cultured was actually the most-increased category of city-state. In regular games, I rig to get a list heavy on maritimes and mercantiles. Enough so that there aren't all that many more in the roster of potential picks. The extra slots actually get filled by cultured more than any other type, because there are more available to add.
This brought in policies at intervals of about 7 turns, surprisingly fast. I got the Commerce opener on turn 112, Landsknechts on t117 with Poland's industrial era freebie, Mercantilism on t120, the Freedom ideology for its two free tenets plus Universal Suffrage on t127. Policy Saving helped me there, that last policy needed to be saved for one turn until the ideology opened.
Next I spent my first two Great Writers for two more policies up to Volunteer Army in the ideology. Why not Scholasticism as in the previous game? It turns out that the beakers from Scholasticism don't count towards the value for scientist bulbs, making that less important than I'd thought. I now judged that it was more important to get the Foreign Legion units going for more city-state tributes. Next came Wagon Trains on t132, also assessing money as more important than those beakers: every lab-turn gained was worth more than a Scholasticism-turn. Finally then the modern era freebie (t137) went for Philanthropy and the next policy on t141 for Scholasticism.
From the moment of Civil Society and Universal Suffrage on t127 onwards, I ran every possible specialist slot and trading post with little exception, just occasionally switching a merchant specialist to a food tile to get a city to grow. Everything is now about the beaker total; no action that foregoes beakers will ever make it back up in the short time remaining. The big key is that every beaker produced now gets multiplied by scientist bulbs. Since I spend two scientists between Sci Theory and Plastics, that means that every beaker produced now gets multiplied by 16 virtual turns, and it only goes up from there as I spend scientists faster. I've learned how to optimize the endgame so that science is the only limiting factor. Bulb to Rocketry as soon as you can, use the Rationalism finisher to sling Satellites, and have a second strong production city for the Apollo Program while the capital builds Hubble. Those will complete faster than the last scientist that's needed to get to the end of the tech tree.
So here it went:
- t136 bulb Steam Power, overflow to Rep Parts
- t137 bulb Radio, overflow to Plastics, buy 5 labs right away
- t138-t145 research Chemistry, Fertilizer, Military Science, Dynamite, Navigation, Archaeology
- t146 bulb Railroad (a full 9 turns after Plastics for nearly full value of 13000 beakers), overflow to Flight
- t147 overflow to Ballistics
- t148 bulb Electronics for 13900, overflow to Radar
- t149 the big combo turn. Bulb Rocketry, use the atomic era free policy for the Rationalism finisher for Satellites, start Apollo and Hubble. Overflow to Combustion.
In policies, I actually ended up getting one more than usual even in ten fewer turns, thanks to the huge amount of city-state culture. I took Space Procurements surprisingly early on t143 by the Statue of Liberty, since the last two relevant policies had to wait a moment (the Liberty finisher until after all the scientists, and the Rationalism finisher until Satellites was open to take.) Then the information era freebie policy turned out to have nowhere important to go. The next available policies in each tree were all blank: Oligarchy in Tradition, Cultural Diplomacy in Patronage, Entrepreneurship in Commerce, anything in Freedom (all junk after the specialist enhancers), or the Aesthetics or Exploration openers. I considered the Honor opener just for the bit of power against a few more barb camps.
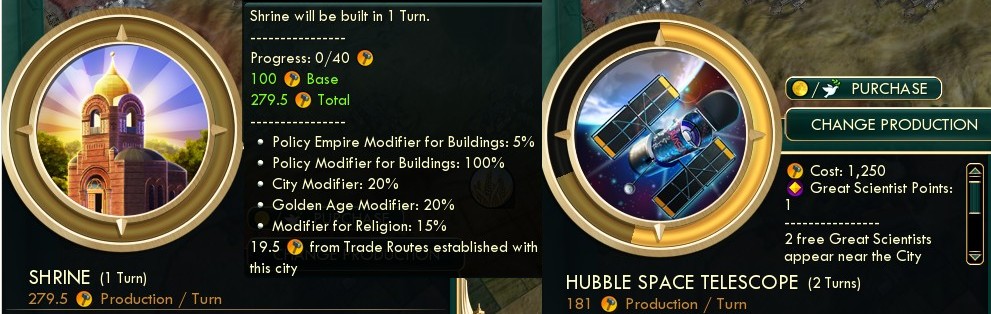
But then the answer hit me: the Piety opener, just to enable the good old shrine-overflow trick for Apollo and Hubble!
")
A look at my city-states. I didn't quite get all of them as allies, but good enough. Normally you keep up city-state alliances in the later game with spies, but I actually forgot to assign them for every election cycle after the first, hah.
")
And a look at the end game. 184 population here is actually less than in my previous game, but I think I did it correctly this time in switching sooner to more trading posts and maximum specialists. That also meant I was comfortably on track to have enough money for the spaceship (11k total with Big Ben and Mercantilism.)
t152 spawned the last great scientist, at the 800 GPP threshold. Then I took the endgame scientists as always from the Liberty finisher, Porcelain Tower, and Hubble. In fact, then I overshot the end of the tree by one entire surplus scientist. Although I really couldn't have cleaned up the timing there: the 800 GPP scientist and the third faith scientist came at the same time. At best, I could have saved just one turn (because I only had one tech between Plastics and Rocketry that wasn't 1-turned anyway), which would have required both one more bulb before Rocketry and more attention to religious city-states to speed up that last faith scientist.
So the endgame came together almost perfectly. Hubble and Apollo both completed on turn 155. At the same time, I had accumulated enough gold for the spaceship, with just enough after selling the research labs. So on turn 155 I directly bulbed all of the last four techs with four of the last five scientists, bought all six parts, and won on turn 156.
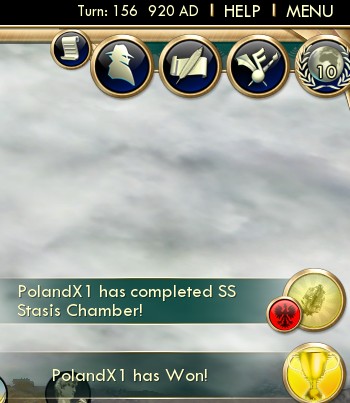
Twelve turns faster by going renegade than by complying with the CFC HOF rules. And also I cracked 1000 AD to finish in the first millennium, not that's any real relevant benchmark but makes me feel accomplished anyway.