I was ready to hang it up on Civ 5 during my previous game. It actually sat unfinished for three months while I just never felt like coming back to it. But in the back of my mind I still had the temptation served up by this post. Blatc on Civfanatics got a science victory all the way down to 125 turns on Settler. I couldn't resist that proposal. Settler difficulty allows you to pop settlers and workers from ruins, which of course the Shoshone will abuse to the max. I'm ready to ditch any semblance of dignity regarding difficulty and setup; now my goal is the absolute fastest science victory possible by any and all shameless means. And I'll shorten this report somewhat to mostly highlight what turns out differently on Settler.
Setup: I went with a large map rather than huge. I found previously that with the setup rigged for only one AI opponent, the huge size wasn't really necessary. Picking up 70 ruins was fun, but really they're not all that impactful beyond about turn 40 or so. With only one AI, a large map still has enough space for enough ruins to yield all the settlers I'll want. And CFC HOF rules had me on huge maps to get the maximum standard number of city-states (24), but the renegade setup lets me pick the real max of 41 on any size map. Finally, the real most important aspect of a smaller map is considerably less distance between city states so it's much easier to reach them for camps and tributes.

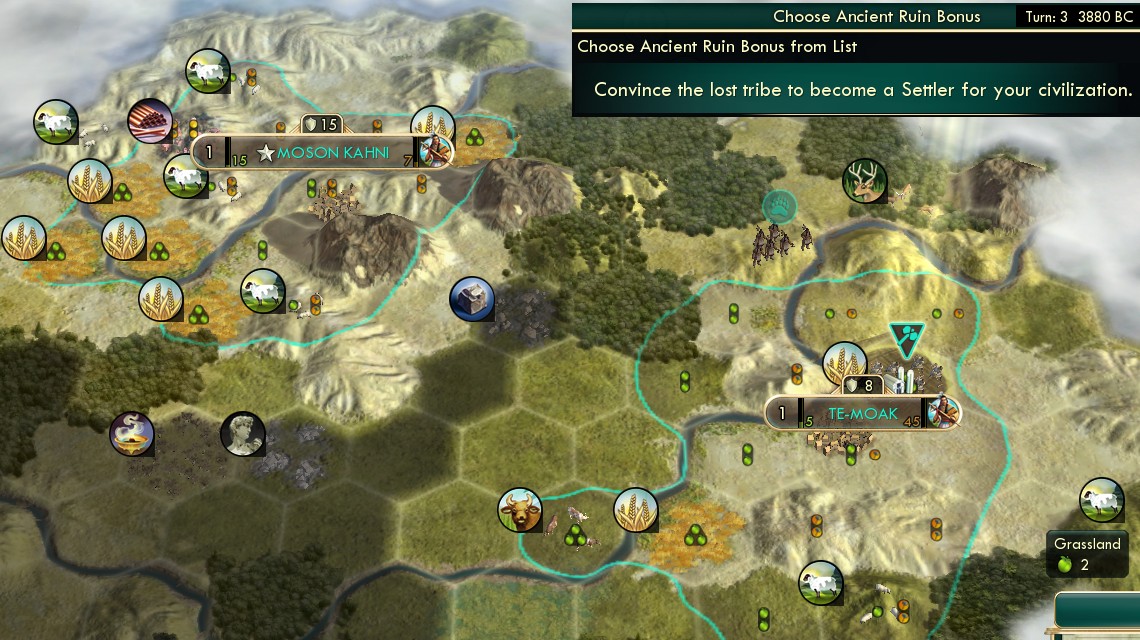
But I also found that going down to a standard-size map (left side image there) was too small. The city-states don't do that clustering on the north and south edges. They cover the entire map leaving no room for my own cities. But a large size (right side) does cause that pattern, and so there's the sweet spot of balance between enough room for the city-states and myself.
Full recap of the settings: Settler difficulty, Inland Sea map, large size, max 41 city-states, minimum 1 AI opponent (Dutch), hot climate for desert, young world age for hills, Abundant Resources, Enable Policy Saving. This is deliberately noncompliant to CFC HOF rules but I don't care. As described previously, I rerolled from the game-setup screen until getting a favorable mix of city-state types with 12 maritimes.
I had to walk my starting settler three turns to that capital site, but holy spectacular crap! FIVE wheat, four sheep, tons of desert hills, even a mountain.
My pathfinder also already found a ruin for my first free settler, which has a nice quality spot too with double wheat, three animals, gems offscreen. And then he even found a second ruin for my first free worker as well. This worker stayed at Te-Moak, reasoning that there was more likelihood that the next free worker would come from closer to the capital.
The third ruin was actually popped upon settling the capital by the Great Expanse ability, so without the pathfinder choose-your-ruin ability, but it yielded gold (65) which was good enough.
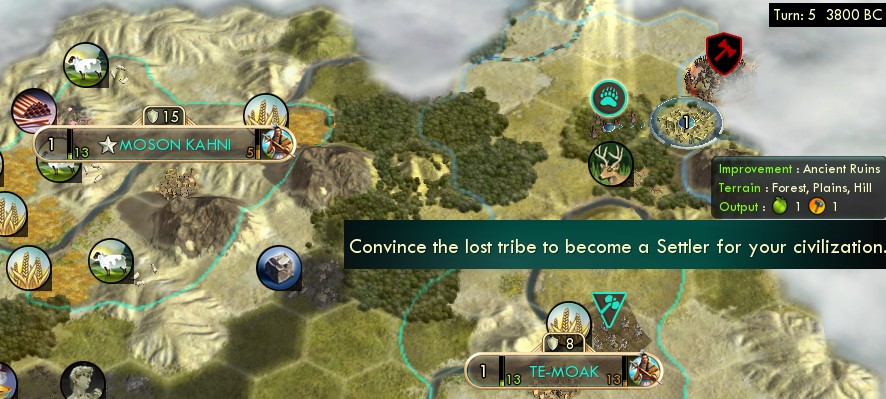
The fourth overall ruin was my second chance to take a settler (as always, each ruin forbids your previous two outcomes, so after every three ruins you can cycle among the options you want.) This area was poor land to settle the next city; past that barb camp was bare desert. But that's okay, I have this plan.
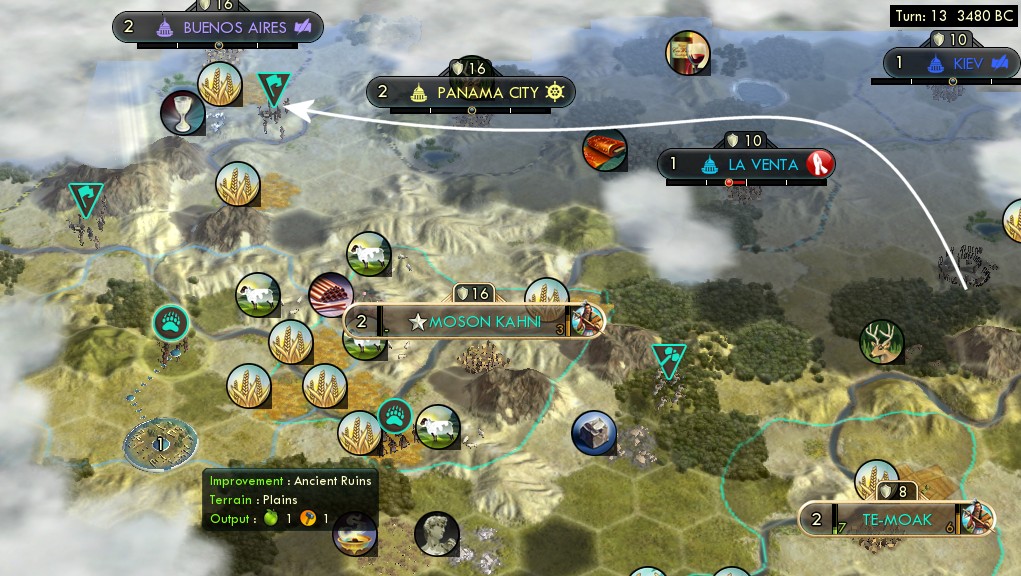
I used that settler to scout through the northern latitudes where I knew the city-states would be. A pathfinder is somewhat wasteful to send exploring around city-states, since a pathfinder doing that isn't finding ruins. But I was quite okay with the settler doing so. The city-states yielded enough gold to buy a pathfinder (the one south of the capital in this shot, who had previously tributed La Venta before moving.) I also have the next ruins-popped settler also going west, and both would shortly find good desert sites.
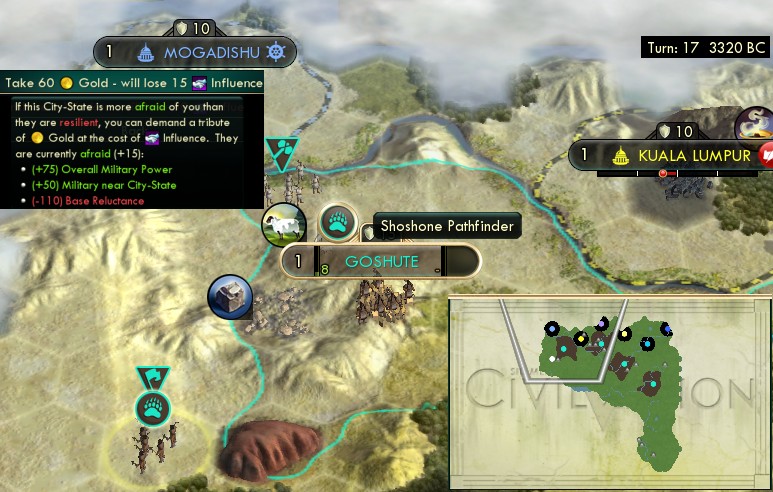
Here's one of them. That's the Uluru natural wonder (2 food 6 faith), which got the Desert Folklore pantheon. I was also learning the value of planting cities far from home, as a place to buy more pathfinders right up on the front lines of exploration. Exploration, and also tribute - that pathfinder in Goshute was freshly bought and immediately tributed Mogadishu.
From here, I'm going to skip the play-by-play detail and give you a broader overview. I don't need to write out every single ruin and city and tribute. Just know that I stayed on a rotation of settler-worker-something else from the ruins for quite a long time. The something-else was culture twice, gold for a few rounds, then techs to finish out the ancient age.
By turn 41, I had 12 cities settled, all from ruins. Here's the overview, with two images needed because they were quite widely spaced.
")
")
I went to 12 cities, not as a result of any quantitative analysis, but just that it felt like about the optimal number. Also by this point I had exhausted all the ruins anywhere near home. Any new settlers would come from all the way across the map (look at the minimap to see how far the front lines of pathfinders now are from the actual cities), in places that would be too problematic to support with workers and military and missionaries. Prior to this, I had carefully paid attention to the order of which ruins I popped in which locations - I would often hold off for a turn or two so that I could sequence it to get settlers and workers near home and other stuff farther away. After this, I continued to take population from ruins whenever possible, mixed with gold and techs to finish up the ancient age.
Since the capital didn't need to build settlers, it went right from pathfinders to the granary and Great Library. That completed here on turn 42 to sling Currency, immediately followed by Petra of course.
Most other cities went granary first followed by library. The last few went library first and got a caravan food route, as usual. I had all the libraries timed to finish with Philosophy research and intended to do the National College, but ended up postponing it. The National College at 485 hammers is actually not a great deal. It's equivalent to a research lab (just about the same cost for the same +50% and +3), minus the scientist slots... which really isn't good hammer value compared to the other items that we need. In fact, I had to start the Oracle next instead in order to get both that and the university done by the time of the Renaissance. The NC eventually came in the late renaissance.

The major topic I need to cover on Settler difficulty is happiness. I had assumed you got some crutches, but hadn't known quite so incredibly much you get to cheat. The baseline for difficulty level is 15 rather than 9, but there's way more than that.
Settler difficulty gives a modifier of -60% applied to all anger sources, both city count and citizens. But consider the mathematical nature of this modifier. It doesn't mean 60% more population, no, it's more than that. It really comes to 1 / (1 - 60%) = 2.5x the population per happy!
Plus there's an extra +1 happy per luxury thrown in there. Combined with the -60%, each luxury will support 12.5 population, over three times normal! It's basically impossible to exhaust all that no matter how wide you build. I rode high at +25 or more happiness this entire game and never did anything to build any, not even pagodas. I even got a happiness Golden Age twice, that never happens normally.
Maybe this is why all the reviewers liked Civ 5 so much. They play on low difficulty and never see the tight happiness constraints. This game really made Civ 5 feel more like Civ 4 than anything I've experienced before. You're allowed to expand all you want, and it's up to you to decide if or when expansion will become economically negative. The only real constraint on expansion was the opportunity cost of what else I could be building instead of workers and settlers. The per-city tech cost penalty does impose a hard constraint; at 3% per city on a large map, cities beyond 33 can't ever be net positive on tech pace, but I can't see it being correct to get anywhere near that.
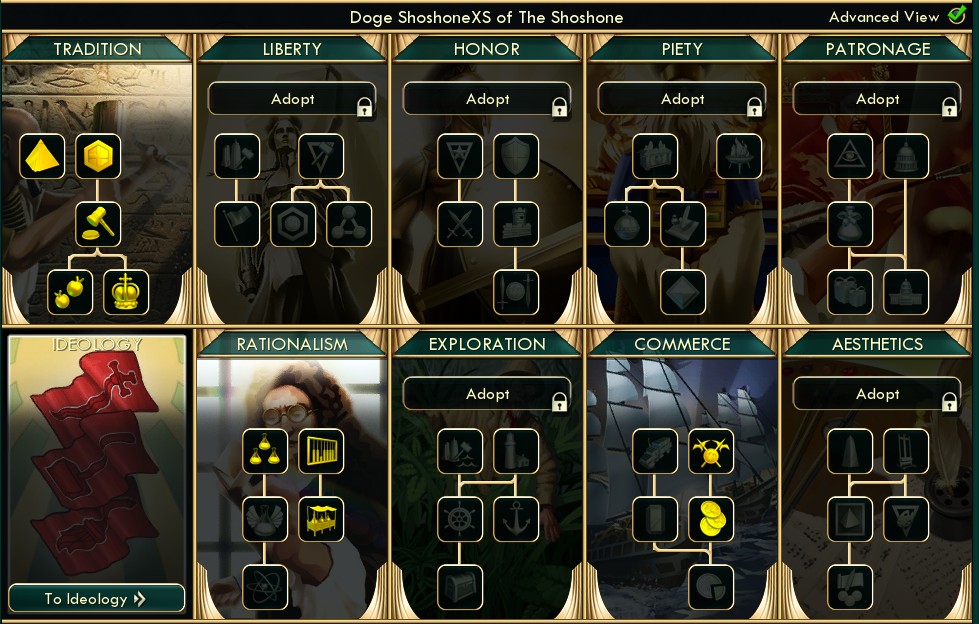
Social policies: I decided to simply go with full Tradition then the usual Rationalism and Commerce up to Mercantilism. The strongest feature of Liberty normally is Collective Rule, but that was moot here with ruins giving all the settlers. So Tradition seemed to be the natural way to go.
It also turns out that Settler difficulty gives you a fairly incredible discount of -50% on all social policy costs. (I never saw this in-game anywhere; I looked online for the info after noticing that the policy costs were so low.) Even that discount didn't really get me ahead, though, just kept pace with the rest of this accelerated game. Like the anger modifier, this number isn't what it looks like on the surface. -50% cost doesn't at all mean 50% more policies. It means maybe 20% more, but this game is going to be 20% shorter so the end result of policy count is just about the same.
Tradition finished on turn 48. I then saved two policies plus the Oracle to immediately dump into Rationalism when it opened on turn 69. Free Thought followed, then the next three policies in Commerce up to Mercantilism which as usual came timed right to buy the public schools.
In the end, I wasn't really happy with the Tradition plan. I hadn't known how huge the difficulty happiness cheats were. Normally, the easy happiness yields of Monarchy and Aristocracy are very important, but here they were superfluous. Particularly Monarchy was quite weak: the -50% capital anger applies (unhelpfully) multiplicatively with the -60% difficulty level discount, so Monarchy only saves 0.2 anger per population rather than the usual 0.5. I really wanted to find a better approach here.
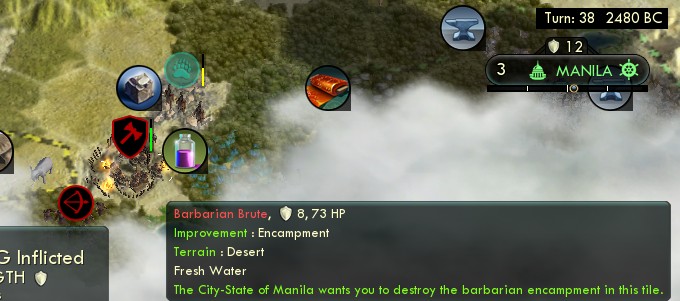
City-states: I got my first maritime ally early. It involved this camp clear on turn 38, plus then Manila issued a tribute quest against another city-state that I completed a few turns later. I would go on to get four maritime allies by about turn 50... but then not really more after that. What was missing was stolen workers for me to retrieve. The problem on Settler difficulty is that the AI cost penalty applies to the city-states too, which means they take forever to build workers to lose to barbs for me to recapture. Barbs are also a lot more passive on Settler and hardly ever attacked either my or city-states' workers.
I got more out of tributing the city-states than from alliances. On a large rather than huge map, it was very noticeably faster to reach all the city-states with units whenever necessary. And on Settler difficulty, they took forever to build units to count against their tribute resistance. I got a steady supply of units from militaristic CS, and used them constantly to hit any CS that wasn't allied for tribute. What I didn't get was tribute workers, since that requires the victim CS to be size 4, which took forever both directly on the Settler food cost penalty and in that their workers took forever to build to farm tiles.

And here the chief advantage of downsizing to a large rather than huge map came into play. It was quite a bit easier and faster to reach camp quests with a lot of overlapping city-states. And also to keep taking tribute as well of course.

Religion went differently in several ways.
First, there was no need for the prophet two-step, where I settle the first prophet and intentionally delay the religion to the second, so that cities founded before the religion will get the pantheon for free automatically. I got my first prophet on turn 29, by which time I had already settled almost all my cities from the ruins-settlers, so I could just found my religion right away.
Second, we didn't need the Pagodas belief. As I described, we didn't need any happiness thanks to the massive crutches on Settler difficulty. The policy cost discount meant we didn't need the culture from pagodas either. So instead, I went with Swords Into Plowshares for the nice fat frontloaded food multiplier.
Third, I went with Initiation Rites rather than Tithe. Without pagodas, I'd have surplus faith to spend on missionaries, taking religion wide. With tons of city-states on the map, 100 gold per each would add up big. With them constrained to be small by the difficulty cost penalty, Tithe wouldn't pay out much. Some small ones could even convert from pressure rather than by missionary. And on the accelerated timeframe of Settler, the immediate money outweighs the time horizon of either per-turn payout belief. This worked out well: I dispatched steady streams of missionaries all across the map and converted about 35 of the 41 city-states by the time of the industrial age.
The second follower belief would still be the usual Religious Community, and enhancer the usual Reliquary. That last was actually more important than usual because it's backloaded into the industrial age, since I will need more faith then to buy the great scientists while lacking the pagodas' faith production.
")
")
Turn 75 overview. Already got Education on turn 60 and built the universities. Then I went to Astronomy to open the Renaissance, reaching that on turn 69. With five observatories to build including the big capital, it felt like that plan would pay off well. Upon reaching Astronomy, I spent two saved policies plus the Oracle into Rationalism, plus then Free Thought a few turns later.
I went up to Industrialization next, then Scientific Theory on turn 92. A move enabled by the Tradition game plan: buy a great engineer with faith and clock Big Ben. I also spent my first great writer to reach Mercantilism, and with the discounts bought all twelve public schools immediately.
Education on turn 60 is 9 turns ahead of Blatc's game, though I spent the Great Library towards that and he didn't. My t69 Astronomy is 5 turns ahead of Blatc, and he spent the Great Library in that interval. Sci Theory on turn 92 is tied between the games, but he spent a bulb and I didn't and I also got Industrialization. It looks like I'm getting ahead of that game, and the difference is my higher city count of 12 to his 7.
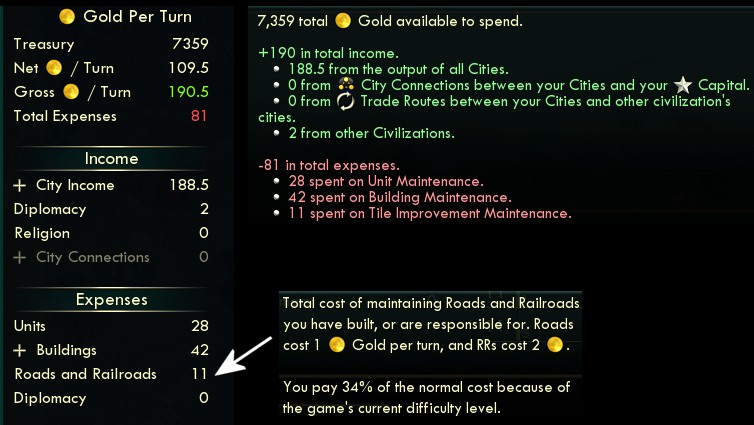
Here I need to talk about how money went in this game. This screenshot is right before buying the public schools.
What was missing was city connections. Without the Liberty worker accelerants, and with the cities spaced more widely than usual, I just couldn't find the worker labor to build the roads. Buying more workers to do it wasn't right either. $310 for a worker, which would take ~20 worker-turns of labor to connect a city, for ~15 gpt which would take another 20 turns to pay back against the worker's cost... that is a payback horizon of 40 turns, too far.
What I didn't know until now was that modifier of paying only 34% normal cost for the roads! Man, that would have made the roads better to build earlier on, although I still wasn't sure where to find the worker labor.
Without the city connections, I had run near zero income for most of the game. The net 109/turn shown here came only recently from the first few trading posts and markets, and the second happy golden age. The bulk of that 7000 saved up (about 4500) came from Initiation Rites and the rest from city-state tributes. I correctly gauged that I had to save everything for public schools starting very early (before universities), and did so... but this was immensely unsatisfying, thousands of gold sitting for dozens of turns unspent into maritime allies or some other form of productivity. Once again I really wanted to find a better plan to handle this.
After this, my income did rise rapidly, as I finally did make the road connections sometime after public schools. As you build universities/schools/markets/workshops, the demand for improved tiles drops as the cities grow into those specialist slots instead, freeing up the workers to build roads. And then the trading posts and markets and banks did ramp up, and soon after this I was making the usual total of 600/turn. Back on track, though I still felt there had been a lot of missed productivity in those 50 turns of saving money for schools.
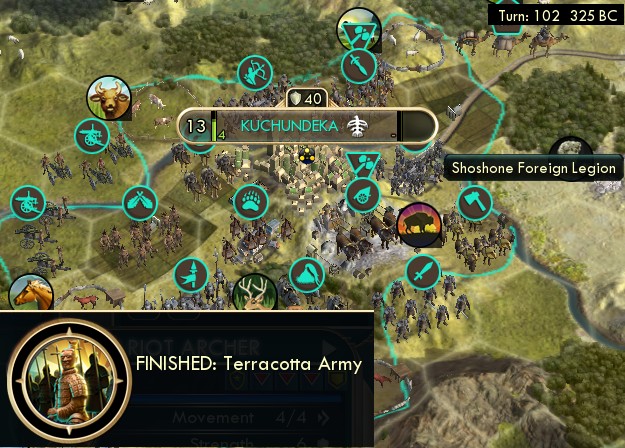
This was an amusing bit that Settler difficulty makes possible: I got to build Terracotta Army very late. Just for fun to see that motley mess of units that would all spawn there. Including an extra Foreign Legion unit, there's a bit of Civ 5 bar trivia, how is it possible to get 7 of those. Anyway, the real purpose was more muscle to go keep tributing city-states.
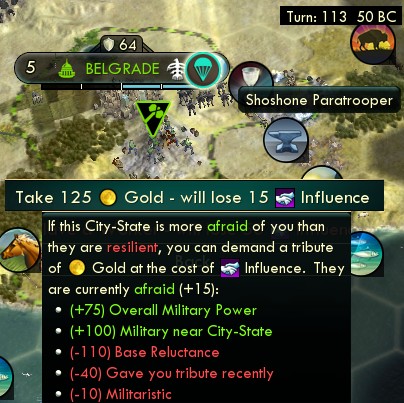
I also got a Paratrooper unit from one militaristic CS, another bit of fun I haven't had before. That was pretty cool to jump him around to get a bunch more tributes. Overall I kept getting a massive flood of city-state tributes, averaging more than one per turn over the last 30 turns of this game.
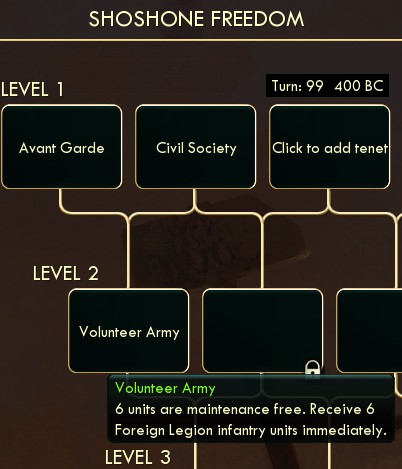
After Scientific Theory on turn 92, I researched Electricity - Radio on turn 98. Research was going noticeably faster than in a normal game (these techs usually take 4 or 5 turns each rather than 3), thanks to the low difficulty modifier and comparatively high city count. Between the fast research and slow coal-mining with non-Liberty workers, the ideology turned out to come faster by going to the modern age rather than by factories. I spent a writer to get the level-2 slot, for which I actually took Volunteer Army, to use the units for tributing city-states. Didn't need the usual Universal Suffrage here with happy moot and no golden age starting soon.
From Radio, I actually researched a tech every single turn until the end of the game! Here was the schedule:
- Turn 98 do 1-turn research on Steel
- t99 1-turn Gunpowder
- t100 1-turn Metallurgy
- t101 bulb Rifling, overflow to Steam Power and Rep Parts
- t103 bulb Plastics (overshot by 4k), overflow to Chemistry, Fertilizer, Mil Science, Dynamite, Railroad
- t108 bulb Flight (yes it was correct to do this bulb less than 8 turns after labs), overflow to Ballistics and Electronics
- t110 bulb Radar, overflow to Rocketry
- t111 1-turn Navigation (would have bulbed Satellites, but ran out of scientists on hand!)
- t112 Rationalism finisher for Satellites (from Statue of Liberty), 1-turn Archaeology
- t113 with the newly spawned 500-pt scientist, bulb Atomic Theory, overflow to Biology
- t114 overflow to Refrigeration
- t115 overflow to Penicillin
- t116 with faith scientist, bulb Combustion, overflow to Nuclear Fission
- t117 with faith scientist, bulb Adv Ballistics, overflow to Combined Arms
- t118 with 600-pt scientist, bulb Computers; with Pisa and Porcelain scientists, bulb Robotics and Ecology, overflow to Mobile Tactics
- t119 with Hubble scientists, bulb Telecommunications and Particle Physics, Oxford for Nanotechnology
That was perfectly executed, planned ahead accurately for 21 turns worth of research with exactly enough scientists to finish the spaceship techs. I did overshoot the end by about three turns worth of beaker research, but bulbing earlier would have been impossible, since there was one moment in there when I had no scientist on hand to keep going.
I got two fewer total scientists than usual: no Liberty finisher, and only two from faith rather than a third. Those two missing scientists just about equaled the total of the low-difficulty discount for tech. Also, I ended up holding off on the Leaning Tower scientist until after all the normal spawns. I usually do the Leaning Tower as early as possible, but remember that the GP spawned from it does bump the master cost counter. An early Leaning Tower is only correct if its 25% bonus will pay back more than 100 GPP by the time of the last normal scientist spawn. I correctly projected that wouldn't happen here on this game's shorter clock, so saved it for later. Also I couldn't really fit it in the capital's build queue anyway.
")
")
Like my previous game consolidated the turn 150 overview into the victory screenshot, this one almost managed to do so with the turn 115 1 AD overview. Here we are a few turns away from Apollo and Hubble.
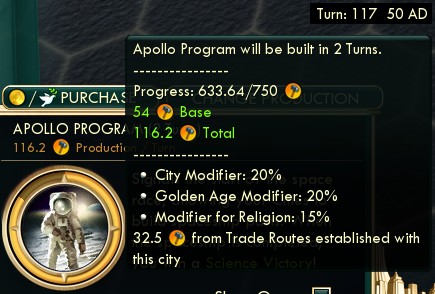
It looked like I was going to fall 0.16 hammers short of finishing Apollo this turn! But then my workers finished this city's railroad connection just this turn too, in the nick of time. The railroad hammer bonus does kick in on the same turn it's completed; I'd thought so but wasn't quite sure, since the modifier doesn't show up in the city screen until the next turn.
But that ultimately didn't matter. I converged all the limiting factors neatly at just about the same time: the 600-GPP scientist, Apollo, Hubble, Leaning and Porcelain Towers, Globe Theater for the last writer, and saving up 11k gold to buy the spaceship, all converged within a span of two turns. On top of the regular income and tributes, I diligently started selling buildings in every city starting about five turns ahead of time: aqueducts, granaries, monuments, gardens, even workshops. I smartly anticipated all this accurately ahead of time and left one research lab unbought to save a bit of spending.
All factors except one. It turned out that the limiting factor was culture for Space Procurements which wouldn't finish until one turn after everything else. I had assumed I'd be fine on culture with the -50% difficulty discount for everything, but that turned out not so. The problem was never getting the third regular Great Writer, just thanks to the shorter timeframe of this game. And so I erred earlier in spending the first two writers for immediate needs before their yields reached maximum value. I probably could have saved this one turn anyway by being less aggressive on tributing cultured city-states, but nah I'm not going to reload back ten or fifteen turns to replay that.
I also lost one more turn to another not-uncommon problem: I had only four cities within railroad range of the capital, not enough to buy and launch all six spaceship parts in one turn. So I finished all the techs on turn 119 and should have bought all the parts then to finish on t120... but in reality got Space Procurements and bought the parts on t120 and had to wait an extra turn until 122 to move them all in to claim the victory.
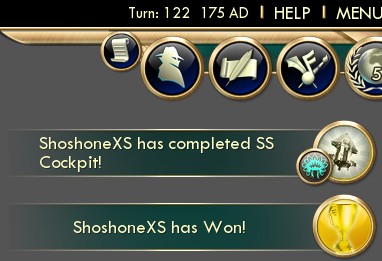
But there it is, 122 turns on Settler difficulty, indeed coming in ahead of Blatc's 125. But this was still fun enough that I might still want to try more...