Here comes one more report of a fast science victory. This is with the Shoshone on the lowest difficulty of Settler, on a map rigged with only one AI opponent and maximum city-states. I learned a lot about the lowest difficulty in my previous game, and saw a new plan that could do better.
The key point I hadn't known about Settler was how incredibly much you get to cheat on happiness, as detailed in that previous report. That game went full Tradition. But the happiness crutch meant that Tradition's full power wasn't really being utilized. The tree's strength besides the finisher is the happiness components of Monarchy and Aristocracy. But with that rendered unnecessary, Tradition felt like it wasn't doing enough overall.
And the biggest deficiency in that game was worker labor. Without Citizenship and the Pyramids, making road connections took an incredibly long time, didn't happen until after public schools. And I missed the quietly strong frontloading of Republic. So I really wanted to open Liberty-Republic-Citizenship.
But the lower half of Liberty is also blanked by this game setup. Meritocracy is also superfluous with the anger discount for low difficulty, and Collective Rule is superseded by the Shoshone popping settlers from ruins. With no compelling must-do path after the top half of Liberty, that opens up quite a number of possibilities on different ways to go.
And I had to try them all. I actually played but didn't finish or report quite a number of games. These included:
- Patronage - Consulates. This is always fun and my most standout games on normal settings involved Patronage. I wanted to grow the cities with maritime food and use their increased size to build the universities quickly. But I found that Settler difficulty goes too fast. Consulates reaches full power only around turn 50; it's ~30 turns to reach the classical era plus 20 to tick up the resting influence. That's great on medium difficulty when Education comes around turn 90 after forty turns of maritime food. But Settler-Shoshone consistently reach Education before turn 60, too soon to have gained any significant size.
- Jesuit Education. That looked like the obvious solution to the situation of spare social policies and a need to acquire the science buildings quickly. It worked pretty well but the problem as always was the heavy opportunity cost. Five policies into Piety meant that this plan delayed some of Rationalism, sacrificed Mercantilism which made affording the spaceship parts difficult, and also couldn't reach the Liberty finisher scientist.
- Mercantilism. After the Liberty opening, save the next three policies until the medieval era to go straight up to Mercantilism. Use the cash discount to buy the universities, with money saved from city-states and tributes and Initiation Rites.
- All of the above, by using Poland instead. Poland's freebies could account for both Consulates and the Jesuits, then later (after Rationalism) catch up on Mercantilism as well. I hoped that some retrying could eventually get Poland enough settlers and workers from ruins. It turned out that this was possible, but too slow. To get the ten settlers and workers required clearing the entire map of ~70 ruins, which took until around turn 50, fatally slower than the Shoshone who could pop and plant all the settlers in half that time.
It surprised me, but the early Mercantilism plan actually turned out to gain the most turns. It beat Jesuit Education because you can buy all the universities right away. Jesuit Education works just slightly too slow because you're not allowed to store more faith than the cost of the next prophet, and only that 500 or 800 isn't enough for all the Jesuit universities right away. The same then happens for public schools, and then even though the faith ceiling lifts in the industrial era, there isn't enough time after schools to make all the faith for the labs. Relying on Mercantilism instead for all these would get each science building immediately upon researching the tech, and could accelerate the Great Scientists just enough to get one more at 700 GPP.
That Mercantilism game went well, but I could see a way to go a bit faster. Mostly I needed more observatories than that map had allowed. Also I made a small adjustment to take 38 city-states on the map instead of the max of 41. The reason: A large Inland Sea map has space for the city-states to cluster on the north and south edges up to about 36. Past that, they start to occupy the interior areas, which I'd rather be empty for me to find ruins and settle my own cities. I could still get enough maritimes by rerolling the setup, and did until finding a list of 12 maritime, 9 cultured, 9 mercantile, 4 militaristic, 4 religious.
Full recap of the settings: Settler difficulty, Inland Sea map, large size, 38 city-states, minimum 1 AI opponent (Dutch), hot climate for desert, young world age for hills, Abundant Resources, Enable Policy Saving.
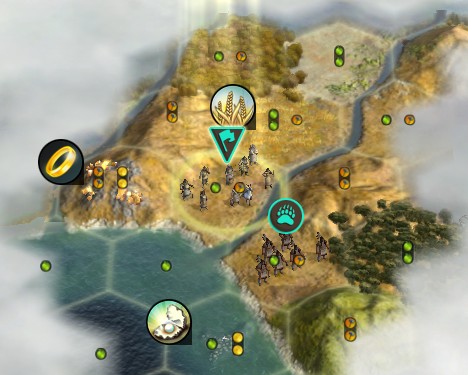
This is quite an unremarkable-looking start. I routinely run through a hundred or so such map rolls for every report you see here. Many times I just immediately click to restart. That single desert tile led me to move the settler that way, still ready to discard it and immediately try again as usual.

Hey, there's actually a promising spot there. Desert hill, mountain, river, multiple wheat.
It's weak by Petra standards (five desert hills), but has everything else. And the Great Expanse land-grab from settling the city popped an unseen ruin, which gave a fine result of population. So that's just enough to poke around for a few turns and see what might happen.
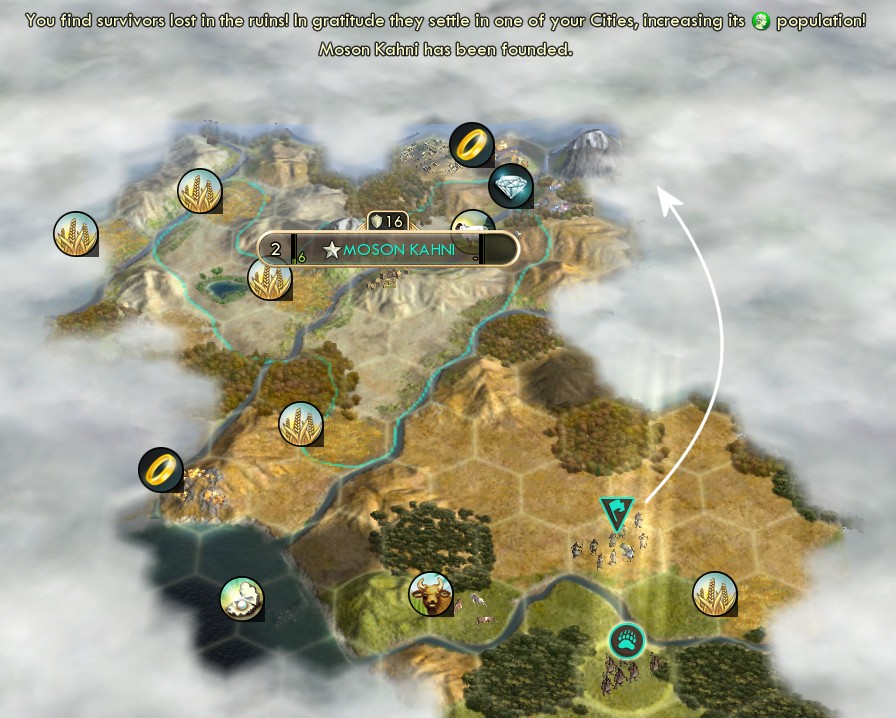
Meanwhile the pathfinder also popped my first settler from a ruin. I had the settler explore northeasterly to look for more desert or a mountain worth settling, maybe all the way up at that mountain northeast of the capital.
What he found... was the greatest mountain of all.
EL EFFIN' DORADO.
Yet it was worth only 250 gold, not the usual 500. I don't know if that's different for Settler difficulty somehow, or maybe because the map has only one opponent. Weird. Anyway, what to buy with the money was obvious. I immediately bought a pathfinder now on turn 2 to go exploring west from the capital. That would accelerate the western half of my cities by 7 turns compared to the normal route of building that first pathfinder.
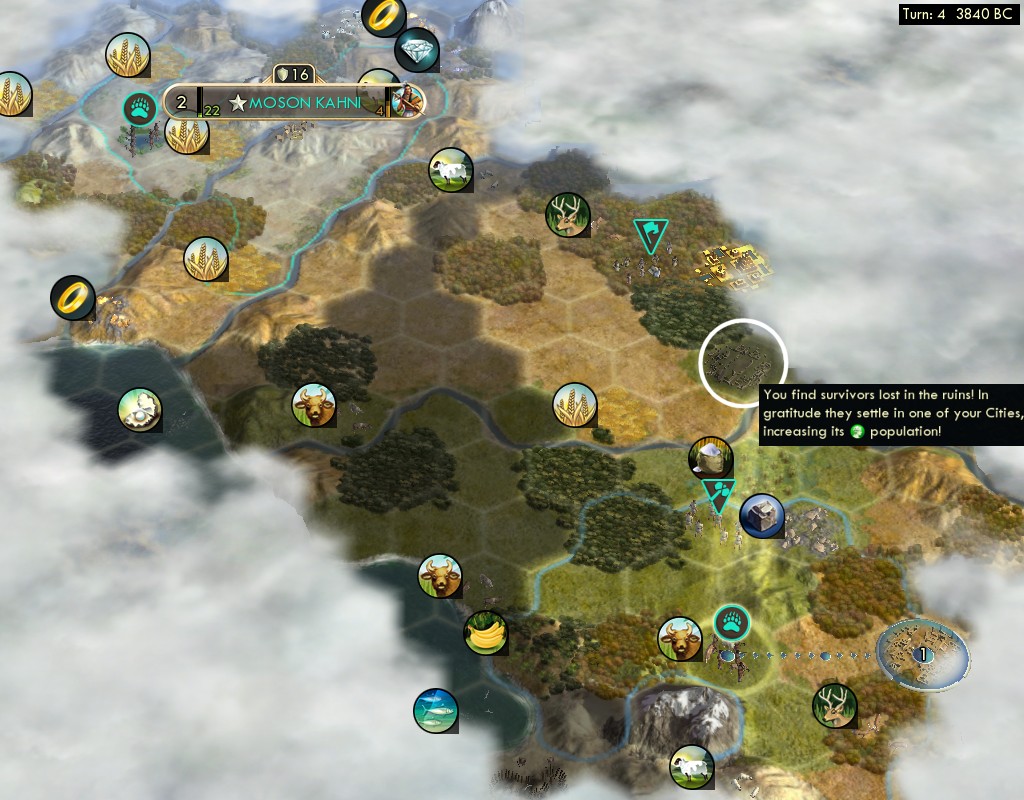
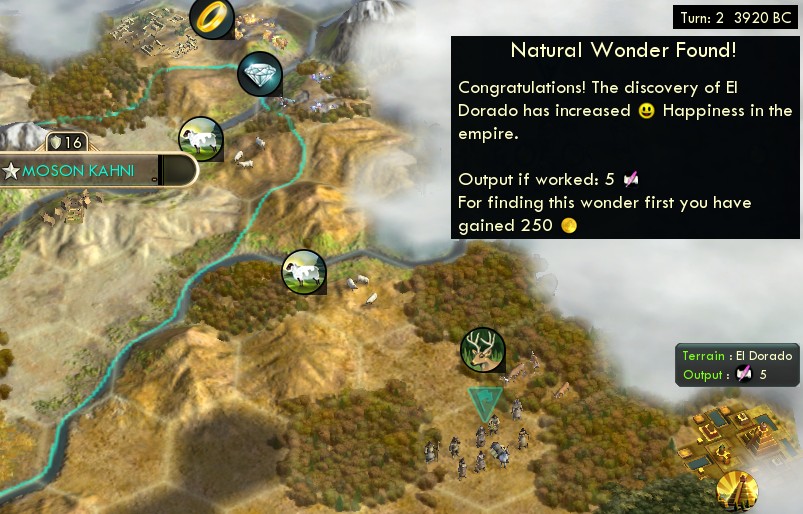
In this next screenshot two turns later, there's a lot going on. The original pathfinder had found another ruin to pop for a worker last turn. Then on this turn there's another ruin sighted from which I could get the next settler. Then I planted my city next to El Dorado, since (I incorrectly thought) the natural wonder would qualify for an observatory. Planting that city also popped a ruin and again gave me a great result of population to size 2 right away.
It's worth noting again exactly how the Shoshone choose-your-ruin ability plays out. For each ruin (popped by any means), your two most recent results are prohibited. This means you can cycle among the most-desired outcomes at intervals of every 3 ruins. On Settler difficulty, ruins can yield settlers and workers, which are far more desirable than any other results. These occupy two out of the three slots of each cycle. Then there has to come one "offcycle" ruin where you have to take a lesser payoff. As long as it's happening in this "offcycle" slot so as not to waste a potential settler/worker, I'm happy to let a ruin get popped for a random result by settling a city or buying a tile. There are still several good results available (population, culture, tech, gold), but the most important thing is to keep advancing the cycle as fast as possible so more pathfinders can get more settlers sooner.
What I most want from the first or second offcycle ruin is culture, to advance to the Liberty opener and Republic. That didn't happen this time as the first two offcycle ruins were randomly popped by cities and yielded population instead. But I could make up for that: my second city could work the 5-culture yield of El Dorado! This led to the Liberty opener on turn 6, Republic on turn 8, and then did get a culture ruin after all for Citizenship on turn 9.
My third settler (from the southermost ruin in the previous shot) was planted here, also in a nice mountain+desert spot. It also popped an offcycle ruin by settling, which yielded a map which was actually very helpful. By knowing where those three more ruins are, I could carefully plan ahead a long way on when to send a pathfinder through there and exactly what results to sequence at which steps.
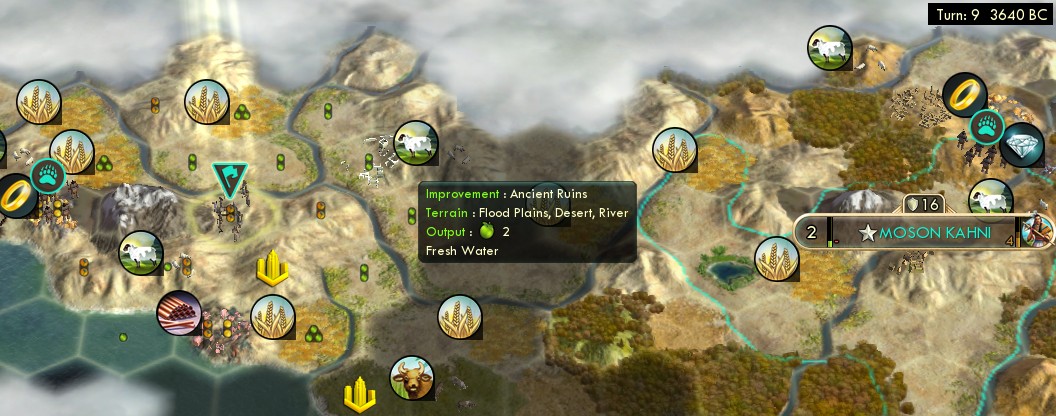
Thanks to having advanced the ruins cycle with the third city, my western pathfinder (the one bought from Dorado) popped a settler from his first ruin. He planted here at a spectacular desert/mountain spot, and this city would go on to build Petra. Planting this city would pop the highlighted ruin offcycle, my fourth time doing that. This time the result was culture, not a super great payoff with El Dorado already having given the first few policies, but it still accelerated into Citizenship by four turns.
Another cycle of ruins followed, where I picked gold in the offcycle slot. This added up with another fun way to accelerate: my second and third cities were each founded two tiles away from a barb camp, which meant the city's attack could shoot down the barbarian and a worker could clear the camp for the money. The cash from these let me buy my first post-Dorado pathfinder on turn 12, at Agaidika in the south to start going for the ruins revealed by that map.

Here is a large screenshot that demonstrates how I carefully sequence and select ruins with the Shoshone. My two most recent picks were gold and then the settler that became Pohokwi. There are three ruins accessible to pop this turn that I can take in any order. A worker was the next scheduled result, so I would take that first at the yellow circle because Pohokwi needed the worker the most. Next I'd take the green-circled ruin in the south offcycle (for gold), because there were more ruins in that direction to later give the next settler for that area. Last I would take the northwest blue-circled ruin for a settler, to plant where indicated by the blue arrow, because there was no other ruin anywhere nearby to get that settler. Then the next ruin next turn (offscreen to the west) would be a worker again for Goshute.
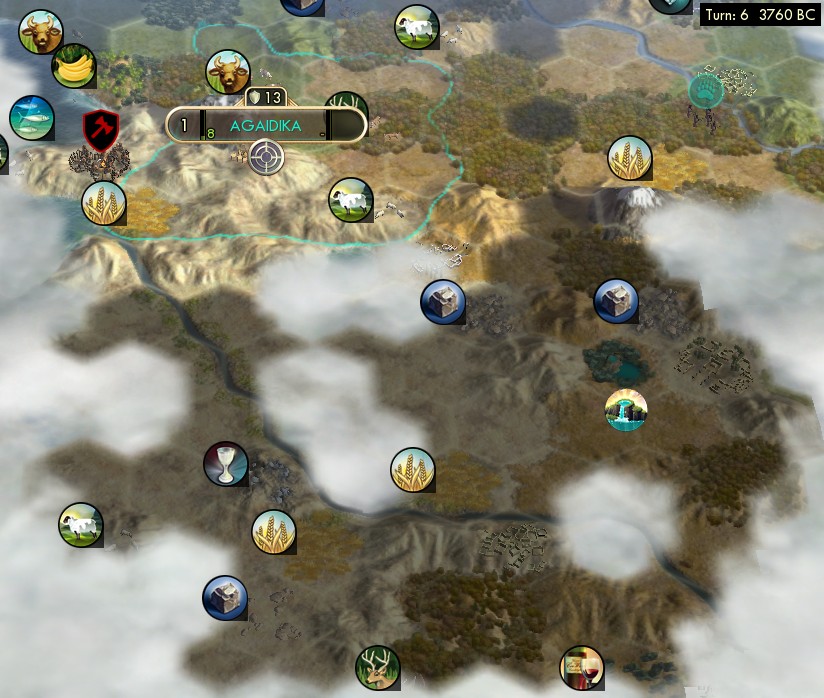
I can leave off showing the rest of the ruins from there. We'll move ahead to an overview on turn 20 when I had all of my cities settled.
")
I stopped at 9 cities. The Mercantilism game plan would require keeping the city count on the low side. I knew there would only be so much gold possible before it came time to buy the universities. Buying schools and labs later on also becomes troublesome past about 9 cities, I've found. 9 cities is enough, I think. 5 are on mountains for observatories (and I thought the El Dorado city also qualified, but later found out it doesn't.)
Research went Pottery - Mining - Animal Husbandry - Writing. I wanted to get libraries going as soon as feasible, particularly before the biggest cities would get tied up building wonders (Pyramids and Petra.) Building libraries ASAP really is the key to get to Education faster. Along the way I started to take tech on most of the offcycle ruins, getting Archery (an unlucky pop considering it was the only first-column tech available against six more expensive second-tier techs) and The Wheel. Then I set my research to Mathematics next even though I really wanted Masonry. I learned from those many partial games that the fastest route to Education is to put your research into the classical era as soon as you can, in order to leave the maximum amount of ancient techs to pop from ruins. So eventually I picked up Trapping, Bronze Working, Masonry, Calendar, and Sailing all from ruins.
City development: Every city went granary first (after two pathfinders built from the capital.) Every city was positioned with at least two wheat or deer resources, most had three, some even had four. Then libraries. This is another significant factor that I didn't describe before: on Settler difficulty, barbarians never enter your borders. You don't need military units, unlike higher difficulties that require some archers before granaries. So the cities could bootstrap as fast as possible with granaries and libraries, and then a couple chariot archers to go hunt barbarian camps. One city (Pohokwi) skipped its regular library to build the Great one instead. The capital built its library then started the Pyramids on turn 31 when Masonry finally popped from a ruin.
Further ruins yielded a mix of good stuff. One yielded faith to get the Desert Folklore pantheon, on turn 21. I continued to find a few on the east edge near home, close enough for workers to reach my cities in reasonable time. Further ruins were most often tech until the ancient age was completed. Along the way was an assortment of gold, population, and later bigger faith ruins as well.
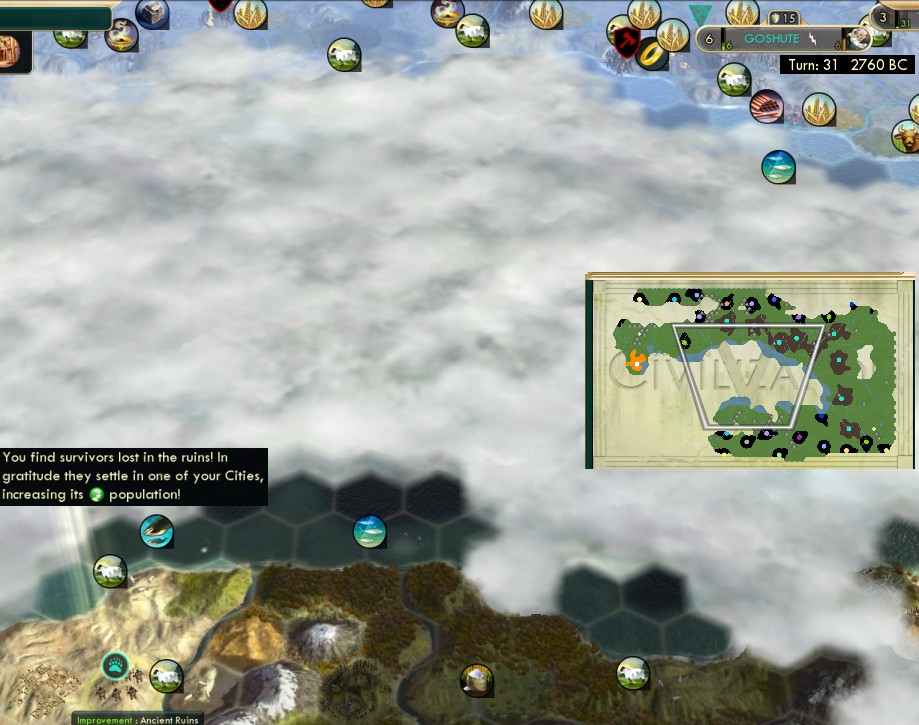
One notable outcome from the ruins is here. Although this ruin is on the south side of the inland sea, counting the tiles actually showed that the closest city to it is Goshute up on the north side. Goshute would be the Petra city, and population has the most value when it's destined to work Petra hills. This happened three times, that I intentionally sequenced my ruin pops to get population on the south side that would go to Goshute.
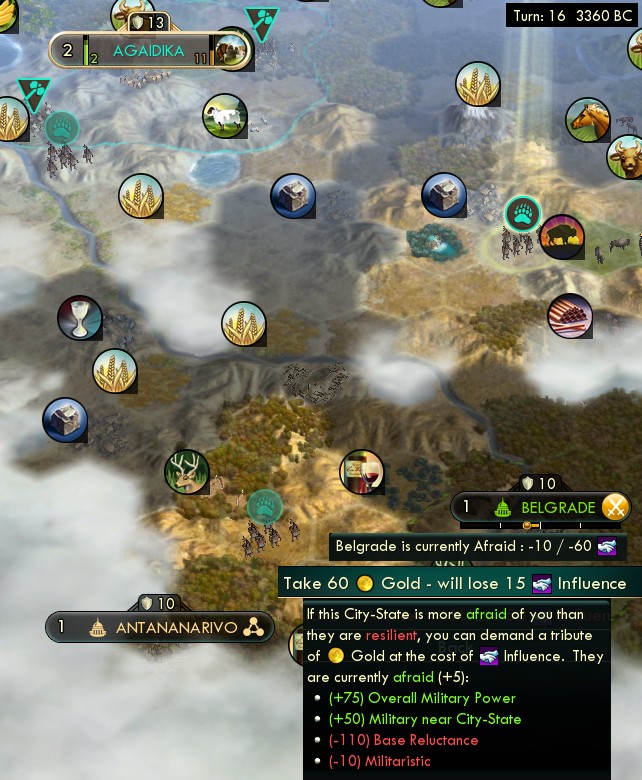
I also started to collect tribute from city-states as usual. Two pathfinders at 16 melee strength total are enough to seize tribute from most city-states on Settler difficulty for quite some time, since it takes so long for their strength to rise or to build a unit. It would turn out that I'd get a lot more tribute on the south side than the north, because my southern pathfinders were grouped up near each other, while my northern pathfinders ended up more spread out.
With gold, I bought a total of three pathfinders (including the first one from Dorado) and one worker (in the city of Timbisha near which there weren't any ruins to spawn one.) I then saved all my money towards universities.
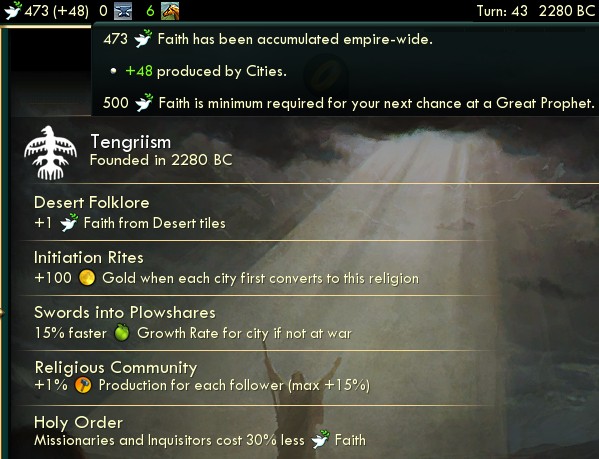
Religion: Here is the plan that I developed across those several unreported partial games. Take the first two prophets, but don't found the religion yet. The reason is that you can continue to pop faith from ruins only as long as you haven't founded your religion. I got one ruin for 20 faith for the pantheon, then one for 60 faith towards the first prophet, one for 90, and one for 160. (The value of a faith ruin is 1/3 of your next prophet threshold, rounded down to a multiple of 10.) The timeline was the pantheon on turn 22, the first prophet on t29, second prophet on t33, then I came up to that 500-faith limit which would spawn an unwanted prophet if exceeded.
So I both founded and enhanced my religion on turn 43, with the list of beliefs shown there. Swords into Plowshares and Religious Community are the usual multiplicative boosts when you don't need to spend a belief slot for happiness such as pagodas. Initiation Rites is the best money producer on the rapid time scale of Settler difficulty, and here that frontloaded money would go into buying universities. And that last belief Holy Order is a new one compared to my usual pick of Reliquary. With that discount, I could get even more missionaries deployed for Initiation Rites in time to buy universities. That 470 faith could afford three missionaries immediately and more quickly after that.
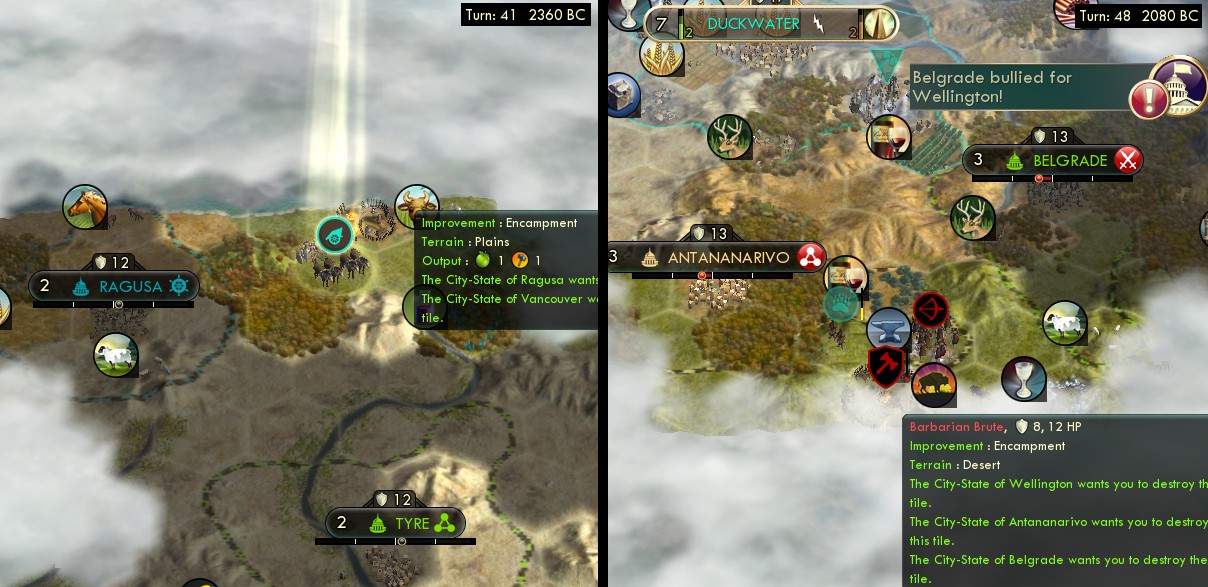
The last big advantage of the Shoshone on Settler is that a single pathfinder at 8 strength + 70% difficulty bonus is well more than enough to clear a barbarian camp. They also get two levels of Survivalism promotions which adds up to double healing to go do it again quickly. My first camp clear came somewhat late, turn 41 on the northern edge (about turn 35 is typical). It was for two maritime city-states. I dearly wished I could have gone Consulates so that they'd be allies, but nay. I also wished I could buy them into alliance with money, but no, saving for universities was more important. A few turns later I did get my first maritime ally in Wellington, with a combination of that camp clear and a bullying quest.
I would go on to get a few more maritime allies over time. Turn 53 came the second, from a camp clear plus a natural wonder quest. t56 got one from a camp clear plus two individual barb kills, and I did pay 250 to refresh it (after buying universities) because it was at exactly 61/60 influence and I could get a missionary there for the decay discount. Got a fourth with a camp + road quest, and a fifth with a camp + trade route quest. t69 sixth maritime ally with a science quest (research the most techs) on top of a camp clear. From there I mostly held steady on maritime allies, somewhere around six for the rest of the game, solidly helpful if not exceptional.
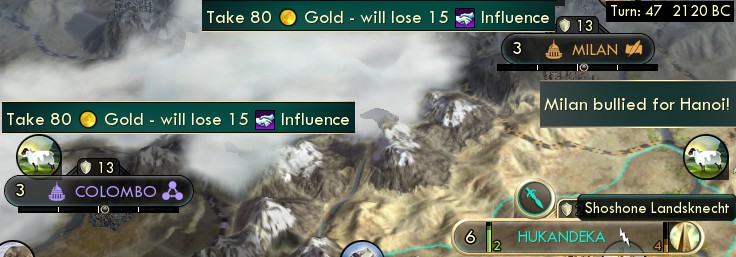
My social policy schedule proceeded as planned: after the top half of Liberty, I saved policies until the medieval age opened to put them all into Commerce. I reached Mercantilism on turn 47 and pulled this cool move. I used the Mercenary Army policy, usually a blank stepping stone to Mercantilism, to buy a Landsknecht unit for 160 and instantly make back that cost by tributing two city-states! And it even achieved a bullying quest for militaristic Hanoi, which meant another free unit soon as well.
")
Here is an overview at turn 50 2000 BC. I am already on the verge of Education, ready to slingshot it next turn upon completing Theology and the Great Library. Nine turns ahead of my previous report, and six ahead of anything I managed in the partial unreported games. Now I was getting really excited about this one.
That screenshot shows 3000 gold, after one more Initiation Rite on the next turn. It came as 1000 from Initiation Rites, about 1000 from city-state tributes, and the rest about equally among camp clears, gold ruins, and the last few city-state first-contacts. That 3000 is enough to buy six universities with the Mercantilism discount. A seventh would come two turns later, and that city would build its Garden promptly to catch back up on GPP. So I had seven universities established as soon as I could, in plans to push out seven Great Scientists before the end of the game. I built the other two universities, to save the money towards schools instead; the timing wasn't critical in cities that wouldn't produce a scientist.
After Education, I researched straight to Astronomy to start observatories. The happiness Golden Age kicked in on turn 57, nicely timed for that. They didn't come as fast as I wanted, though. I felt the cities hadn't really quite gotten up to size before universities (most around 8-10 population), with only a modest amount of maritime food. It drags a city's growth and production quite a bit to assign two out of eight citizens into the university. Two of the observatories didn't even complete until after public schools, after those cities also had to build gardens first. At least the capital was strong and completed the National College then observatory quickly.
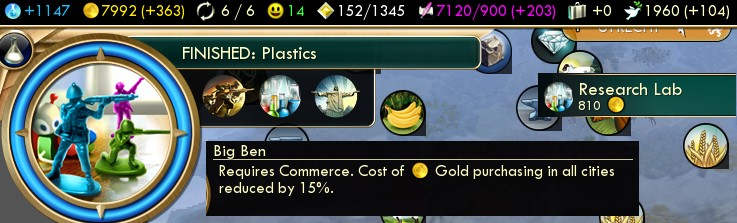
After Astronomy came Engineering on turn 61. I bought the aqueducts in the capital and Petra city. Aqueducts are super efficient as a buying target: cheaper than other 100-hammer buildings (colosseum costs 500, aqueduct is 400), very immediate payback (can retain over 100 food in two growths as fast as 4-5 turns), plus I could keep leveraging Mercantilism. I wished I could keep going with more, but decided I could afford the aqueducts only in those two most critical cities and still had to save everything else for schools.
One helpful detail of researching Astronomy: I could embark missionaries across the ocean, to get to the far side of the inland sea faster, in time to spread Initiation Rites everywhere before schools.
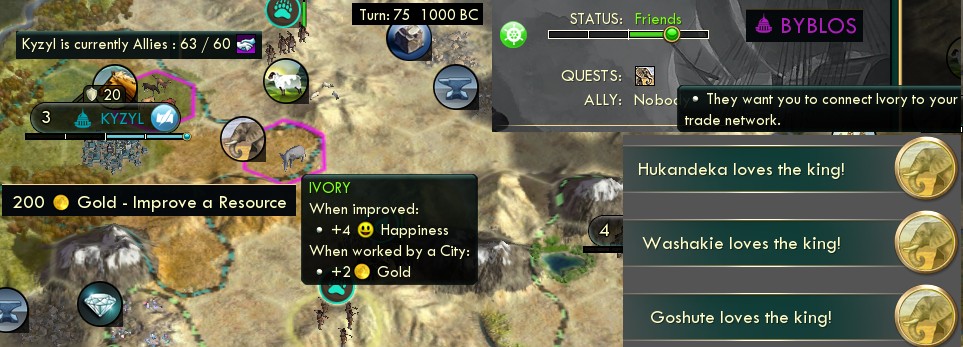
Here's a move I hardly ever do so it's worth noting. I paid to improve Kyzyl's ivory resource. I had no idea how long it would take them to build a worker to improve it, and I had a tight clock with only a very temporary alliance there after clearing a camp. But the payoff was excellent: King Day in three cities including Petra, plus a maritime ally by fulfilling Byblos's quest for it.
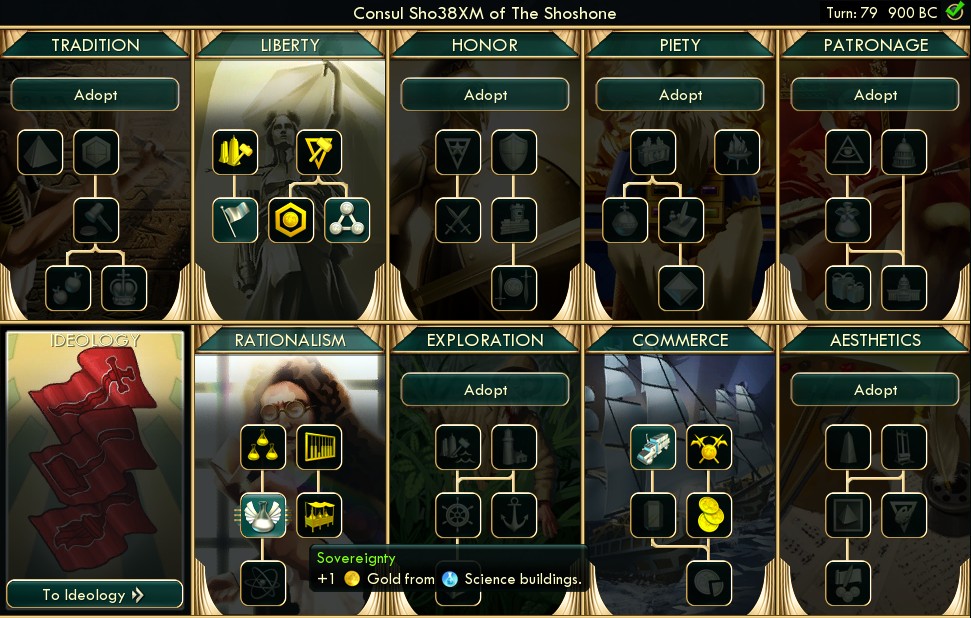
Back to social policies: Rationalism and the Renaissance opened on turn 59. I had two policies saved (since Mercantilism) to go immediately into the Rationalism opener and Secularism. The Oracle followed two turns later for Humanism. Free Thought took until turn 65 to cycle through the next policy, which felt rather slow. Even though tech was going faster than ever before, culture wasn't. But Free Thought is the the last critical policy milestone; the timing of everything else in Freedom and the bottom half of Liberty doesn't have to go fast as long as we complete it all.
Next policy after Free Thought came on turn 73 and went into Representation. I wanted Sovereignty in this slot, but the constraint was the timing of the Golden Ages. If I didn't take Representation now, its golden age would be wasted as I had the usual two Great Artists coming from the guild which would already cover Golden Ages through to the end of the game. Either Representation's Golden Age or Sovereignty would be worth about the same amount of gold (20-30/turn) towards buying schools anyway. Sovereignty then did follow in the next slot on turn 79.
This was the history of my golden ages; the timing doesn't really matter as long as you get them all, but just chronicling for posterity. The happiness GA occured on turns 57 to 67. Representation was 73 to 83. The first artist spawned on turn 85 to last until 97 (including the +50% from Chichen Itza) and the second spawned on t104 to last through the end of the game. So that's how most of the second half of the game is spent in Golden Age, and even without needing the Taj Mahal.
")

For once I went straight to Scientific Theory instead of Industrialization first. The problem was my Petra city wasn't all that strong (not the capital so didn't get the maritime friend food) and couldn't do Big Ben fast enough; it would take an extra three turns past Sci Theory to finish the wonder for the buying discount. Better was to go to Sci Theory first and buy the schools even without Big Ben. Full disclosure: I didn't project this correctly; I actually did research Industrialization first, but then realized the problem with the wonder timing, so reloaded a few turns back in order to go to Sci Theory first.
So I bought the schools on turn 84, even without Big Ben's discount. I had saved 6000 gold, and now spent it on seven schools. And same as with the universities, I built two schools normally, in high-hammer cities that either would never or already did produce their great scientist.
The 6000 gold came about half from Initiation Rites, plus another thousand or so from city-state tributes and the rest from normal production. I had started switching all my tile improvements to trading posts soon after Guilds tech and had already almost finished. I felt like I might have done that a bit early; or that might have been right after all to afford the research labs.
I then did research Industrialization right after Sci Theory. Sometimes Industrialization waits until after Electricity and Radio to get the ideology, but here I needed more lead time to start and finish Big Ben before research labs. Then in fact, I would research a tech on every turn but two from Electricity until the end of the game! Because you can only research one tech per turn, there's a hard incompressible limit to how fast the end of the game can go. So the only way to finish faster is to hit that one-tech-every-turn pace sooner. My original benchmark for that on higher difficulty was after Rocketry/Satellites. In previous games on Settler difficulty it had become common to hit one-tech-per-turn after Plastics. Here it started at Electricity, seven techs before Plastics!
- End of turn 89, research Electricity
- t90 Steel
- t91 Gunpowder
- t92 Metallurgy (These three techs aren't prerequisites for Radio - but the cheaper techs were the way to hit a tech on every turn-end which was the most important factor now.)
- t93 first bulb, 9 turns after schools, 7200 beakers on Radio, overflow to Rifling
- t94 overflow to Steam Power
- t96 bulb Rep Parts, overflow to Plastics (by a margin of less than 30 beakers)
So I got to Plastics on turn 97, 6 turns faster than the last report. But that's not all: this game still had a margin of three more scientists yet to come that the previous game lacked! One fewer spent before this point (before Sci Theory), one more regular spawn (at 700 GPP), and the Liberty finisher.
I also finished Big Ben just in time to buy the labs. My money management had been accurate, got up 8000 more since schools which was enough to buy all nine labs right away. Most of that was simply from normal production, now working all the trading posts multiplied by markets, but it still included about another 2000 more worth of city-state tributes.
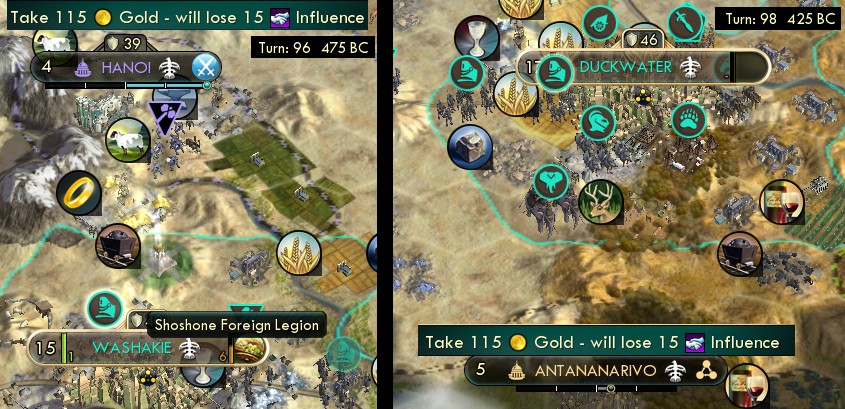
That's where the tributes came from: the Volunteer Army Foreign Legion units in the north, and in the south I did another Settler-difficulty trick in building Terracotta Army late for an extra big pile of units. With these, I tributed almost every city-state in the north (most multiple times) and half in the south for about 2000 gold towards labs and another 2000 towards the spaceship.
The Freedom ideology came with Radio research on turn 94, and the two free level-1 tenets were the same as always in Civil Society (specialist food saver) and Avant Garde (25% GPP.) I also had one policy saved which went into Volunteer Army. From here, we continued to clean up the rest of the endgame stuff: eventually three more policies in Freedom up to Space Procurements, plus the Rationalism finisher, plus Meritocracy and Collective Rule to get the Liberty finisher late.
I would even have one policy to spare after Liberty/Mercantilism/Rationalism/Freedom, thanks to finishing the Globe Theater just in time at the end for a third great writer. This went for the Piety opener just to enable the shrine-rebuild trick to double hammers every other turn towards Apollo/Hubble.
One thing that didn't happen was the Statue of Liberty. It just couldn't fit in the capital or Petra city's build queue between Big Ben, factory, hydro plant, and Apollo/Hubble. I could live without it. Didn't need the policy; we had enough culture coming to finish everything important. The specialist hammers would have been nice but wouldn't actually have saved any turns in the end. This feeling is familiar; as the timeline of each game shortens, I've become used to cutting out and skipping formerly must-build wonders like Taj Mahal, Sistine Chapel, Ironworks, as there just isn't time to build them. Also workshops have slid out of the build orders for most cities; markets come first as a higher priority and then there's no time horizon left for the workshop to pay back. In this game I built workshops only in the capital, Petra city, and one other in order to send production trade routes to the first two.
")
Here's a look at setting up all the lategame build orders. Moson Kahni is carefully scheduled like this: on turn 101 work on the stable just short of completing, turn 102 build a shrine with the +100%, then on turn 103 overflow big from the stable to start Apollo on turn 104. At the same time, Goshute will complete its hydro plant on t103, build a shrine on t104 for the overflow, and start Hubble on t105. Meanwhile, four other cities are building all the lategame wonders in parallel to complete right at the same time. Railroad will be researched this turn and the workers are lined up for that too. And one more city offscreen is building a caravan to direct hammers to any city that needs it to catch up.
And one more check-in on the money. Here I have 2600 + 350/turn and looking to finish in about ten turns. That doesn't quite reach the discounted total of 11k for the six spaceship parts. But I would get there with yet more city-state tributes, plus an incoming Golden Age from the second great artist, plus selling my research labs on the last turn. I also sold unnecessary buildings along the way: aqueducts in cities that would never grow again, gardens in each city that finished its great scientist.
Tech: I used the Rationalism finisher for Rocketry because I had already spent all available scientists, since that would account for both Rocketry itself and for Satellites by unlocking buying a faith scientist. I would indeed squeeze out a seventh natural Great Scientist at 700 GPP, and then complete all the lategame wonders (Leaning Tower, Porcelain, Hubble) for four more, plus the Liberty finisher. Plus two scientists for 2500 faith, but we weren't anywhere near the 5000 total needed to buy three, another thing that gets cut from these accelerated games.
- t97 one-turn research on Chemistry
- t98 one-turn Navigation
- t99 bulb Fertilizer (subpar yield because less than 8 turns since labs, but must bulb now to continue burning the overflow every turn), overflow to Military Science
- t100 overflow to Dynamite
- t101 overflow to Railroad
- t102 bulb Flight (still only 5 turns after labs but must continue overflowing and also reach Rocketry ASAP), overflow to Ballistics
- t103 overflow to Electronics
- t104 bulb Radar (with the last scientist on hand, had been the 500pt spawn, 600 due in two turns), Rationalism finisher for Rocketry, overflow to Atomic Theory
- t105 bulb Satellites (with the first faith scientist) and start Hubble, overflow to Archaeology
- t106 overflow to Biology
- t107 bulb Nuclear Fission with the 600pt scientist, overflow to Refrigeration
- t108 bulb Combustion with the second faith scientists, overflow to Combined Arms
- t110 bulb Computers, overflow to Penicillin
- t111 bulb Robotics, Oxford Nanotechnology, bulb Ecology, Telecommunications, Mobile Tactics, Adv Ballistics, overflow to Particle Physics
Do you see the one hitch in there? I researched no tech on turn 109, because I had no scientist on hand. The 700-GPP scientist spawned one turn later on 110, and that one turn gap was ultimately the limiting factor. After that scientist, I completed all the scientist wonders and the Liberty finisher on turn 111 and bulbed them all right away then. I barely finished Hubble this turn, by a margin of about ten hammers. Hubble completed in just six turns from starting it; those tricks to get extra overflow with the shrine were necessary to not lose any turns here.

The scientists directly bulbed all techs except the last one of Particle Physics. They added up enough overflow to account for it, but it took one more turn-end to burn that overflow into the actual tech. And so I bought the first five spaceship parts on turn 111, the last on turn 112, and won on turn 113.

Actually got a science win down into BC years!