Throughout my last game, Poland luck abuse, I kept telling myself that was a one-shot deal, I wouldn't want to push through that time and tedium of reloading again. But since you're reading this, you know there's another to come.
In fact I played several more partial starts with the luck abuse method. I tried games with Babylon and Maya (for the Pyramid UB), as the two civs with early research abilities to get to Education faster. They did, each three turns ahead of that Poland game, but didn't sustain that lead with nothing gained on growth and buildings. I also tried Rome, hoping the building bonus could frontload infrastructure; but that didn't start to make a difference on research until after Astronomy by which time there were only about three possible turns to gain over Poland. I did not try Spain; that's the premier frontloady civ of course, but I got tired of chasing Spain maps once I realized there's really only one right outcome of King Solomon's Mines; and anyway I'm not even sure Spain would gain a whole lot on Settler difficulty when the ruins give way more for free.
The common thread to all those partial starts was how long it always took to find good maps. I spent an entire evening or more restarting for each of those partial attempts. Problem is that this setup (huge map, only one AI opponent) makes it really rare to find good desert on Inland Sea. Inland Sea doesn't put desert in its middle latitudes, but wants to start the first two civs there because it thinks that's the richest area. So I finally looked at the Highlands map, which is what everyone else uses. But I didn't like it; Highlands has significantly less food compared to the lengthy floodplains rivers of Inland Sea. Also the hills would critically slow down the starting warrior exploring before the scouts got going. I'd found across those partial games that grabbing many ruins in the first ten turns really was essential to speed up, particularly once I increasingly started to use workers to explore too.
Then late one night I couldn't sleep but didn't feel like loading up Civ to play. So I opened the Worldbuilder tool to look through all the map scripts to see if there might have been anything I missed, any other way to get some big deserts. Great Plains wasn't good enough for my purposes; some people use that for its western mountain-desert region but again there wasn't enough food. I poked around others like Pangaea and Oval and Terra, but none of those would do what I wanted either. I did find one script, North vs South, that looked like it might have some promise.
But then this happened. Remember I was detached and sleepy and not expecting any results, and it took me a minute to pay attention and process this.
HOLY CRAP! Am I dreaming? What happened here? Is this for real?
")
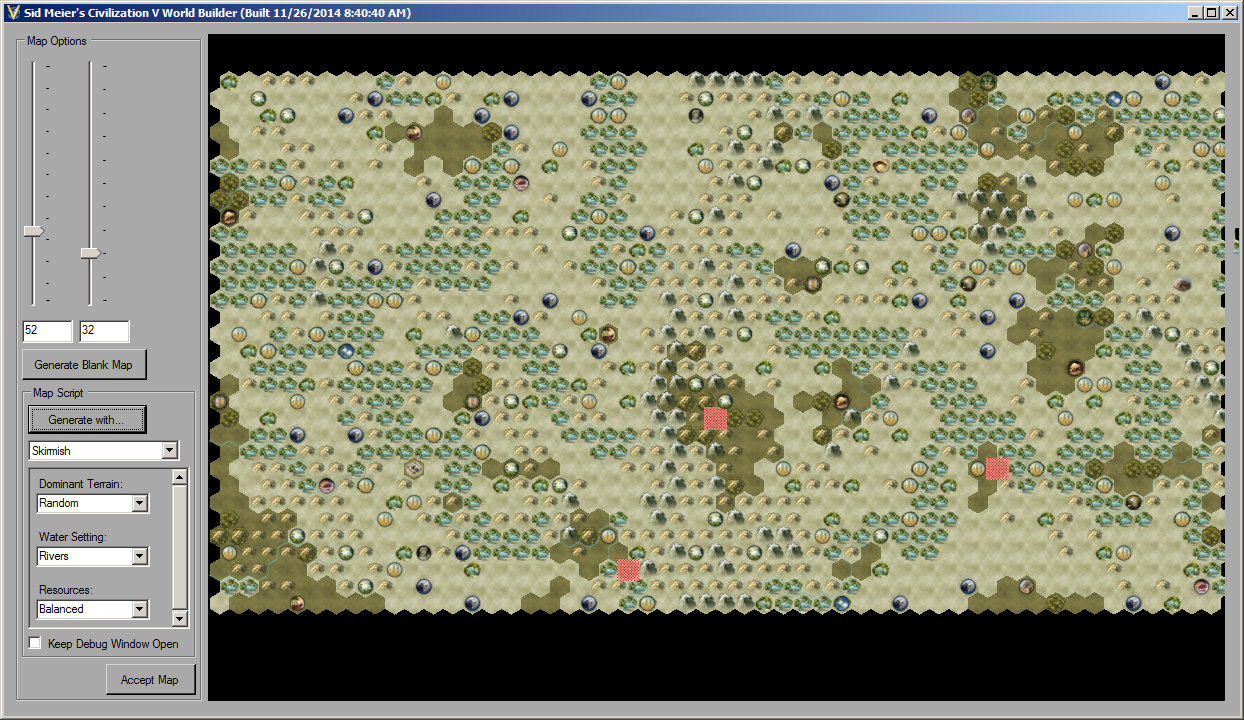
There is a map script called Skirmish. It's intended for small duel battles, although it does have all the usual map size options. It includes a unique option for "Dominant Terrain". That turns 85% of the map into that and can be set to Desert. I didn't even notice that dropdown option at first. I got lucky that it defaulted to Random and the dice happened to hit Desert on my second test click; if that hadn't happened I might have missed this entirely.
And it's got a setting for Rivers, which does exactly what it says. With no water anywhere (not even single-tile lakes), every river stretches all the way across the map to the edges and produces gigundo swaths of flood plains. Exactly what I'm looking for.
The Skirmish script does have a few imperfect aspects. It has no setting for world age, so it doesn't give a ton of hills or mountains. And it doesn't allow Abundant resources; Balanced is the only option. But there's enough to work with.
Skirmish isn't on CFC's list of allowable maps for Hall of Fame play, which is why nobody knew it existed. But I don't have to care. I'm going with it. It's included with the standard unmodded game of Civ 5, and that's what counts in my judgement.
(By the way, all the map scripts are readable text files of Lua code. I read through several of them while exploring map script possibilities. The code files include prolific commentary from the author about how everything works. That author was Sirian, and I found it very cool and interesting to hear that discussion even eight years later now.)
So now that I've got infinite desert, what are we going to do with it? Obviously this calls for a Jesuit Education game plan, to turn all that Desert Folklore into science buildings at unprecedented speed.
And Jesuit Education means Poland yet again. I thought over several options, but it really is true that nobody else can afford five policies into Piety without sacrificing too much elsewhere. Reading back through my past results, I never had a Jesuit game that exceeded expectations with anyone other than Poland.
Even Poland still has limits, though. Even Poland can't get everything that frontloads: Liberty-Republic-Citizenship, Patronage-Consulates, Tradition-Aristocracy, and also five policies in Piety all by the time of Education. The ceiling before Education on Settler difficulty is 8 normally earned policies plus Poland's first two freebies. Something has to give way, and it's going to have to be the Patronage tree. Consulates is fun and all, but the Tradition opener is mandatory, and Aristocracy is pretty good too. Consulates is not quite as necessary as I had thought; enough rigged quests for maritimes and King Day demands can provide enough food.
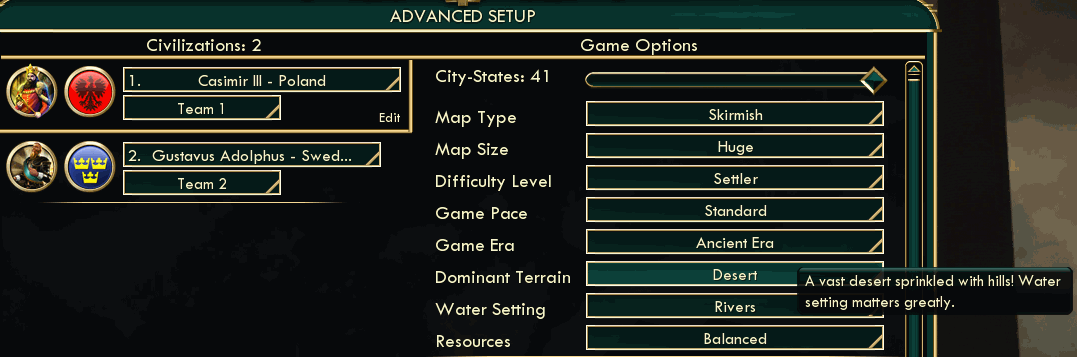
This game also employed the New Random Seed option for luck abuse, see the previous report for more details on that. Also I finally realized to change my one AI opponent to Sweden, for the chance of the 10% GPP for friendship with him, although it didn't happen in this game.
Full recap of the game settings: Settler difficulty, huge size, max 41 city-states, minimum 1 AI opponent (Sweden), Skirmish map, Dominant Terrain Desert, Balanced Resources, Enable Policy Saving, New Random Seed. As always, I restarted from the game-setup screen to get a good mix of city-states: got a list with 12 maritime (only 6% likely for that many or more), 10 cultured, 9 mercantile, 5 religious, 5 militaristic. Finally, I'll also specify this is normal game speed since folks tend to assume that these turn numbers happen on quick.
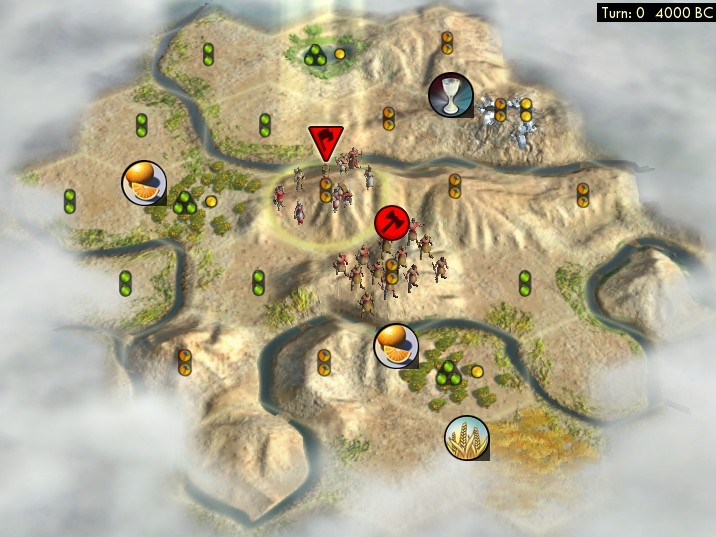
Less than an hour of map rolling got me this. No mountain, but the critical point is that this location right where the settler spawned is good enough to begin right away on turn 0. (I've neglected to mention it, but almost every recent report here had the settler move for two turns before settling.) As always, Warsaw started building scouts working a hill for max hammers, while the warrior went to collect ancient ruins.
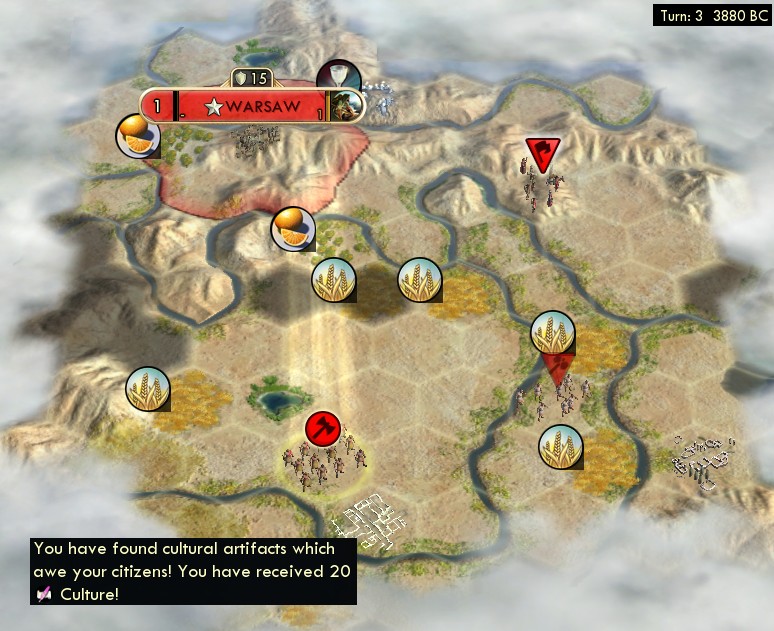
There were several ruins close by south of the capital. My warrior popped that settler on turn 1, who in turn popped that worker on turn 2, while the warrior continued south for the next ruin that would yield culture fast enough for Republic to speed scouts from both of the first two cities by a turn. Then the worker continued east to pop another settler from that last visible ruin. As in the previous luck abuse game with New Random Seed, I saved repeatedly and reloaded until each ruin gave what I wanted.
Since I'm already pretty blatantly abusing reloading, I decided to simply look ahead at the map to plan out my exact moves to grab ruins as fast as possible. I did this to some extent in the previous luck abuse game, increasingly so in the uncompleted partial games, and just took it all the way here. Looking ahead can be done in-game by walking units around then reloading from the start; but I decided to do it easily by editing the game asset XML for more unit vision. Basically a temporary maphack. This picture illustrates how I approached this.
")
Each sequence of colored lines shows one unit, and each arrow is one turn. The blue line is the starting warrior. Red lines are settlers, with the red shaded ovals illustrating where they settled; notice the northeastern one where settling popped a ruin for a worker to keep going in that direction. Yellow lines are workers. Green lines are scouts; the one from Warsaw was its first built and the northeastern one was my first bought.
In my head, this looked like a nuclear chain reaction. A unit going into a ruin would "fission" off a settler or worker to keep going at another angle. Notice how the entire right half of the map had nothing to do with the capital; all that came from the starting warrior and his byproducts. I carefully thought through every possible sequence when popping many ruins on the same turn, in order to get the settlers and workers where I most wanted them.
I also envisioned this concept of the "speed of light" in grid systems. There is a maximum limit as to how fast "information" can propagate from my capital, which of course is two tiles per turn. It's impossible to reach any ruin N tiles from the capital in fewer than N/2 turns, before horse units. There are slight adjustments to that: for example, a unit can move two plots and pop a ruin which spawns a worker that can immediately move two more that same turn. I took advantage of that as I could to edge beyond that "light speed" barrier and keep my "observable universe" expanding as fast as possible. Yes, I'm describing a game of Civilization in terms of cosmology.
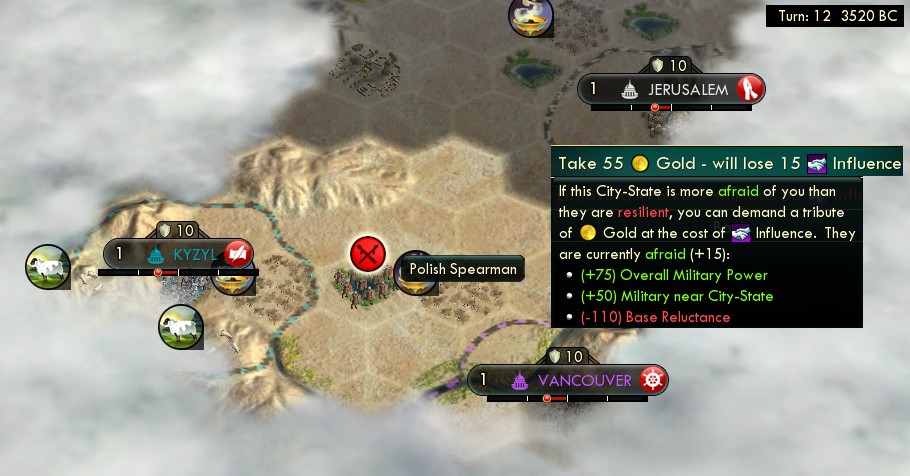
The southernmost ruin in that picture became a spearman upgrade for my starting warrior. He had headed south because that was the closest distance to any city-states, where I could start seizing tribute quickly. The spearman got Jerusalem on turn 9, and that money plus the first gold ruin bought my first first purchased scout. Those two more tributes followed on turn 11 which bought a second scout as well.
As described in several previous reports, the game allows the same result to repeat for every third ancient ruin. As always on Settler difficulty, I would cycle among settler-worker-other for a long time. The first "offcycle" ruin was culture on turn 3, for the Liberty opener then and Republic a turn later. Turn 6 was the spearman upgrade. Turn 8 was my first gold ruin for that scout buy.
Next I got population into Warsaw twice. I knew that option would be cut off soon as other cities would surround my capital quickly. So I grabbed those shots when available even though it only accounted for the cheap low-end growth intervals of size 1 to 3. I usually say how that first population ruin only accounts for 15 food, but in this case it was actually more than that, since the added citizen would work the wheat tile (which I bought) for another +1 food per turn.
The next three offcycle ruins all went for gold again. For each of these ruins, I would reload even more until getting a good numerical roll on the gold. It varied depending on exactly how impatient I was feeling, but in general I kept outcomes of 80 or more gold (it's random from 50 to 100). In particular the number 85 kept turning up over and over, seemed like almost every gold ruin ended up yielding exactly that.
Research: I went down the first column of the tech tree in order: Pottery, Animal Husbandry, Archery, Mining. From the next few offcycle ruins, I got Trapping and Writing, not specifically because I sought them, but kept those results when they came up because I'd need them soon, for furs and the capital's library. Once Archery finished, I needed to pop The Wheel right away in order to start buying chariot archers. That did happen from the next offcycle ruin, although it took over 40 reloads and nearly an hour until it finally happened.
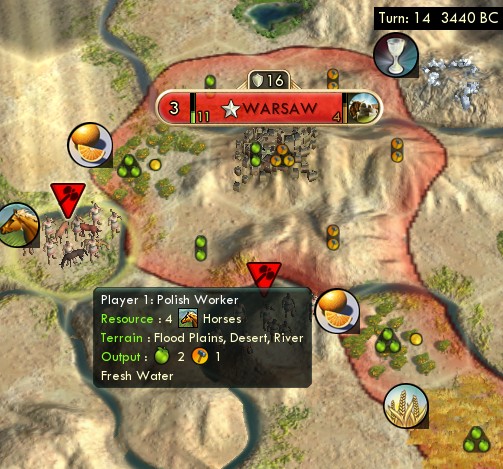
Here's an oddity peculiar to this map script: floodplains horses! That doesn't usually happen, but Skirmish made it so, since it forces the resource setting to Balanced which will apparently give every capital a horse resource even overriding its usual absence from desert tiles. It's entirely ordinary in terms of yield (doesn't get Petra, not worth a stable), but was still a neat curiosity. I also knew this was here ahead of time by playing ahead and reloading, so had the worker in place to improve it right away on researching the tech.
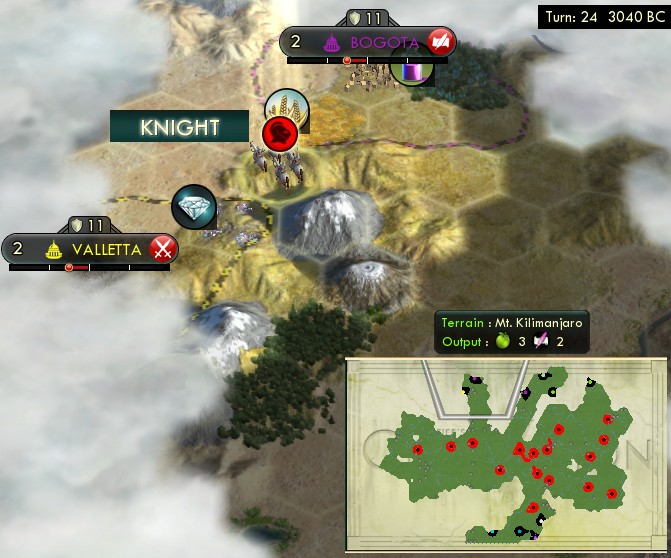
Horses plus gold means buying chariot archers. I mapped out and saved nearby ruins for each of them to get an upgrade, which goes all the way to a knight. The first chariot was purchased on turn 18, and by turn 24 had found and tributed two city-states on the north edge of the map here. The money from that went into buying a second chariot, then a third and fourth. After each of their upgrades, they dispersed to cover each of the four corners of the map for contacts and tributes and soon barbarian camps. This particular one also happened to pass by Kilimanjaro for a bit more speed, although it wasn't that hard to move around on this mostly flatland map.
For whoever might want to see it, here are my complete unedited notes from recording every ancient ruin. This was my method of sequencing multiple ruin pops on each turn. I wrote down in a text editor some descriptor for the unit and location, then rearranged the lines until the desired results all came together in the right sequence. It's not enough detail to reconstruct everything visually on a map, but maybe this gives some idea of how it went.
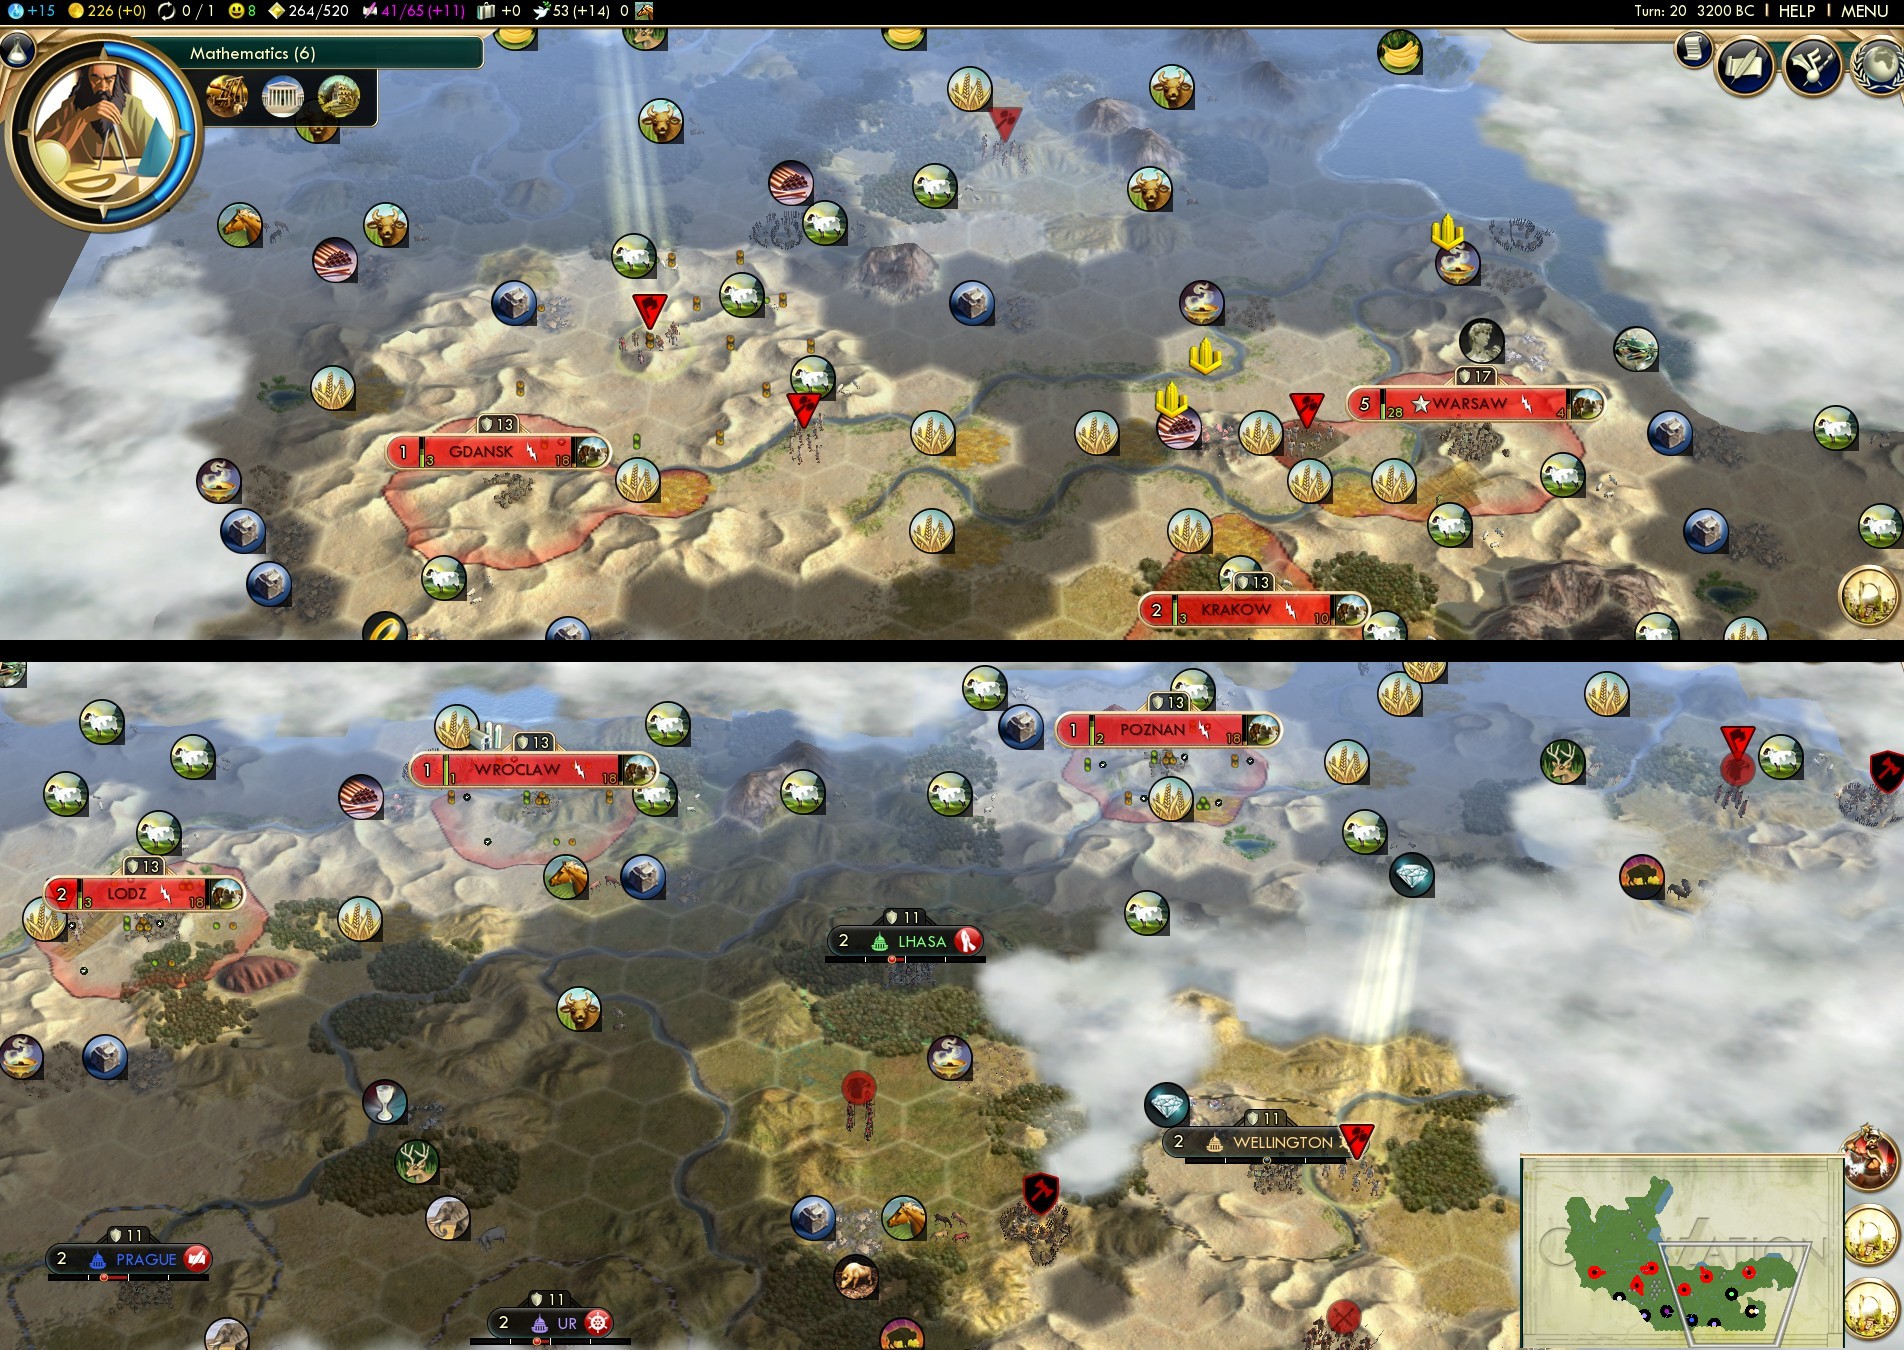
Here's what all the ruins got me 20 turns in.
")
Where the previous game had six cities, this game is out to twelve already! And this has nothing to do with Poland (the civ ability hasn't done anything yet) or the Jesuit Education game plan, nor special help like Kilimanjaro or El Dorado either. This came entirely from meticulously planning out how to reach all the ruins as fast as possible.
Although really, that improvement came from the Skirmish map script. I started centrally so could scout in all directions, which isn't quite possible with an inland sea in the way. And this script has noticeably more flatland and fewer hills without the young-world-age setting, which did speed up workers and also settlers reaching their target sites. And finally, there were just more ruins in total, on a 100% land script without the sea.
And using workers to pop ruins was a critical piece of that. I think workers popped about a third of the ruins overall. It's totally the right thing to do as much as possible. A worker popping three ruins over ten turns (a typical occurrence) accounts for roughly 200 hammers total of a settler and another worker and population/gold/etc. 200 hammers worth in ten turns is far more than a worker can yield by actually working. And this was the usual logistical arrangement: I would often send a worker to pop a ruin, getting a settler, where the worker would then stay to improve tiles.
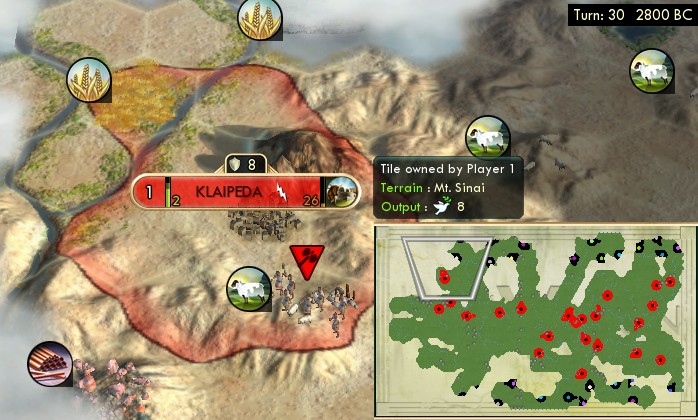
I expanded out to 20 cities overall (all settlers from ruins), which seemed like a nice round number, and tends to be about the limit of stretching happiness even on Settler without investing effort to build or buy some. Then I couldn't resist a 21st here, at this uniquely productive location, Mt Sinai for big faith plus a new unique luxury in the copper. This city was positive value, but 21 turned to be more than enough in the long run.
I continued to take about five more workers from ruins after I was done with settlers. That made a noticeable difference on getting those cities improved and developed, and then on connecting all the roads.
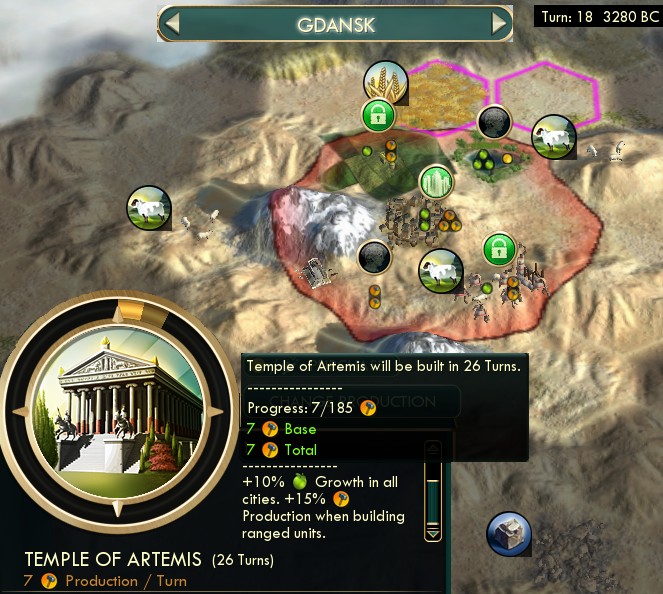
The previous overview shows the Temple of Artemis beginning construction, and here's a closer look. I started it right away as soon as I got Archery, and this was the best city to do it, my first one that was able to reach size 2 and sustain working two hammer tiles. It would stay that way until getting maritime food, almost until the wonder was completed. It really was the top priority: when building wide enough, the Temple of Artemis gives better payback than a granary or anything else. By the time it finished sometime after turn 40, I would be almost done scouring the map of ruins, and expected to have 20+ cities settled producing somewhere around 200 food total. 185 hammers for ~20 food civ-wide is a far better ratio than 60 for 3 from the granary.
Social policies: Liberty opener on turn 3 from a ruin, Republic on turn 4, Citizenship followed on turn 13. That's the frontloaded start, but then the bottom half of Liberty isn't necessary on Settler difficulty. I could then fit two more policies before needing to start into Piety, which became the Tradition opener on turn 21 and Aristocracy as Poland's classical era freebie on turn 26.
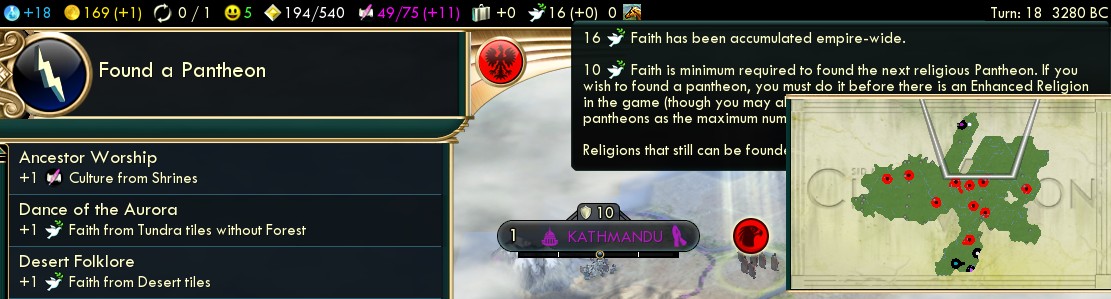
Religion: Thanks to maphacking, I knew where to go to find two religious city-states for the pantheon. This happened on turn 18, which isn't super fast but was as soon as I could cover the distances involved. Check the minimap there, where this scout had to beeline halfway across the world to find Kathmandu here.

But then thanks to every single population point working a desert tile, I went from the pantheon to the first prophet in just six turns! Over 30 faith per turn adds up to 200 that fast. Then I did the prophet two-step move as I do in most Jesuit Education games. I settled this first prophet, intending to use the next two to found and enhance the religion instead. The primary purpose of this move is to raise the prophet spawn threshold, to allow carrying up to 800 faith banked into Education rather than 500. The holy site went on the citrus tile, since that's the best workable base yield (3 food 1 gold) with the lowest opportunity cost (only -1 gold for the missing plantation before Fertilizer.) It doesn't connect the citrus resource but I didn't need it with another right there.

That led to this message we haven't seen before: ruins yielding as much as 260 faith! This happened after the next two prophets spawned at 300 and 500, but I didn't found the religion yet. As long as you haven't founded a religion, you can pop ruins for 33% of the cost of the next prophet, and 33% of 800 rounded down is the 260 seen here. I was able to do that three times before the counter went past 800, at which time I had to finally found the religion and buy the first missionary just to spend the faith total back down below that.
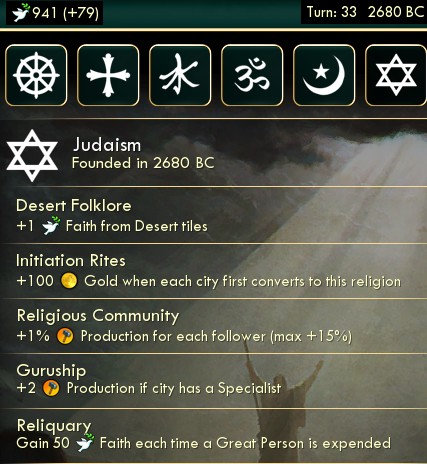
I changed up two beliefs from my recent standards. One pick was Guruship instead of Swords into Plowshares. This game would already have overkill on food: vast flood plains, rigged maritime quests and King Days (not multiplicative with Plowshares), plus aqueducts soon since the cities could build and cash-buy those instead of universities. But this map was light on hills, and since a Guruship specialist would be enabled quickly with the Jesuit universities, I felt the production would make the bigger difference.
And the enhancer pick is Reliquary over Holy Order, to fit a Jesuit game. Reliquary is necessary to catch up on faith at the end of the game to buy faith scientists after spending on research labs. Holy Order is less necessary when we will buy fewer missionaries (universities instead) and they already get a good discount from the Mandate of Heaven policy.
As always, I bought missionaries to spread the religion to all my own cities. Then came a handful (about four) to go to city-states for Initiation Rites money, before it was time to save all available faith for Jesuit universities.
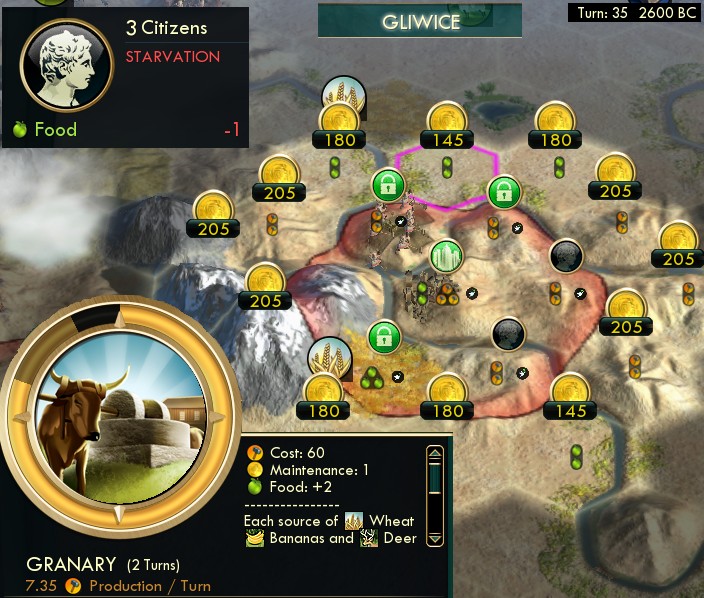
This has nothing to do with the narrative, but here's an unusual situation I ran myself into. This city Gliwice had received a population ruin, but I didn't realize until two turns later that it had no workable tile for food to support that pop and would starve! 145 (!) was way too much to want to spend on a food tile, couldn't finish the granary soon enough, and couldn't get my hands on a maritime ally yet.
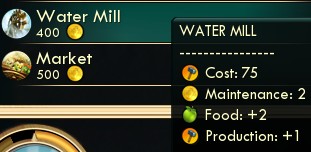 The best answer I could figure out was to buy the city's water mill. Not super efficient, but better than starving, and would eventually pay back on helping this city build Machu Picchu some time later.
 Also nothing to do with the narrative, but I had to smile at this request.
")
Here's a look at how I set up and parallelized all the early game wonders. I talked about completing Temple of Artemis quickly, although I still offloaded it to a side city instead of the capital. I really wanted the capital to be able to make Petra its first wonder, and to complete all its normal buildings (granary, watermill, library) beforehand. I hate seeing the capital limping along without one of those while building Petra. That library does make a difference in speed up to Education. And I really want Petra complete ASAP so its hammers can start going into medieval wonders.
Warsaw started Petra on turn 32 as soon as Currency research completed, and finished it on turn 44, a speed record by a wide margin. It then started Chichen Itza and was able to finish it before the happy Golden Age triggered, then did Angkor Wat next in good time too. Meanwhile, the Pyramids and Great Library went up in side cities as well. The one piece that fell out of the puzzle a little bit was the Oracle, which ended up in a side city instead of the capital, and finished a bit later than I would have liked (turn 62 after opening Rationalism on t57) but that hitch was acceptable.
The Aristocracy policy was adding to all of these, which may indeed have saved as much as a turn or two on the finish date, comparable with Consulates. As the timeline gets ever shorter, the fixed-size wonders consume a greater percentage of civ-wide hammers, so Aristocracy relatively goes up in value.

Presently I finally started to get some maritime city-states. They were just randomly slow to start issuing any quests to clear camps. The first quest I completed for any was a natural wonder for these two at the same time. I decided it was worthwhile to spend 500 each into alliance, with money that had come from Initation Rites and knights continuing to tribute other city-states. This wasn't the most efficient way to get maritimes, but I decided to do it after clicking ahead a few turns to see that neither gave any other quest quickly, so take them now for speed speed speed. (BTW, it's actually right to buy a city-state before you actually see the quest trigger; then the CS turn happens to process the quest, then the alliance will be in effect for your city production.) This move also grew the Artemis city one turn sooner to complete the wonder a turn sooner, which accounted for another 20+ food gained by this move.
More maritime allies came as follows: on each of turns 41, 43, and 45, I cleared a camp for a maritime and paid 250 into alliance. Turn 48 saw one maritime give an investor quest (a random-seed result I decided to keep because several other things on that interturn also had to go right) and I decided that was worth spending 500 straight up for the 75 influence (80 with protection). Also paid 200 to improve a city-state's incense to get We Love The King Day in six cities including the capital. Overall I maintained about six maritime allies for the bulk of the game, with a couple coming and going on occasion. The overall food yield wasn't as huge as it would be with Consulates, but still accounted for enough that I wasn't worried about more. I knew a Jesuit game didn't have to save cash for universities so it could go into these maritime city-states.
Meanwhile I was moving up the Piety tree for policies: turn 29 the opener, t39 Mandate of Heaven, t44 Poland's medieval freebie for Organized Religion, t45 Religious Tolerance, and exactly on turn 50 came the Reformation.
Here we come to the turn 50 overview, which just might be my biggest turn in Civ 5 history.
")
All at once, I researched Theology, completed the Great Library for Education, claimed the Reformation policy for Jesuit Education, and bought five universities with faith.
Education on turn 50 is three turns ahead of the previous game. And that 181 beakers/turn shown is before the universities, almost 50% ahead of the previous game at 126. 849 faith is over the limit to spawn a prophet at 800, and indeed I reloaded to make sure that didn't happen so I would have all that faith to spend on universities.
I picked five ideal cities for Great Scientist generation for those first five universities: Wroclaw, Poznan, Lublin, Czestochowa, and Radom. What made a city ideal was to be on fresh water (for the Garden of course), but not scheduled to be tied up building a wonder or observatory. That's a benefit of going wide on city count, to diversify and parallelize tasks like the gardens into separate cities where they aren't competing with other concerns. (Poznan didn't need the garden, since it had the Great Scientist point from the Great Library, so it would spawn first ahead of any other city.)
The next big question was what to spend that 2100 gold on, since for once it didn't have to go to universities. Buying some was still an option, which would get them twelve turns sooner than the Jesuits would finish the last few. My head said the purchase target should be observatories, to directly raise science which is ultimately the goal. My heart said aqueducts as the way to grow and develop cities the most. Another voice even said Gardens, if I bought them all right now, that would speed up all the Great Scientist clocks to get one extra.
Ultimately I went with my heart, the aqueducts. Looking back through past reports, there's a definite correlation, that every game where the result exceeded my expectations was a game that got aqueducts early. Greece, Poland, Shoshone, and my two best games with Poland. Here are several reasons as to why.
First, aqueducts are directly cheaper than other buildings. A 100-hammer aqueduct costs 400 gold, compared to a colosseum or market at 500. I always knew this, but now investigated in the asset XML file to see the details of why: almost every other low-end building has a hurry cost penalty of 25%, while aqueducts don't. I see how this happened: the aqueduct is listed in a different section late in the file, after its addition in a patch (it wasn't in the original release of Civ 5), so the hurry-cost field was overlooked by a later designer. Universities have a hurry cost penalty of 15%, which isn't huge, but does still make them less gold:hammer efficient than aqueducts.
Second, an aqueduct has the fastest payback of anything, as I frequently note. A virtual modifier of 40% more food is bigger than anything else in the game, and that's even effectively multiplicative with the other food modifiers too. And that payback is "chunky" in that it only matters when a city grows, which is particularly compatible with purchasing, timed at the right moment for each city shortly before growth. The aqueduct can yield dozens of food right away within a turn or two, and more than the 100-hammer cost in under ten turns.
Finally, buying aqueducts is the way to get them into cities currently tied up building wonders. I had the Oracle, Chichen Itza, Angkor Wat, Writers Guild, and soon Machu Picchu all under construction. I could buy aqueducts in the best cities (tied up on wonders) and the worst (needing to catch up the most), while the "middle-class" of cities built them normally. This is the hidden but real advantage of Jesuit Education, that faith-buying the universities frees up those hammers to go into other items early and snowbally instead. It's the converse of opportunity cost � opportunity advantage by knocking out an otherwise sizable cost. So after Education, my next researches were Construction and Engineering in one turn each, and I bought six aqueducts right away and a couple more soon after.
The other piece needed along with the aqueducts is enough tiles for the population to work. This meant a monument in every city, the Liberty and Tradition openers, and presently Angkor Wat started right away in the capital. That is really everything you can assemble for tile expansion; the amphitheater line of culture buildings is terrible, and the Sistine Chapel doesn't work because 3 + 25% truncates to 3. I even considered the Monasteries religious belief, to convert faith into culture buildings, but decided that wasn't worth pushing out another religious belief. All the other ingredients plus judiciously buying tiles came to just enough workable tiles in total. As for Angkor Wat, I also realized that it actually does quite a bit more than its stated -25%: the discounted cost also gets truncated down to the next increment of 5. The math can be 45 � 0.75 = 33.75 but that truncates all the way down to 30, actually a discount of -33%!
So here's how city development went. The basic infrastructure for each was granary, library, monument, shrine, and a few also got watermills before this point. Presently I arranged my midgame wonders (Angkor Wat, Oracle, Writers Guild, Machu Picchu, Mausoleum of Halicarnassus) and bought aqueducts in those cities. Everyone else built their aqueducts normally, and then either a garden or an observatory. A couple cities with none of those concerns could finally fill in caravans.
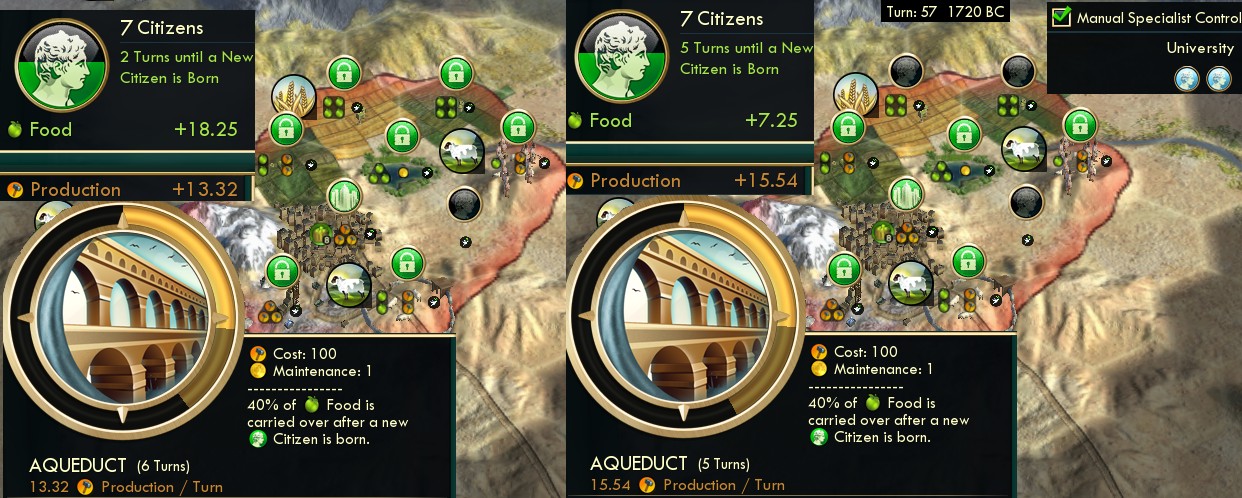
Here was an interesting dynamic that never quite came together like this before. I was making enough faith for more than one Jesuit university per turn. But the interesting question was where to buy them on each turn. I realized that I should choose cities that, if they delayed growth by moving laborers into the university, would sync up growth with the aqueduct! That happened in this example here, and the drop of 6 turns to 5 on the aqueduct was from Guruship. (Aqueduct mechanics are complicated, but here's the relevant simple version: if the aqueduct and growth would happen on the same turn, instead set Avoid Growth for that turn, then grow next turn when it will retain food.)
Universities came last in the wonder-building cities, and actually last of all in Warsaw the capital. Since losing laborers into scientist slots hurts more when it delays wonders, and most of all when pulling them off Petra tiles. Warsaw actually turned out to build both its university and school with hammers, since it didn't have any pressing wonders after Angkor Wat.
A question related to all this that comes up in Jesuit games is how soon to go to the Renaissance. Of course you always want to unlock Rationalism, but advancing the era also bumps up the faith cost for universities. I decided after Education to go for Construction, Engineering, Guilds, then Acoustics. I ended up buying 14 universities at the base faith cost of 160, then 6 at the Renaissance cost of 240.
Acoustics came on turn 57, with Poland's free policy for Rationalism and one saved for Secularism. Following that were the next regular policy on t60 for Humanism, a somewhat belated Oracle on t62 for Free Thought, and then Sovereignty on turn 65.
The first two Rationalism policies increased my science production from 420 to 560 beakers. That means that each turn of delay to the Renaissance cost 140. So as long as accelerating the chain of universities with the cheaper faith cost would produce that much before I finished buying all of them, delaying was correct. Pretty sure I got that timing right here, or at least close enough not to matter.

A trick that's possible in normal games but can be maximally exploited with New Random Seed: When several King Days are about to expire, intentionally rid myself of a resource that I'm about to acquire another copy of, so the cities can demand it and quickly be satisfied. (King Day was easier than usual to rig on this map, with no inaccessible sea resources to pollute the possible picks.)
One thing that went completely perfectly was Golden Ages. I took care to keep the happy surplus up (mostly by paying attention to camps and quests for mercantile city-states), and reached the happiness Golden Age on turn 58, ten turns sooner than the last game. Chichen Itza extended that to run for turns 58-73, then Representation for 73-88, and one great artist for 88-100 which was exactly perfect for my target end date.
Cities continued building with aqueducts - some gardens - temples - watermills - workshops - observatories, in approximately that order. Guruship noticeably sped up the aqueducts. I was really starting to like Guruship, since it kicks in exactly when a city needs it most, right as it loses two land laborers into scientist slots. Swords into Plowshares is bigger numerically but less leverageable. Guruship is roughly equivalent to an extra city size working a 2-food 2-hammer farmed hill right away. For Swords to do that requires ~20 turns for the food to add up to an extra city size, plus a workable tile and worker labor. Also along the way I made use of the usual trick to bring a shrine/temple just short of completion, then shoot +100% overflow onto the next item, and that doubling included Guruship too.
Observatories were at the end of that list because I decided to go straight to Scientific Theory before Astronomy. Jesuit games have a ticking clock in the form of the faith threshold that will spawn a prophet; you do not want that prophet so you really want to hit the industrial age ASAP to lift that. Even two turns spent to research Compass and Astronomy would mean delaying every single Jesuit school two turns, a cost of over 1200 beakers that would not be made up by faster observatories.
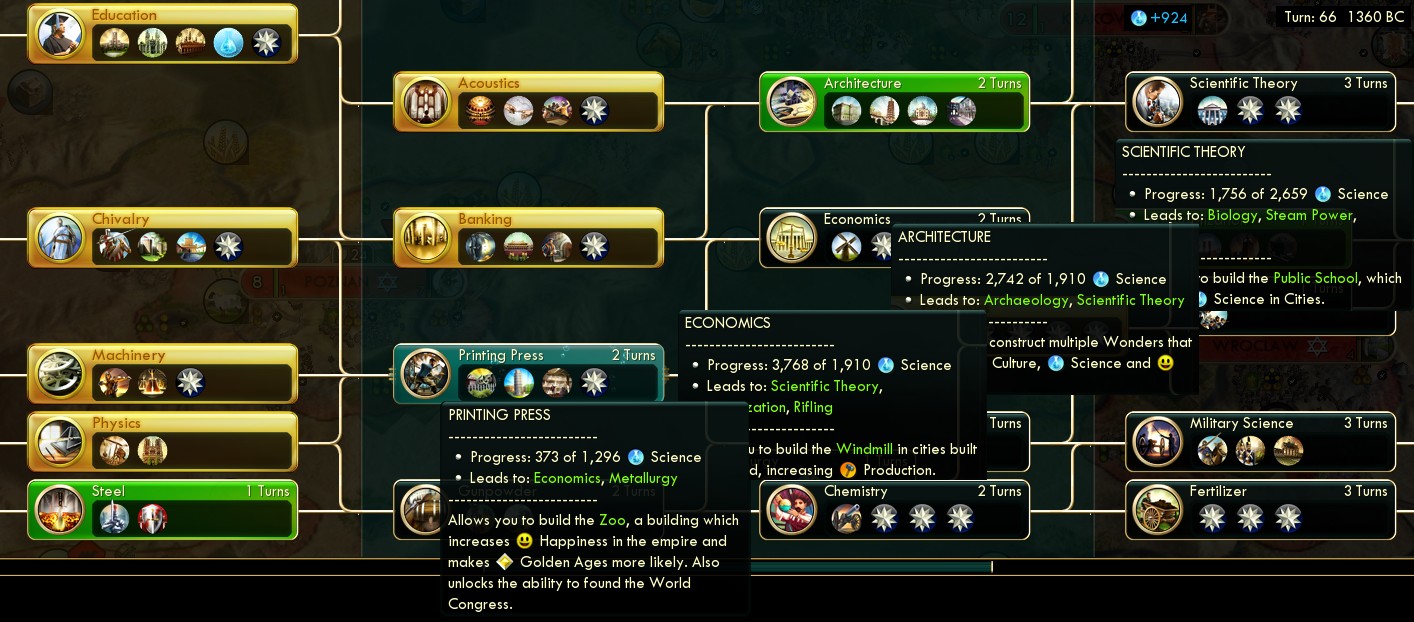
Here's how technology went through the renaissance. After Education on turn 50, I researched Construction, Engineering, and Guilds in one turn each. Acoustics took four turns to t57. Then with the Rationalism beakers kicked in, I continued through Iron Working, Metal Casting, Chivalry, Machinery, Physics, Optics, Banking in one turn each. Turn 64 came another sweet spot of converging everything together: the first Great Scientist spawned on this turn, exactly when he could bulb Printing Press with enough overflow to carry all the way through Scientific Theory!

So that was Scientific Theory on turn 67 (by a margin of only 20 beakers to spare!) Now six turns ahead of the last game. And I calibrated the faith numbers perfectly too. It is OK to exceed the 800 ceiling one turn before Sci Theory, as long as I reload with New Random Seed to make sure the prophet doesn't spawn. Then next turn the game will process research (to reach the industrial age) before checking the prophet auto-spawn (canceled by reaching the industrial age.)
So I was able to carry over 1100 banked faith into Jesuit schools. That was enough for three schools right away plus almost one per turn thereafter. But it would take 18 turns to accumulate enough faith to buy them all -- so any city that could build its school sooner than that would come out ahead. I did that in three cities, and also cash-bought one school right away because that would importantly sync up the fourth and final remaining Great Scientist city. Overall I've learned that Jesuit Education usually isn't quite powerful enough to get every school quickly, so it is worthwhile to speed up a few by building and buying. Remember that each building accelerated by those methods moves the last would-be Jesuit building forward in time.
After Sci Theory, my next research goal was indeed Astronomy, and every eligible city (11 out of the 21 total) started building an observatory right away. I would have liked to buy some with cash, but that felt inefficient since the Mercantilism and Big Ben discounts were still some distance away. And the cities could build the observatories pretty quickly, most in 7 to 9 turns or so.
And then my next research was Chemistry. Way back when, Chemistry and its bonus to mines used to be my key tech target in the midgame, and I'd even spend Oxford to get it or Fertilizer. That's fallen away nowadays, since Chemistry isn't on the beeline to the next major target of Plastics. But for once it seemed right to do. The bonus to mines gained two turns on most observatories, and on workshops in other cities. Overall, this game was so satisfying in terms of building up the cities, they all got workshops and observatories and watermills and even temples done in good time. I've had so many recent science games where the cities build university - public school - and then the game is over halfway through the market. But Jesuit Education opens up such huge space in the build queues, thanks to not sinking 460 hammers into the university and school. It doesn't really translate into much or even any gain on the finish date, but the cities feel so much more developed and satisfying.
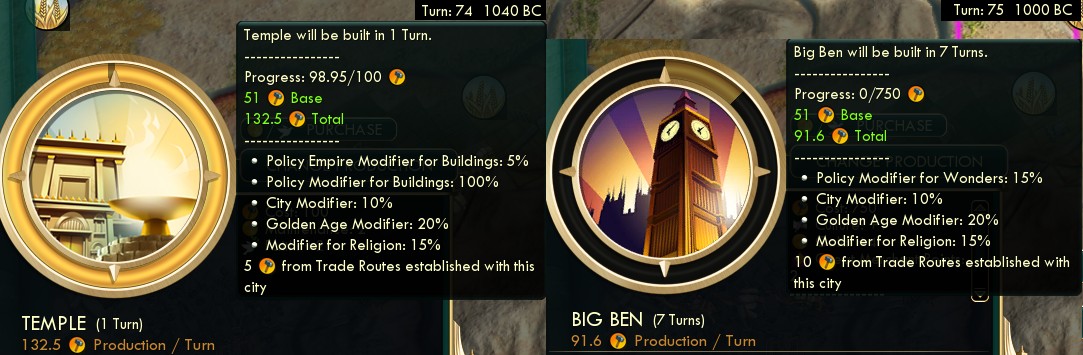
Industrialization followed Chemistry, on turn 75. I was yet again proud of how I arranged several concerns here. I had alertly built Warsaw's temple with maximum doubled overflow on the turn right before Industrialization to get a jump on Big Ben. Warsaw could complete the wonder in 7 turns total, exactly timed to when I would reach Plastics. Then I saw that if Warsaw bought its hydro plant, then before Hubble, it could even cram in the Statue of Liberty! That was nicely worthwhile because the extra policy would account for Theocracy for +25% gold in all cities, about 90/turn and about 1500 total by the end of the game. Plus the Statue specialist hammers might shave a turn on Apollo/Hubble.
As always, extra policies account for not just their own benefits, but for opportunity gain in tuning the sequence of others. The Statue would account for the slot for Theocracy later, but I could actually take Theocracy earlier and then use the Statue to catch up in the ideology later. Here was the late game of policy picks:
- t67 Representation (industrial era freebie)
- t69 Commerce opener
- t73 Landsknechts
- t77 Mercantilism
- t80 Meritocracy (modern era freebie)
- t81 Avant Garde and Civil Service (free ideology tenets)
- t81 Theocracy
- t82 Rationalism finisher (first great writer)
- t87 New Deal
- t88 Capitalism (atomic era freebie)
- t90 Volunteer Army (Statue of Liberty)
- t90 Space Procurements (information era freebie)
- t92 Liberty finisher (second great writer for Collective Rule)
- t94 Patronage opener (the Globe Theater great writer came to even one more extra policy than needed.)
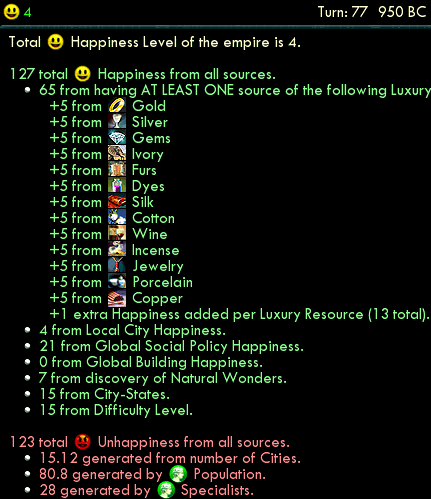 One unusual bit in there was Meritocracy sooner than usual; usually that comes late just for the Liberty finisher scientist. But I actually needed it here as I found myself running out of happiness. 21 cities had been the right wideness. Notice that Aristocracy (global social policy happiness) was even needed to sustain us here! That's one of the things that anyone but Poland would have to sacrifice to go Jesuit, and why I keep ending up using this civ over and over.
Also I went for New Deal in that list of policies. We didn't need Universal Suffrage at all, with enough happy from Meritocracy, and already maxed out on golden age turns. So I took New Deal just for a little extra margin on the faith numbers from the two settled holy sites.
Back to science, it would turn out that Chemistry, Industrialization, Electricity, and Rifling would each take two turns to research. That meant four turns lost against the theoretical limit of one tech per turn. The previous game lost three turns on Electricity but saturated the tech pace from then onwards. This game managed that after Rifling, when I used my second great scientist to bulb Radio with enough overflow to carry up through Replaceable Parts.
")
I reached Plastics on turn 82, three turns sooner than the previous game, plus one more turn ahead since this game also picked up Chemistry already. The interesting part was that I could take Plastics with either the Rationalism finisher or the third regular Great Scientist. (Neither of these could have happened a turn sooner. I could complete Radio and Rep Parts only by turn 82. The scientist spawned on t81 and would have provided enough beakers for Plastics, but only after directly bulbing Rep Parts then ending turn to process the overflow.) I went with the Rationalism finisher to get Plastics, for this reason: the first faith-purchased scientist (enabled by finishing Rationalism) was going to be necessary soon, before I could reach any tech more expensive than Plastics to cash in the finisher.
That also meant I pulled off this necessary piece of the puzzle: I gained that time to Plastics on one fewer great scientist! The previous game, like most, bulbed twice between Sci Theory and Plastics, but this game managed to keep pace with only one. I knew all along that I would need to somehow get through the endgame on one fewer scientist. The previous game got the final regular scientist at 600 GPP on turn 99, which is too late to break a goal of t100 for the finish date. There just wouldn't be room on the timeline to get a city to 600 GPP, so I'd have to make do at 500 max. I pulled it off with enough natural beaker production between Sci Theory and Plastics. Mostly because Jesuit Education accelerated the schools faster than slowbuilding them, and also the observatories finished quite a bit faster too, thanks to everything I mentioned in Guruship and early Chemistry and room in the build queue for workshops.
I had been worried about how to cover the 16,000 beaker value of the missing scientist -- but now realized that wasn't the number that was required. The missing scientist was an early one, worth only about 7000 beakers in the industrial age, and that could indeed be made up by the wider city build and fast Jesuit schools.
From Plastics here, there are 27 techs left to go for the spaceship. I would get 12 of those from instant methods: 11 scientists (three more from regular GPP, three from faith, four from wonders, Liberty finisher) and Oxford. That meant 15 more turns was the minimum to finish the techs, and indeed I would pull that off.
And knowing the exact finish date that far ahead, I could also calculate quite accurately on culture and gold and faith totals. I could buy just three research labs with Jesuit faith, then had to save the rest to reach 5000 total for three scientists. I could also buy a total of 9 research labs with cash (now that Mercantilism and Big Ben were finally in place), then saved the rest for the spaceship parts. I left the last 9 labs unbought as unnecessary, which turned out to be correct.
As before, here's the entire schedule of techs for the second half of the game.
| Turn | Researched | Additional sources |
| 50 | Theology | Education (Great Library) |
| 51 | Construction | |
| 52 | Engineering | |
| 53 | Guilds | |
| 54 | Acoustics | |
| 55 | ||
| 56 | ||
| 57 | ||
| 58 | Iron Working | |
| 59 | Metal Casting | |
| 60 | Chivalry | |
| 61 | Machinery | |
| 62 | Physics | |
| 63 | Optics | |
| 64 | Banking | Printing Press (GSci 100 GPP) |
| 65 | Economics | |
| 66 | Architecture | |
| 67 | Scientific Theory | |
| 68 | Compass | |
| 69 | Astronomy | |
| 70 | Steel | |
| 71 | Gunpowder | |
| 72 | Chemistry | |
| 73 | ||
| 74 | Industrialization | |
| 75 | ||
| 76 | Electricity | |
| 77 | ||
| 78 | Metallurgy | |
| 79 | Rifling | |
| 80 | ||
| 81 | Steam Power | Radio (GSci 200 GPP) |
| 82 | Rep Parts | Plastics (Rationalism finisher) |
| 83 | Fertilizer | |
| 84 | Military Science | |
| 85 | Dynamite | Railroad (GSci 300 GPP) |
| 86 | Flight | |
| 87 | Ballistics | |
| 88 | Electronics | Radar (GSci 1000 faith) |
| 89 | Rocketry | |
| 90 | Combustion | Satellites (GSci 400 GPP) |
| 91 | Atomic Theory | |
| 92 | Navigation | |
| 93 | Archaeology | |
| 94 | Biology | |
| 95 | Refrigeration | Nuclear Fission (GSci 500 GPP) Adv Ballistics (GSci 1500 faith) |
| 96 | Combined Arms | Computers (Leaning Tower) Robotics (Porcelain Tower) Penicillin (Hubble) Ecology (Hubble) Telecommunications (2500 faith) Mobile Tactics (Liberty finisher) Nanotechnology(Oxford) |
| 97 | Particle Physics |
Satellites came a turn after Rocketry, which was alright because Warsaw was a quarter-turn late finishing the Statue of Liberty. This game had been four turns ahead of the previous at Plastics, and gained one more by finishing Apollo and Hubble each a turn faster, thanks to buying and mining more hill tiles ahead of time. On the penultimate turn, I bulbed six scientists plus Oxford into all of those techs listed there.

And the beaker numbers went off the charts. I was making well over 3000 per turn, more than 20,000 with each great scientist... which all added up to 70,000 extra overflow to Particle Physics! Still, even despite that excess, the end could not have come faster thanks to the limit of overflowing one tech per turn. The gold numbers also spiked far ahead of ever previously, nearly 1400 per turn thanks to more trading posts, all the markets, and most of the banks. The 5200 on hand there is after buying the first four spaceship parts, after Apollo had completed one turn ahead of Hubble.
")
One last overview of the core will do; the rest of the 21 total cities looked about the same.
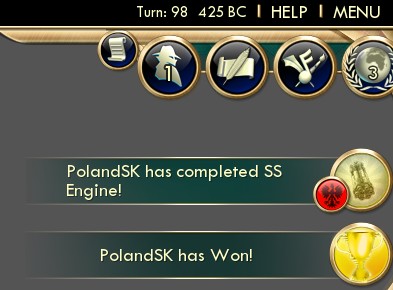
And so I won with science in 98 turns, five faster than the previous game and coming in under 100.
I'm ready to close the books on Civ 5 here. I have nothing left to try. I'm sure another few turns could be squeezed out from even this performance somehow, something like El Dorado or Kilimanjaro right away, but I don't need to chase maps for that.
I have no more civs or social policy plans left either. As mentioned at the top, I did try luck-abuse games with each of Babylon and Maya and Rome, though they'll remain offscreen as none turned out better than this. Those weren't on the Skirmish desert map, though I doubt any would gain anything significant over Poland. Nobody besides Poland can do Jesuit Education without missing too much frontloading elsewhere. It's possible the Jesuits might not be necessary to compete; as much as I talked about it here, Jesuit Education really gained only two turns over the previous game; the rest of the improvement happened before Education just by clearing ruins faster.
I'm also not interested in tweaking any more game settings; the only frontier I left untouched was quick or marathon speeds. Nor in other victory conditions. I liked the science games so much because, fairly uniquely for the Civilization series, they never depended on conquering or otherwise exploiting the AI opponents, but rather were always about my own performance. Racing for science stayed surprisingly fun and interesting even with that degenerate setup on the lowest difficulty versus just one AI. A military victory wouldn't (use the Huns for a ruins-upgraded battering ram), neither would tourism (race to Sacred Sites against minimal AI culture), and diplomacy is really just science in disguise (all you need is to reach the information era to allow a vote, since it's trivial to get the city-state allies.)
Settler difficulty turned out to be quite a bit more fun than I would've thought too. Civ 5 was actually very enjoyable that way. The lowest difficulty allows expanding as much as you want with only a very soft happiness restriction. That really did make Civ 5 feel much more like the go-big empire building of Civs 4 and earlier. It was even a treat to build roads, since the maintenance discount makes it OK to build incomplete segments or extra tiles without getting crippled by the cost. I see where Civ 5 got so much praise from reviewers, who would have just rushed through one low-difficulty game in order to 'finish' it and qualify for the review. They got to play it as a fun anything-goes sandbox that we veterans never saw on the higher difficulties.
I'm not sure, but I think I may even have spent more time on Civ 5 than Civ 4 in the end. The game really does do enough things right that Civ 4 feels clunky and outdated by comparison. Civ 5's interface in particular is still pleasing, beautiful to see and "crispy" to click on, compared to Civ 4 that always felt laggy and dull. We like to say the gameplay is the only thing that matters, but the aesthetics really do make the experience as well even for veteran gamers. The science races cut out the bad parts of Civ 5 (1UPT and bad AI tactics, excessive expansion features like tourism and archaeology and spies) and focused only on the good, where the escalating costs are a challenge to solve rather than a poor design to whine about.
Thanks for reading. I have some other projects in mind for the near future so I'm not moving on to Civ 6 now for various reasons, but that itch might arise someday.